Signs painted on walls

spitfire

Active Member
Jul 28, 2002
3,448
0
36
75
Toronto, Canada
www.parkdaleyard.com
Here's a great little idea for pre-weathering signs if you have Adobe Photoshop and Illustrator.

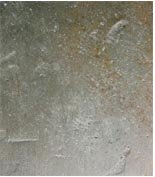
1) First I scanned the side of the building I want the sign to go on. That's to get the exact brick texture

2) then I create the artwork for the sign in Illustrator, and import to P'shop

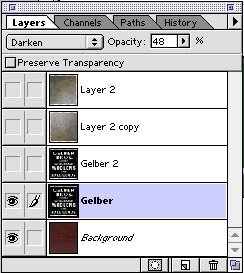
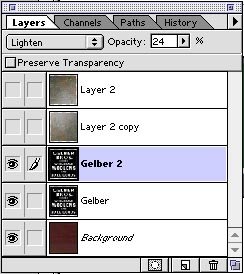
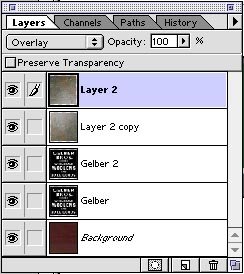
3) In my Photoshop file I have the following layers from the bottom to the top:
a - brick texture
b - sign art - darken 80% opacity
c - sign art duplicate - lighten 50% opacity
d - texture layer - overlay 100% opacity

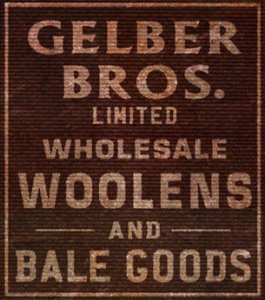
And here is the result - a perfectly weathered sign that exactly matches the brickwork of the building it's on.

This one is for a City Classics building. Feel free to download and use this sign if you want to.

Val
 

Attachments

  • gelber.jpg
    gelber.jpg
    41.1 KB · Views: 359

FiatFan

Member
Jul 16, 2004
191
2
16
Outstanding work! Take the rest of the day off and play with trains.
thumbsup.gif


Tom
 

Matthyro

Will always be re-membered
Dec 28, 2000
4,550
0
36
86
Georgetown, Ontario,Canada
Very nice Val. I will have to try my Corel Xara program to see if I can do it too. I don't want to spend the money on Photo shop. Too expensive for how much I would use it.
 

spitfire

Active Member
Jul 28, 2002
3,448
0
36
75
Toronto, Canada
www.parkdaleyard.com
Now I copy the artwork into a layer in the Photoshop file that has my brick texture and past it on top. I want the brick texture to show through, so I set the layer to "darken" and it will add to what's underneath.

Here's the layer palette, and what the image looks like at this point.
 

Attachments

  • layer1.jpg
    layer1.jpg
    24.5 KB · Views: 338
  • 3.jpg
    3.jpg
    10.3 KB · Views: 333

spitfire

Active Member
Jul 28, 2002
3,448
0
36
75
Toronto, Canada
www.parkdaleyard.com
Now for the texture. I downloaded this photo of a concrete wall which had the texture I was looking for. Then pasted it into another layer in my P'shop file and set it to "overlay".
 

Attachments

  • concrete.jpg
    concrete.jpg
    10 KB · Views: 320
  • layer3.jpg
    layer3.jpg
    25.3 KB · Views: 324

spitfire

Active Member
Jul 28, 2002
3,448
0
36
75
Toronto, Canada
www.parkdaleyard.com
As you can see, the concrete image goes from light to dark, so I copied that layer, flipped it 180 degrees and set that layer to overlay as well - giving a more uniform look. And the final result is the image at the beginning of this thread.

Fun, huh?

Val
 

spitfire

Active Member
Jul 28, 2002
3,448
0
36
75
Toronto, Canada
www.parkdaleyard.com
By the way, that sign is based on a real one. It's from the website of a Toronto photographer, so for copyright reasons I won't post it. But you can check out the original sign on his website here

There are lots of other painted signs on the site - it's great inspiration!

Val
 

spitfire

Active Member
Jul 28, 2002
3,448
0
36
75
Toronto, Canada
www.parkdaleyard.com
Pat, see the first page of this thread about halfway down. I have posted the step by step process that I used to create the sign. If you don't have Adobe Photoshop it may be a bit confusing, but basically I am using the Layers feature which allows one layer to affect those below it.
Example: I have a brick texture on the bottom layer. If I simply paste the sign on top of this, the brick texture is covered by the artwork and you can't see it. By putting the sign art on a different layer, and telling that layer to "darken" the one below it, it combines with the brick texture in such a way that both are visible.
Does that help?

Val