RS-32 Project

David Rosser

New Member
Sep 15, 2003
74
0
6
88
Penna
Visit site
A month or so ago I noted here that I had created an Alco Alligator to add to my HO Alco fleet. I spoke in error and used Alligator as a generic description for any early low-nose Alco. What I did was create a fair representation of an RS-32. Our SP yards are at the end of a curve/heavy grade location and two locos are better than one with a long train, time to build a second unit, with progress pictures.!
I used the Model Power RS-11 ( I know, truck mounted couplers, no flywheels, no cast chassis, and most detail molded. etc...) but it has some real advantages here. It is available and cheap, the railings are chassis mounted so that do not make shell modification a problem,and the lack of the cast chassis means no metal to cut down. The goal was get a presentable RS-32 using scrap material from the workbench.
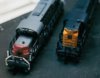
The first picture shows the initial RS-32 and the new, fresh from e-Bay, RS-11 ready to cut and chop. Picture
 

Attachments

  • train1.jpg
    train1.jpg
    27.3 KB · Views: 124

David Rosser

New Member
Sep 15, 2003
74
0
6
88
Penna
Visit site
The only chassis mod was to cut off the light bracket built into the front truck and grind the surface flush for good clearance under the planned low hood. Picture
 

Attachments

  • train2.jpg
    train2.jpg
    40 KB · Views: 123

David Rosser

New Member
Sep 15, 2003
74
0
6
88
Penna
Visit site
Cutting time! 1, remove the roof from the cab. 2, saw cut just above the battery boxes from front to the cab face. 3, Exacto cut in the joint of roof to hood until you can separate hood from shell. 4, Saw cut 3/8 in. from the hood and discard the middle piece. Then build a headlight assembly. I used a bit of old aluminum step flashing from our last roof job to make piece that was cylindrical in front and more open at the rear. A small section, about 1/8 in. of clear plastic tube was inserted in the end to act as a light bezel and the piece was attached to the roof underside with CA glue. We are at this point in the next picture. Picture..
 

Attachments

  • train3.jpg
    train3.jpg
    26.8 KB · Views: 123

David Rosser

New Member
Sep 15, 2003
74
0
6
88
Penna
Visit site
Next, we needed a new face for the cab with a square windshield opening; used scrap styrene sheet here. A flat surface under the roof, angled wings for number boards and the boards are next (styrene, aluminum, styrene). Boards will not light up.
Cut, fill, and file time. Remove the big vent on the hood top, and the molded grabs. Fill them, and the old light holes and file and sand as needed. Glue the new hood top to the shell and fill and file any imperfect joints. Drill a hole to attach the brake wheel ( had a spare one on the bits and pieces collection)latter, and add the two grab handles. The next picture will show all of this
 

Attachments

  • train4.jpg
    train4.jpg
    20.4 KB · Views: 119

David Rosser

New Member
Sep 15, 2003
74
0
6
88
Penna
Visit site
Scrub the shell, prime it, and paint it SP gray (I used a mixture of two bottles that I had on the bench to match other SPs on the layout). Mask the ends and use SP scarlet, add decals and brake wheel. The next picture shows both units. The color is identical, the lighting may distort that.
It was fun, I have two low nosed Alcos, and all the bits and pieces, old decals,and paint were already on the work bench.
 

Attachments

  • train7.jpg
    train7.jpg
    14.1 KB · Views: 114

Greg Elems

Member
Dec 19, 2002
404
0
16
66
Reno Nevada
Visit site
Great job David. This is an ex-SP RS-32 at the Portola railroad museum. I'd say you hit the nail right on the head. Alcos are a favorite engine and your conversion makes me want to get out the razor saw and start hacking on my own.

Cheers,
Greg
 

Attachments

  • 1sp rs32.jpg
    1sp rs32.jpg
    53.4 KB · Views: 77