queston about this bridge.....

Jun 18, 2004
487
0
16
55
barboursville, wv
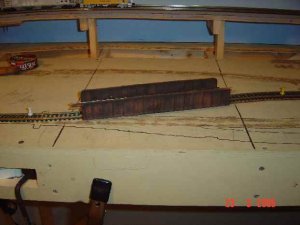
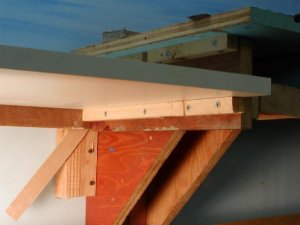
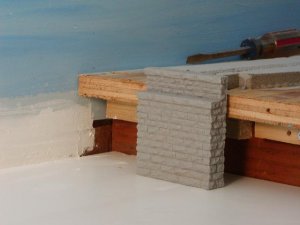
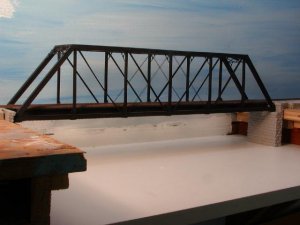
hello everyone, im haveing trouble decideing how to install the bridge abutments and bridge in the pictures below. i have never done anything like this before, so im a bit confused. the benchwork is open grid style with 1/2" plywood sub road bed. the frame is 1" x 4"'s spaced every 12". the picture shows the location i would like to install the bridge at. the straight black lines are showing where the frame supports are located. as you can tell, i chose a place in between the supports. any information is really appreciated, i would really like to be able to use this bridge since i spent a month building it....lol! thanks everyone!
wave.gif
 

Attachments

  • bridge pictures 003.jpg
    bridge pictures 003.jpg
    19.9 KB · Views: 156

Ray Marinaccio

Active Member
Aug 4, 2003
1,940
0
36
66
Dewey Az.
Visit site
Hi Steve,
I would start by marking the plywood at the ends of the bridge. Continue these lines where you want the top of your valley to be. Then cut an opening in the plywood.
I would then screw or nail a piece of plywood to the bottom of your benchwork as a base to mount piers and and build scenery on.
Install the bridge then build the piers to fit.
If you have ready made piers that are shorter than the depth of your benchwork you can shim them with wood or foam then do your landscaping.
Would like to see your progress with this project.
 

Gary Pfeil

Active Member
May 7, 2001
2,510
0
36
Boonton NJ
Visit site
Hi Steve, I'm installing a bridge now too. Here are a couple pics. First I had to cut a section of shelf between joists long enough to clear bridge and abutments.
 

Attachments

  • P1010641.jpg
    P1010641.jpg
    44.4 KB · Views: 81

Gary Pfeil

Active Member
May 7, 2001
2,510
0
36
Boonton NJ
Visit site
These show the next couple steps. One shows the supports I used for the lowered shelf section which will be the river bed. The next just shows an abutment in place, the last shows the bridge sitting in place.
 

Attachments

  • P1010642.jpg
    P1010642.jpg
    52.4 KB · Views: 81
  • P1010643.jpg
    P1010643.jpg
    50.4 KB · Views: 82
  • P1010645.jpg
    P1010645.jpg
    55.5 KB · Views: 78

Gary Pfeil

Active Member
May 7, 2001
2,510
0
36
Boonton NJ
Visit site
Those abutments are made by Chooch. I have made a mold of one and pured a couple plaster ones to use instead, as I need to remove a bit of height and think the plaster will paint up better. For homemade, there a a few ways I've used in the past. For cut stone I've used a block of balsa or bass wood and carved in the stone. Result was ok but the face was a bit flat. You could carve plaster instead, after making a mold of appropriate size. Another method I used for cut block was to use styrene strip, I used 1/4". Use a utility knife to scrape the edges so they are not square, then use a trianglar file to notch grooves. Then simply stack them up, staggering the blocks. This is simple and very effective, tho not especially inexpensive.