Putting LPB's In The Drivers Seat.

eightyeightfan1

Now I'm AMP'd
Jun 18, 2002
2,772
0
36
62
Torrington, Ct.
In the last couple of years, we all have seen the HO scale die cast cars on the shelves of our local Wal-Marts and other retail outlets. They are cheap, some cases less than $3.00 USD, nicely detailed, and there is a mixture of automotive years, that would fit within any layout era.

A lot of us modelers. populate our layouts with a multi-tude of LPB's. Shopping, toiling at their scale jobs, some just sitting in a park, or waiting at the station for trains they never can board. But one thing we seem to neglect is the cars. They race around our scale streets, wait at railroad crossings and intersections, with a ghostly invisible prescence behind the wheel. I know. I'm guilty of this also. Until now.

Lately, I have been putting LPB's behind the steering wheel of my HO scale cars and trucks, to give a little detail that seems to be overlooked, not by everyone, but a lot of us.

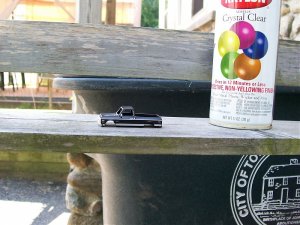
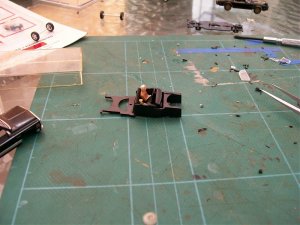
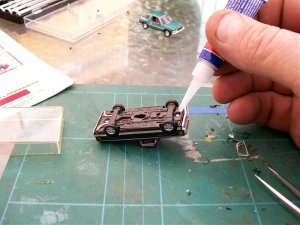
So, when I saw these HO scale cars at Wal-Mart, I started putting drivers in the seats. For you new modelers, or those who thought that it was more than they can handle(Come'on guys...Ive seen the pics of your kitbashes and scratchbuilds), here's how I managed to do it. With a couple of spare LPB's, a sharp Xacto knife, and a couple drops of Super Glue, in an hour or two, you just did some super detailing.

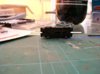
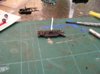
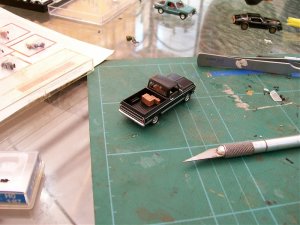
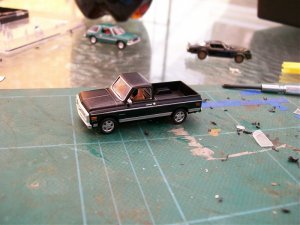
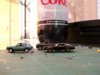
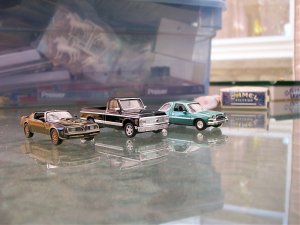
Fisrt, I started with a couple of cheap cars, the Chevy pick-up and the Firebird are from Malibu, the Pacer is from Wild Cherries. These are great cause if you screw one up(like I know I do) it was only a couple of bucks.
 

Attachments

  • 000_0002.jpg
    000_0002.jpg
    146.9 KB · Views: 11

eightyeightfan1

Now I'm AMP'd
Jun 18, 2002
2,772
0
36
62
Torrington, Ct.
I started with the Pacer from Wild Cherries. This was easy to take apart because there was only one little screw at the front of the car.
 

Attachments

  • proj3.jpg
    proj3.jpg
    80.6 KB · Views: 7

eightyeightfan1

Now I'm AMP'd
Jun 18, 2002
2,772
0
36
62
Torrington, Ct.
After taking apart the car, I started to fit a driver. I wasn't to concerned about the whole LPB, because, first, there is no way that I was going to get his knees under the dash, and second, no-one was going to see his legs anyway. So, using LPBs in standing position is ok.

I used a Life-Like person, because it was made of soft plastic and easy to cut. It took a couple of slices with the knife to get him to fit right, in the seat and with the car back together.

Those with weak stomachs and can't stand the sight of an LPB getting chopped up move past to the next reply.
 

Attachments

  • 000_0008.jpg
    000_0008.jpg
    110.6 KB · Views: 8

eightyeightfan1

Now I'm AMP'd
Jun 18, 2002
2,772
0
36
62
Torrington, Ct.
Here's the finished driver. Fitted in the fron seat.
Using the same method I also included a wife, and though you really can't see her(though you might at the right angle) when the car is assembled, a little girl in the back seat. A couple of drops of Super glue keeps everyone in place.
 

Attachments

  • 000_0007.jpg
    000_0007.jpg
    136.4 KB · Views: 6
  • 000_0011.jpg
    000_0011.jpg
    169.6 KB · Views: 6

MadHatter

Charging at full tilt.
Jan 27, 2007
1,034
2
36
37
Centurion, South Africa
Hi eightyeightfan1

Thanks for posting this idea, which, as you say is a lot of the time overlooked.

Here's two ideas from me, if I may:

1) Add lights to at least a few of your vehicles using LEDs (my friend who does this for me says that he has only been successful with vehicles with round lights (such as the VW Love Bug, which he has done for me).

2) I think Faller make them, but you can even have an automated vehicle system. You bury a small, very thin, wire in your streets and roads and then paint over it- which ever colour you are gonna use for the road.

They supply mainly trucks, lorries, and buses (unfortunatly no cars as nobody makes small enough motors).

The vehicle has a motor and rechargable battery (which lasts about 3 hours). Underneath the front axel- which can swivel- there is a small magnetic skate (much like the Marklin and other three rail- stud rail these days?- rollingstock have) which follows the wire hidden beneath the road.

So, what you then need to do is make a circuit for your vehicles to go around and around on. You can hide the loop in a tunnel or behind a hill I suppose. Yip, you even get switches (as in points) so that the vehicle can stop at a bus stop or change lanes, etc.

That was my two cents in making your layout ever more realistic.
 

eightyeightfan1

Now I'm AMP'd
Jun 18, 2002
2,772
0
36
62
Torrington, Ct.
Thats a neat idea. A little more work for these cheapies though.

Next, I worked on the truck. It took a little more time, because I had to drill the two pressed lugs out of the bottom. The Firebird had them also.
 

Attachments

  • proj1.jpg
    proj1.jpg
    69.4 KB · Views: 5

eightyeightfan1

Now I'm AMP'd
Jun 18, 2002
2,772
0
36
62
Torrington, Ct.
While the pick-up was apart, I took the body and gave it a couple of shots of Krylon Crystal Clear(satin, not the gloss) to dull the shine. I wanted it to look like it was being used, and not stored in the gararge. You can weather all these cars to fit your taste. I wanted this to look like it was in fair shape. After all, on my layout, thsi pick-up is a classic.
 

Attachments

  • 000_0017.jpg
    000_0017.jpg
    215 KB · Views: 7

eightyeightfan1

Now I'm AMP'd
Jun 18, 2002
2,772
0
36
62
Torrington, Ct.
While the body was drying, I shaved the mounting lug on the bottom that was used to hold it in the case(all three had them). The truck also came with the side windows up. I wanted them to look down, so I carefully cut them out. Becarefull when doing this step, you may ruin the rest of the glass(which I did).
 

Attachments

  • proj2.jpg
    proj2.jpg
    86.9 KB · Views: 4

eightyeightfan1

Now I'm AMP'd
Jun 18, 2002
2,772
0
36
62
Torrington, Ct.
Gees...Thanks for the replies guys, haven't even finished this yet.
I then added a driver, using the same method as before, and a dog. I used a piece off trimmed LPB to get the dog above the top of the door.
 

Attachments

  • 000_0021.jpg
    000_0021.jpg
    179.3 KB · Views: 10

eightyeightfan1

Now I'm AMP'd
Jun 18, 2002
2,772
0
36
62
Torrington, Ct.
I reassembled the pick-up. To hold the body in place(because the lugs were drilled out) I used a couple of dops of Super Glue on the spots where the lugs were.
 

Attachments

  • 000_0022.jpg
    000_0022.jpg
    175.3 KB · Views: 4

eightyeightfan1

Now I'm AMP'd
Jun 18, 2002
2,772
0
36
62
Torrington, Ct.
I Super Glued a couple of Prieser crates in the back, and had a truck ready for the road. Must of gotten something big at the hobby store.
 

Attachments

  • 000_0025.jpg
    000_0025.jpg
    181.4 KB · Views: 4
  • 000_0024.jpg
    000_0024.jpg
    156.6 KB · Views: 8

eightyeightfan1

Now I'm AMP'd
Jun 18, 2002
2,772
0
36
62
Torrington, Ct.
Using the same methods I just mentioned I did the same to the Firebird. Except I used a young "Party girl" for the driver. What was neat abot the Firebird was the seats were seperate from the rest of the chassis casting, so I could positition her in that "leaned back" pose I remember from the Cameros and Firebirds of that era.

There you have it. A couple of hours of work, some spare LPB's and parts from the parts box and you have a couple fo cheap, super detailed cars.
 

Attachments

  • 000_0027.jpg
    000_0027.jpg
    136 KB · Views: 7
  • 000_0028.jpg
    000_0028.jpg
    132.4 KB · Views: 8

doctorwayne

Active Member
Sep 6, 2005
3,516
0
36
Canada, eh?
A nice job, Ed, and it will also work for passenger cars.
I put some people and a driver in this bus, although they're not all that visible.
Train_Brain_113.jpg


Same for this bus and the car in front of it.
260406_088.jpg


The figures are from a bag of about 100 unpainted, seated figures that came with a $5.00 lot of garage sale stuff. Don't know who makes 'em, though.

The Sylvan car and truck kits come with a driver (well, at least the upper half of a driver), although they don't always show up in photos.
2007-01-10_144.jpg


2007-01-10_149.jpg


The "driver" in this Model T is "scribbled in", using "Paint".
CopyofCopyoffreshfoe-toes-balanceofmishapphotosA.jpg


Wayne
 

jbaakko

Active Member
Jun 25, 2006
1,082
0
36
39
San Diego, CA
rr.blockchoice.com
Very nice work. Adding drivers is one of the neatest details there is. I recently toyed with making that C-10 look weather beaten. I have allot more work to do tough, it doesn't look as old as I want it to.