

Just bought a Bachmann Spectrum SD45 in UP colors for the purpose of weathering. I haven't weathered any cars or engines yet but want to start...the first question is with what technique? I would like to do the work by hand - that is without an airbrush. I've read about india ink washes, dry painting techniques, and others...so my question to all of you is...what works well with good results? I'd like to start small (fuel spillage, diesel engine exhaust discoloration for example) build some experience then try to weather the whole engine accurately. Since the diesels running around my home are almost all Norfolk Southern black...you don't really see all the dirt that other RR's have on their lighter paint schemes. So, please...share some good techniques that I can incorporate on diesels of various RR's that I have in my inventory. (And here's a great chance to add a picture of your weathered masterpiece to highlight your technique!)
Need some suggestions on diesel weathering
- Thread starter Herc Driver
- Start date
You are using an out of date browser. It may not display this or other websites correctly.
You should upgrade or use an alternative browser.
You should upgrade or use an alternative browser.
I may not be the best source for weathering, as I do things backwards. Most will apply weathering where they want it...I paint the entire area solid, then remove paint as I go, leaving behind what I want. Even with the smallest detail brush, in N scale, I found that this method was easier for me. That said, I personally didn't like the results with India Ink. I think the wash is hard to control, and can leave a spotty finish. The good news is, it's easy to remove if you don't like what you've done.
Here's a paint list that I use for engines. All paints are Floquil:
You'll also want to apply some Rust to the couplers and high useage spots like handrails and steps. A little goes a long way with Rust. For fuel spills and drips, use Oily Black. This paint can be hard to see, especially on a black engine. But if you apply the all over dirt technique using Grimy Black as described above, it will show up really well.
The roof will also need to be weathered. I found that by painting a wash right down the centerline of the roof and lighly drybrushing it towards the edges works best. I'm also a fan of drybrushing, which is very time consuming, but the end result is great. Above all, trial and error is going to be your best friend. What works for me or the next guy may not work for you. The MRR book "Basic Painting and Weathering" is a great tool, so pick that up if you can.
Good luck! :thumb:
Here's a paint list that I use for engines. All paints are Floquil:
- Oily Black - Used for greasy spots, like fuel and oily spills.
- Grimy Black - All purpose yucky/dirty greyish black grime and road dirt.
- Roof Brown - A dirty brown color, which is also great for use on boxcars.
- Rust - Not a true rusty color by itself, but is good mixed with other colors.
- Earth - A light tan that reminds me of mud.
- Dirt - Greenish/brown color that is best used in moderation.
- Aged Concrete - Also great for buildings, this is a dirty greyish/white color.
- Rail Brown - Dark brown color with a hint of rust.
- Light - Perhaps it's a new engine, or recently serviced. These will still be dirty from use, but won't show significant signs of rust and dirt.
- Moderate - Average road useage. This engine has been in service for awhile, and shows signs of neglect and age.
- Heavy - Used and abused. Lots of rust and dirt.
You'll also want to apply some Rust to the couplers and high useage spots like handrails and steps. A little goes a long way with Rust. For fuel spills and drips, use Oily Black. This paint can be hard to see, especially on a black engine. But if you apply the all over dirt technique using Grimy Black as described above, it will show up really well.
The roof will also need to be weathered. I found that by painting a wash right down the centerline of the roof and lighly drybrushing it towards the edges works best. I'm also a fan of drybrushing, which is very time consuming, but the end result is great. Above all, trial and error is going to be your best friend. What works for me or the next guy may not work for you. The MRR book "Basic Painting and Weathering" is a great tool, so pick that up if you can.
Good luck! :thumb:
weathering
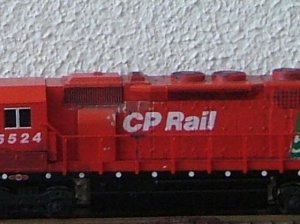
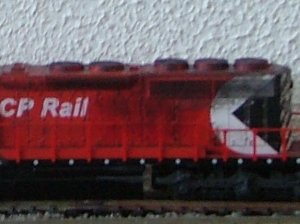
Its seemed to me that weathering pretty specific to era, engine type, and road name. I model almost all CP Rail northeast, which uses a lot of old Sd40-2 and SD60 power. I also model NS (they haul each others trains in the region) and they seem to take very good care of their equipment, as well as the black color doesn't weather as much as fade. I get a lot of railpace magazines to see what the engines look like now.
As for CP, I end up using a lot of grimy and weathered black. The roofs of the CP SD40-2's get filthy black, especilally the farther back to the rear you get. Also, the older SD40-2's tend to chip paint on the A.C. covers to a steel color. All of them get dirty around the front trucks as well. Newer paint schemes and engines get dirty mostly around the front trucks and engine fans and grilles, I see that in the photos a lot on the AC4400's. I use an almost dry brush and the thumb! As you get paint residue from handling objects on your thumb and grab the shell in the right spots it leaves a great weathering behind!
Attachments
I find nothing is more effective at modelling dirt and dust than pastel chalks. You can pick up a set from an art store for a couple of bucks, and they will last you forever. Just grind some up on a piece of paper, and drybrush it on. Careful not to touch it before you dull-coat it! A few alternating layers of chalk and dullcoat, and it looks pretty sharp. I'll have to upload some pics when I get a chance.
I use a similar technique to Cornreaper. I use artists pastel chalk which is a little softer to the touch than regular chalk, but still quite cheap. I use a craft knife & scrape down the length of the chalk while holding the chalk above a piece of folded & opened plain white paper, then I just tip the dust into a vile. I only use 4 colours. White, Lamp black, Gold ochre and Burnt sienna. I use a stiff bristled flat brush to apply the chalk.
The results are very good, unfortunately I can't show you any pictures as the camera I have does not do close ups well at all.
The results are very good, unfortunately I can't show you any pictures as the camera I have does not do close ups well at all.
I'm going to give those techniques a try...on some of the less expensive cars/diesels first (usually I jump in head first...but this time I'm going to take it slow and actually learn from my mistakes). Thanks!
Herc: you may want to varnish/flat finish the body before you start work. If you don't like the weathering you may be able to wash it off if you're quick.
Watch the Floquil paints -- some of them have a solvent (Dio-Sol) that will weather plastic more than you want. Look for the plastic compatible ones.
There are loads of techniques. It's like artists who use oils or watercolours or acrylics -- but not every artist uses all of them.
Remember to start with a little at first and then add.
Nealy forgot: TomPM has some wonderful threads on weathering.
First Attempt
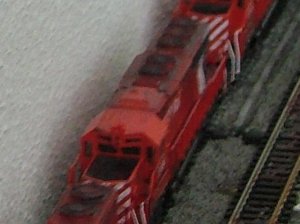
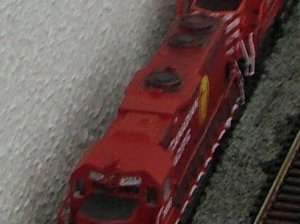
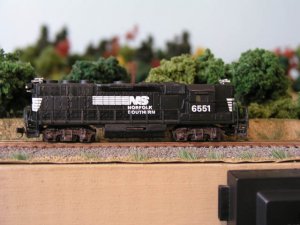
Well, I got out my oldest diesel (I'm not even sure what type it is...made my Trix about 25+ years ago, I think it's a U-boat, but not sure which one - still searching) and tried using isopropyl alcohol to rub down and remove the shine, then used 50% burnt umber acrylic paint/50% alcohol mixture on an 00 brush and a fine tip cotton swab. I looked at some pictures of weathered/dirty yard duty diesels for ideas on where to put the discoloration. The trucks were weathered with the same mixture but with burnt sienna added. If I can get it right on this one...I'll work up the nerve to weather the current diesels. The photo's seem to highlight the lines and areas that didn't get evenly weathered more than your eye can see. But since I'm working in Nscale, weathering so small of areas seemed easier to remove paint instead of building up a weathered area. All totaled, took me only moments and I'm all about keeping it simple and repeatable...but honestly, does it look like it took only moments and should I try another more elaborate technique? All honestly blunt critiques are welcomed.
Well, I got out my oldest diesel (I'm not even sure what type it is...made my Trix about 25+ years ago, I think it's a U-boat, but not sure which one - still searching) and tried using isopropyl alcohol to rub down and remove the shine, then used 50% burnt umber acrylic paint/50% alcohol mixture on an 00 brush and a fine tip cotton swab. I looked at some pictures of weathered/dirty yard duty diesels for ideas on where to put the discoloration. The trucks were weathered with the same mixture but with burnt sienna added. If I can get it right on this one...I'll work up the nerve to weather the current diesels. The photo's seem to highlight the lines and areas that didn't get evenly weathered more than your eye can see. But since I'm working in Nscale, weathering so small of areas seemed easier to remove paint instead of building up a weathered area. All totaled, took me only moments and I'm all about keeping it simple and repeatable...but honestly, does it look like it took only moments and should I try another more elaborate technique? All honestly blunt critiques are welcomed.
Attachments
Paint yer handrails red! PAint your trucks silver! to follow the prototype...
Weather the roof with a wash of black, or a quick spritz of black from a spraycan.
The alcoholwash looks great! good work so far...
Weather the roof with a wash of black, or a quick spritz of black from a spraycan.
The alcoholwash looks great! good work so far...
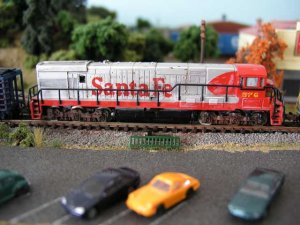
Well, finished 5 diesels with a light weathering. Good points MilesWestern... Here's two diesels that I did today as well. Right now all I'm trying to do is weather the trucks and body areas by the vents and grill work. Finally, my LHS got one package in of Ployscale RR colors so I have a few more colors to choose from. Still a work in progress.
Attachments
Herc: you may find some interesting colours in the crafts store or even Wally world. They should run about a dollar a little plastic bottle for acrylics, less on sale. Look at the basic landscape colours and the range of shades of gray.
That looks good, great start, love the look on the trucks. Also wanted to chime in that from what I can see of the layout their pictured on that looks great! Nice picture taking too, what kind of camera are you using?
Thanks...using an Olympus 550 digital that honestly, I wouldn't recommend. Doesn't take the best pictures, and was pretty expensive to boot. Set in auto, the pictures are only mediocre. I've been playing with it to get close ups of the layout...still haven't had the success I'm looking for. I think it's all in the lighting. From what I've read, two 100 watt bulbs in lamps (no shade) seems to give better light than what I'm using now. Plus, the room has a slanted ceiling - which really plays with the light bounce and reflection. I will stop by the dreaded Wally world for those paints...maybe see if they have any frabric resembling grass too. After doing a search on railpictures.net, it was easy to grab some shots of prototypical dirt on the engines. What amazed me, is just how dirty/grimey they are below the catwalk. Almost everything below those walkways was one shade of grimey brown.
Great job on weathering those trucks!
:thumb::thumb::thumb::thumb:
I'll give you credit, you were more brave than I've been. I have yet to experiment on an actual engine yet, as I've only done rolling stock. What you've done so far looks great, so I think it's time to bite the bullet and give one the full treatment.
:thumb::thumb::thumb::thumb:
I'll give you credit, you were more brave than I've been. I have yet to experiment on an actual engine yet, as I've only done rolling stock. What you've done so far looks great, so I think it's time to bite the bullet and give one the full treatment.
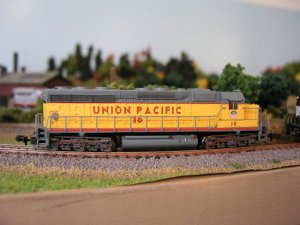
Excellent! :Thumb: also might I suggest the LIGHTEST dry-brushing of silver to bring out the finer details in the truck? That would provide some pleasant contrast to the boxcar red(?) rusty color you have on your trucks right now. Good work, now try some freight cars! OH! and I forgot...are your UP trucks gray? If they aren't once again I'd suggest the correct color UP harbor mist gray. Hope this helps and thank you for being so nice about my earlier suggestions! ")
Silver is a good idea...and yep those UP trucks are gray (although grimier now). All comments are appreciated and always taken in the best light. I agree with the need for flat or dull coat after painting to work out the transition areas. So far...even the simplest weathering goes a long way to adding to the overall layout scene. I am really impressed with some of the weathering I've seen by contributors to this website. Some of you guys should hold a clinic! Maybe a thread of your best weathered car/diesel/steam/building and how you did it. Any takers???
I agree about holding a clinic (hint hint moderators ). Weathering is difficult, especially in N scale. Personally, I'd like to get into chalks and even airbrushing. Using paint is okay I guess, but it's hard for the fine detailing needed for such a small engine.
). Weathering is difficult, especially in N scale. Personally, I'd like to get into chalks and even airbrushing. Using paint is okay I guess, but it's hard for the fine detailing needed for such a small engine.I agree...detailing an Nscale diesel is a challange. The cars are a bit easier though than the engines IMHO. I would guess an air brush would make the job easier - but I just took a picture of all my diesels and I'm guessing the bank account can't afford an air brush purchase right now otherwise I might take the plunge and use one. Until that day, I'll probably stick with what I can do - make the wheel sets/trucks grimey, discolor the exhaust vents, and rust/dirty up the knuckle coupler areas. I use a 00 brush and micro-fine painting Qtip like product...even then, it still puts on more paint than I'd like or feel comfortable with at my current stage of expertise. I think I'll leave the total engine body/hood weathering until I get an air brush. Still, I'd like to try that chalk method too and see the results. I still think we could use a thread on the topic. There is some great work out there lurking on this website that just begs to be shared with us all. If not a thread, posting the links to personal websites is good too.