TruckLover said:
Thanks Dean, But yep, that is a reflection. I am a little affraid to wheather my engine right now. But since you broght up the idea of only wheathering a few parts, I suddenly feel more confident. I think I might do that.
Yeah, i agree, only do some parts at a time, and like he said, start with the bottom, ang go up ( just remember to paint down, lol)
speaking of painting down, it looks more relistic to weather your equipment in a downward fashion, as this is the way all the grime gets washed away when it rains.
Also, while the grime is impressive, on your next few models, try a lighter apporach to weathering. While it is true that most cars aren't shining clean, many cars have only light grime on them. Most of the time it is only a light light covering of grime, and maybe a few rust streaks here and there. most of the time you won't even noticed you did anything until later when you hold a brand new model to the weathered one. changes should be subtle
trucks and wheels are the only things that should be heavily painted on freight cars. paint them all Polly scale (PS) grimy black. next, use a little thinned PS rust in small patches. The wheels are weathered depending on truck type. On solid bearing ( also known as fricition bearing) trucks, the wheels will be PS oily black. This is because the Jounral boxes (the box covers are the main spotting feature of soild bearing trucks) are full of cotton waste covered in oil to use as lubricants. the oil eventually covers the whole face of the wheel in a dark black oily look. Roller bearing trucks (identified by the triangular shape on the bearings) have a more rusted or grimy look. This can be achieved by mixing PS tarnished Black and PS rust at different proportions. Locomotive wheels are also weathered in this fashion. Make sure to keep paint off the points of the wheels though!
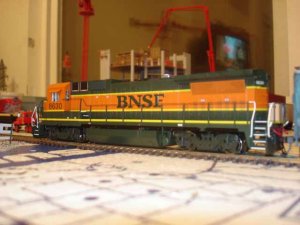
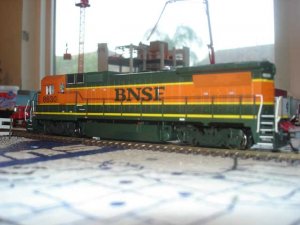
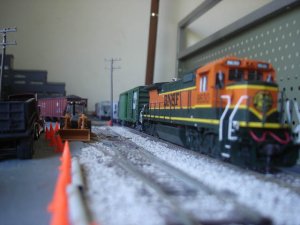
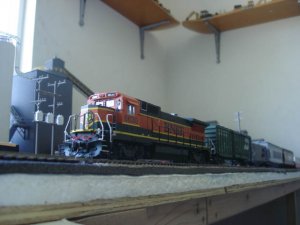
When it comes to weathering locomotives, It is best to work in stages. The first step is to study your locomotive. I have found a whole 3 page section a of a site dedicated to picture of BNSF 8630, your locomotive. use it to refer to if you want to see how exactly it is weathered.
http://www.rrpicturearchives.net/locoPicture.aspx?id=16747
You can also use pictures of other BNSF B40-8s as a guide if you have to. Starting with the trucks and fuel tanks, Its best to use washes of PS Dust (which is already thinned) or thinned out washes of PS grimy black. the goal is to fade the trucks out so that they look like a faded green/ light grey. The fuel tanks appear to be more weathered on the ends and bottoms than it does the upper middle of the tank, so keep that in mind while weathering. Its easy to do this with an airbrush (jsut make it extra thinned) if you have one, but you can so it with paints if you want. also just make thepilots look a little grimy and rusty on the bottom. Refer to the pictures for help
Moving up onto the body, the nest thing you want to do is a very very very light coating of PS dust, or (as is the case with most of my models) thinned PS grimy black. the goal here is to just dull the paint just a tiny, tiny, tiny bit. You should barely be able to detect traces of the black paint.
On your model, you need to touch up the factory paint job. The Long vent at the end of the "hump" (directly above the steps on the right side of the locomotive) needs to be painted black on both sides. Also, the series of vents on the rear of the locomotive also need to be painted grimy black. the locomotive's striping didn't extend onto the vents. Leave the roof top radiators alone for now.
while I am on the subject of vents and such, on some modeles they will be cast on, but are also so supposed to be in cast colors. A way to greatly improove the realism here is to thin some grimy black and let it flow into the vent's openings, and get rid of the excess. That will make it appear like there is something in there, and that its not cast plastic. The only place on your may have to do that is on the roof details (more on that when i get there). This is just advice for the future.
On pictures of #8630, the cabs also seems to have some dust streaks on it, so in a downward motion, apply a tiny bit of PS Dust going down, so it looks like small streaks. Its good to go out to an art store and get some small brushes to do all of this.
On the roof, there is still more touch ups that need to be done. If yours is like mine, they left the exhaust stack silver on the inside. Paint the bottom and insides of the exhaust stack flat black. There will be 2 square vents towards the front of the locomotive on the right side that need the thinned out black treatment i mentioned earlier.
the roof will need the heaviest weathering of all. the areas directly behind the exhaust stack and in front of it should be paints lightly thinned black. the horns ,theough whole exhaust stack, it all has to look very sooty from all the diesel exhaust (chances are fire shot out of the exhaust stack at one point or another, a technical problem with many new GE locomotives) the soot should be painted back over the middle walke way of the raidaors, as well as on the radiators themselves. make them look fairly grimy. the whole upper portion of the locomotive should appear grimy. However, the grime should fade out back the the green as it reaches the sides of the locomotives. It should be green out past the hood lift rings on the roof section with the exhaust stack. the angled side of the roof should only be faded, with little exhaust stains on them. the top of the cab will have more, but not that much.
Thats as far as weathering the locomotive goes. I'd reccomend detailing the locomotive first, then weathering it so that it all matches, but thats up to you. It can be tough, because you'd already have to do lots of work on the nose (not to mention milling out a channel in the nose weight for headlights. I had to do that for my U34CH marker light... that was tough) Things like the Air Conditioning box and the antenna (whichis in the wrong place on your model) can be easily corrected and installed. If you get a chisel blade, you can also remove the marker lights that have been cast on to your locomotive's cab (they aren't installed on the prototype 8630). Just a few suggestions.