Truth. This is what hangs me up on distributing anything I have designed.I think instructions are just as hard to make as the model.
Launch when ready!
- Thread starter Revell-Fan
- Start date
You are using an out of date browser. It may not display this or other websites correctly.
You should upgrade or use an alternative browser.
You should upgrade or use an alternative browser.
I am trying this approach of instruction writing:
As I am testbuilding the model I am writing down sequence of part numbers as I am using the parts, with additional notes when I feel necessary. This, accompanied by instruction drawings, will be my instructions for the model.
As I am testbuilding the model I am writing down sequence of part numbers as I am using the parts, with additional notes when I feel necessary. This, accompanied by instruction drawings, will be my instructions for the model.
That would mean numbering the parts too.I am trying this approach of instruction writing:
As I am testbuilding the model I am writing down sequence of part numbers as I am using the parts, with additional notes when I feel necessary. This, accompanied by instruction drawings, will be my instructions for the model.
I'm assembling the whole model again in my mind and make sure that nothing is missing. I too make notes but that depends on the complexity of the model. I don't assemble the model in the correct order (I tend to switch between sub-assemblies, mostly when I run into problems with one part). The most difficult thing is the numbering because sometimes I go back to one part, add a new one and have to redo the numbering again. Then there could be doubles. If build pictures do not show a step clearly I use a quick SketchUp render to explain. I now have 15 pages. A few more to go. 
Last edited:
That would mean numbering the parts too.
I am numbering the parts when unfolding, otherwise I would get lost quickly, especialy if the process takes longer time with many pauses, and it usualy does.
I'm assembling the whole model again.......
I also do not allways assemble in "correct" oder. In that case I just switch the order of the subassemblies in the final instructions as needed.
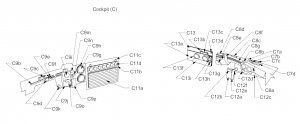
I am numbering each subassembly by its name first letter and number. For example for engine it is part E1, E2 etc. if there is some smaller sub asembly at the engine subassembly then it is numbered by letters E3a, E3b etc. Sometimes I add L,R, B or T for right, left, bottom or top side (or combination) like E3b LT. This way I have no long number lines, so I do not have to renumber to many parts when needed.
Last edited:
Holy Moly! These are a lot of parts only for the cockpit! I assume that they are rather small. ;-) LIKE,LIKE,LIKE.....
Yes, it looks difficult - I hope that the announced 1:32 version will be released soon.Lots of parts, not something my poor hands could handle now.
Sorry for discrepancy - instruction drawing it is NOT from this Viper model by Revell-fan (it is from my A-wing model). I post it to illustrate my way of numbering parts.
All theese parts are optional. Modeler could pick what parts to incorporate to his model and what parts to omit for whatever reason.
Sorry for discrepancy again - now lets go back to Viper
All theese parts are optional. Modeler could pick what parts to incorporate to his model and what parts to omit for whatever reason.
Sorry for discrepancy again - now lets go back to Viper
No worries, mates! 
I'm so relieved that I was able to finish the build in time because I've been fighting a pretty nasty sinusitis infection again for the last three days (the weather is so bad here and the whole town is one large construction site). That's what really throws me off course when it happens during a build. Thank goodness I only need to concentrate on writing stuff now.
The final page is being written - and this contains a little surprise from @Rhaven Blaack . My jaw dropped when I saw what he had developed and I'm sure yours will, too, so please stay tuned for his Beta build!
At first I thought it was a studio model. Very impressive! Amazes me enough that you can design it in 3D but then unfold it into a buildable model! Awesome model and my favorite SciFi fighter!
Lee
Lee
Thank you! I'm still feeling a bit guilty that it took me so long to make it, but, well, better late than never. 
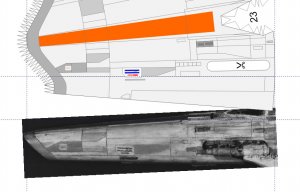
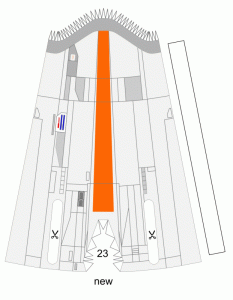
Alright folks, the revision is complete! Here are a few things that were changed: Maintenance hatches on the side engines moved up, detail on the high engine thruster moved down, added panel lines to the intakes to make decals for a Viper variant, added greeblies to the wings and undercarriage, extensive rework of the lines on the nose. To correct them I printed out the part and assembled it. Then I held it against the monitor and made additions with a marker directly on the part. Then I mesaured the difference to the old lines and updated the vector drawing accordingly. I could have cut the part apart again and scanned it for tracing but it was pretty tricky to draw the lines on such a small curved surface (no pun intended!  ). Then I thought about importing a part of the side view of the filming miniature and cross-check everything. One drawback is the perspective distortion of these images. That's what almost drove me mad when I desiged the Landram.

In the end everything lined up very well. Here is a comparison between old and new:

One small change of the instructions and the Beta build may begin!

In the end everything lined up very well. Here is a comparison between old and new:

One small change of the instructions and the Beta build may begin!
Last edited:
I like the look of the new changes! Once I finish the launch rail, I will jump on this beta build!!!
OK, then I'll switch back to the new Landram. That one's gonna be a blast! 


