Display cases?

ezdays

Out AZ way
Feb 3, 2003
6,339
0
36
Arizona
bigbluetrains.com
Originally posted by kf4jqd
Does anyone know where I can get the plastic covers for display cases? I am looking for covers for my display of HO and N scale trains. These are for table top displays. I have access to the wood working tools to build the base.
Andy,
Look in the phone book under "plastics, fabricators" and you will find someone that will custom make something for you. If you're adventurous, you could buy sheet goods at a local supplier and make your own. I freqently cut acrylic and other plastic sheet goods with my table saw. Since you have woodworking tools, you should be able to as well. I use a sharp plywood blade and keep the paper overlay on until I'm ready to assemble whatever it is I'm doing. You may have to buff, or "flame" any saw marks out of the edges. And just like assembling model buildings, there are two types of glue, watery thin and thickened to glue the part together.

There may be somewhere you can buy "off the shelf" (no pun) covers, but these are my suggestions.

Don
 

YakkoWarner

Member
Mar 10, 2001
291
0
16
55
Orange County, NC.
www.the-gauge.com
Andy, your local home supply house should have sheet lexan or similar product that will suite your purpose. Most will even cut it to size for you. Lexan comes in sheets from 1/16" all the way up to 1/2". (aprox. 1.5mm to 13mm for all you metric people, and for all you regular people who use the metric system.)

The easiest way to cut sheets up to 1/4" (aprox. 5mm) is to score with a sharp knife and then snap off.
 
Thanks

Thanks for the replies guys. But I was told that making your own cover looks wrong. What about the seams? Wouldn't look weird? I also remember in phyics that light reflects off of prisms. In many ways these seams will become prisms. I don't want light rays scattered across the room! I would like to have a solid molded cover.

I will have to check out Michael's this weekend. Also I have been looking at NASCAR model car cases.

Thanks again,
Andy
 

Bill Pontin

Member
Oct 14, 2001
708
0
16
83
Milford, CT
Visit site
Andy, like you I searched all over for covers, wound up making my own from the inexpensive acrylic plastic that is available in most of the Orange Boxes (Home Depot) My original goal was to make a case that would actually be used for display and as a cassette for loading in a string of rolling stock.
 

Attachments

  • mvc-020s.jpg
    mvc-020s.jpg
    36.2 KB · Views: 140

Bill Pontin

Member
Oct 14, 2001
708
0
16
83
Milford, CT
Visit site
Made eight of the cases, but found they work for displaying only. Found it too hard to keep the string of cars from derailing if the case was not handled with kid gloves.
 

Attachments

  • mvc-022s.jpg
    mvc-022s.jpg
    35.4 KB · Views: 135
NASCAR case

Here is a picture of a NASCAR case. However, that darn line is there. The other is a case from Walther's. It's ok. Walther's also sells an all plastic case, but I want the base to be wood. I can get that for free at work!

Andy

I will be hitting the craft stores this weekend. I may end up using your idea Bill!:D
 

Attachments

  • cases.jpg
    cases.jpg
    47.9 KB · Views: 122

RailRon

Active Member
Nov 23, 2002
1,602
0
36
80
Trimbach, Switzerland
Andy, Jessica is right!:D :D :D

I fear, you have to put up with the corners that obstruct the view in some way - there's no way around it. Your own pictures show it clearly:

If you glue the transparent walls edge-on, you'll have a 'hard' line that shows. And the Walther's case with rounded edges distorts the view optically. In my eyes this is even worse for a showcase. (I know, I had some similar boxes, too. Finally I threw them away. :( )

Bill's solution is something I never saw before, but I like it. IMHO the matted edge strips look somehow elegant. If you can't make disappear the edges, ENHANCE them - perhaps that's a psychological trick. ;) (Sort of 'If you can't lick them, join them!' :rolleyes: )

Bill, how did you do it? Are the edges beveled and/or sanded down?

Ron
 

ezdays

Out AZ way
Feb 3, 2003
6,339
0
36
Arizona
bigbluetrains.com
Re: Thanks

Originally posted by kf4jqd
Thanks for the replies guys. But I was told that making your own cover looks wrong. What about the seams? Wouldn't look weird? I also remember in phyics that light reflects off of prisms. In many ways these seams will become prisms. I don't want light rays scattered across the room! I would like to have a solid molded cover.
Andy,


The only way you can avoid seams is to injection mold the plastic, now you're talking real money, or very high volume. Heating and bending is another way, but it's tricky and you still wind up with some seams. You can minimize the look of seams by polishing the edges before gluing. You can do that with a propane torch. Just be careful, too much heat will ruin the plastic. The best way would be to bevel the edges, but there is no room for error when doing that. And lastly, (and probably least desireable) you could use corner molding and build a frame. That way you just have to deal with flat pieces. Kinda like an inverted fish tank:D:D:D:D I know, bad ideal....

Again, if you don't want to try it yourself, I'm sure there is a plastic fabricator near you that can do a professional job or find someone that makes trade show displays.

Don
 

Bill Pontin

Member
Oct 14, 2001
708
0
16
83
Milford, CT
Visit site
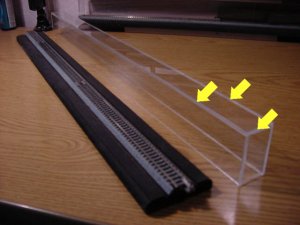
Steve, as to the thickness, it was the thinnest and cheapest stuff I found at Home Depot. My vernier reads .090", fractional size ????

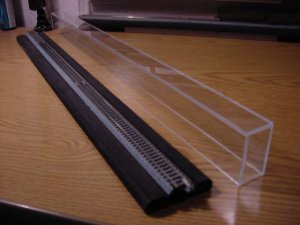
Andy I came to the same conclusion after a local plastic supplier and distributor told me what was involved for a special order. Seems to me that there is a market out there for clear rectangular shaped plastic tubes. Had to experiment some with the sheets I bought at the "Orange Box". Scoring and breaking the sheet in widths of 1- 1/4" and 2" proved difficult. Solved that problem by kerfing a piece of 2 x 4 with my radial arm saw. By inserting the plastic edge, the entire length of it into the 2 x 4, it allowed me to snap the plastic on the scored line each and every time. I used one of the heavy duty tools they sell for scoring the plastic. The biggest key incredient is the liquid solvent for bonding the acrylic pieces. The stuff I used I purchased from a plastic distributor and is made just for bonding acrylics. "Weld-on" the #4 formula for moderately fast curing. You assemble the pieces, top and sides with clamps, (tape will not work), standing the parts on end, carefully add drops of the solvent to each seam. Add just enough to each seam so that you see the liquid travell down to the other end of your work. Does a great job, but takes a little practice. I tried all the other plastic adhesives and glues, always made a mess and the seam was not as tranlucient as I wanted. Found also that if I used tape to hold the parts together, the liquid solvent ran under the tape and created a sticky mess. The edges of the work are best worked by scraping it with a razor blade. Sanding leaves an unsightly dull edge, but, that can be scraped down with a razor to get that polished look.

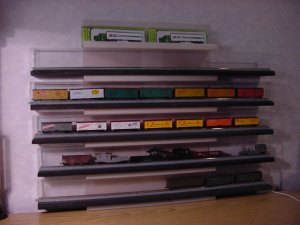
The base is made from 1/2" MDF particle board with two and a half sections of the "Kato" sectional track glued to it. Again my original goal was to make cassette type cases for pluging into a staging area. That flopped because the cars would not stay on the track with handling. Oh well, the ten cases look great stationary on my wall. It was very labor intensive but all things considered it was a learning experience.:)
 

billk

Active Member
Jun 12, 2001
1,116
0
36
Marion, IA, USA
You could eliminate the long joints altogether by bending the plastic material. If you do a web search on "bending" and "plexiglass" (or for the material of your choice) you should get a lot of hits. Looks like it involves using a heat source to soften the material enough so it caon be bent.
 

Blake

Member
Jul 19, 2002
446
0
16
60
Northern New Jersey
www.BlakeDTatar.com
Here's what to do. Get some 600 grit wet sand paper and double sided tape. After cutting the pieces to size, stick the sand paper to a very flat surface. Put some water on the sand paper and run the edges of the acrylic back and forth over it, holding it at a 90 degree angle (similar to how you would hold a piece of wood on a jointer). After that, run the flame of a propane torch up and down the edges until they become clear. When you glue them together with MEK the joints will look great.