Control Panel Layout

Woodie

Active Member
Mar 23, 2001
2,093
0
36
Northern Rivers NSW Australia
Guys,

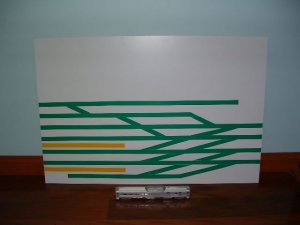
I had an attempt last night at making up a control panel. It ended up about twice the size I thought it would be. :eek:

I made it from a sheet of prepainted masonite, and used insulation tape to represent the tracks. I hope it don't shrink or come off!! I'll probalby seal it with lacquer of varnish or something.

It's only one half of it, and will be mounted on the front of the layout at about a 45 degree angle. The green represents the tracks, and the yellow represents the station platforms. The mainlines (the central 4 "thru" tracks are up/down/up/down lines (top to bottom) (top track runs west to east/left to right). The crossover tracks are not double slips, just plain crossovers.

Are crossovers represented in a track diagram such as this, in any special way? i.e. to NOT show them as, say, a double slip?

It's a bit big, but I think I'll need it that big by the time block and turnout switches go on it, (and those elusive LED circuits!!) and other switches etc for sturcture lighting etc go on the empty bit at the top.

That's a HO Budd Railcar at the bottom to show the size. Is it tooooooooo big? Its the control panel for only one half of the main section of Garahbara Mk II that covers 3.6 metres.
 

Woodie

Active Member
Mar 23, 2001
2,093
0
36
Northern Rivers NSW Australia
It just would not upload the pic on the intial thread. It just sat there.... and sat there... and sat there.... and waited... and waited.... and waited... so I gave up and tried again here... Didn't matter how many times I clicked "upload" or left it alone for 1/2 hr. It just sat there... and sat there.....

Then it blew up completly on this one, after 15 minutes with a "cannot find server".... GGGGGRRRRRRRRRRR :mad: :curse:
 

Woodie

Active Member
Mar 23, 2001
2,093
0
36
Northern Rivers NSW Australia
I'll try again!!! The pic is a jpg, 640 X 480 and 27K.

Nup..... did it again. You'll all have to wait till tomorrow. I'll email the pic to the shop and try from there, with a 1.5 MEG DSL link, instead of my crappy dialup from home.

The Gauge, itself it going OK. Just for posting, and viewing threads etc is fine... it's just the file upload just sits there.... and does fornicate all. :mad: :curse:
 

neilmunck

Member
Feb 18, 2004
180
0
16
41
Glasgow, UK
www.gmts.org.uk
Hi woodie,

With crossings (crossovers are two points facing each other on dual track lines that allow trains to get from one track to the other but not in all four possible ways, only two) it is usual to represent them as an X. Doulbe slips have an X with a ^ and an upside-down ^ drawn just above and below the X to represent the fact that trains can change tracks. In a single slip the ^ is only put on the side that has the slip.

neil
 

Woodie

Active Member
Mar 23, 2001
2,093
0
36
Northern Rivers NSW Australia
I'll try again!! Don't think it was the fault of The Gauge, cause I could not attach it to an email either. It just "sat there" and timed out, (using Outlook). It would also not send using Hotmail as well. (just sat there and timed out too). Emails with no attachments sent off fine. Just any way of sending that file, no matter what method, just "sat there".

Just worked like a boomer now. 1 1/2 sec to upload it from the shop. :cool: but still :mad: and :curse: about trying to send it from home.
 

Attachments

  • cpanel.jpg
    cpanel.jpg
    26.8 KB · Views: 310

Gary Pfeil

Active Member
May 7, 2001
2,510
0
36
Boonton NJ
Visit site
Woodie, Only you can decide if it's too big, but if you'd like it smaller, you may be able to do as I did. I gave up having the switch/toggles on the track diagram. Instead, I used dry transfers (not visable in the photo for some reason) on each turnout on the diagram and arrainged my toggles in a row beneath, with corresponding letters. I used toggles as these turnouts all use slow motion motors. I didn't need to worry about leds for showing which way the turnout is thrown since the toggle handle shows it. When up, the turnout is sraight, when down the turnout is diverging. In operation, one simply follows the desired route and throws toggles to suite. I used 1/8" wide lines, seperated by 1/8". Except on the bottom where two lines represent hidden staging. They are 1/2" apart to allow room for the Acme pushbuttons I used for these two turnouts, which have twin coil machines. The panel is 11"x18". The leds along the two lines are driven by photo cells between the rails and are occupancy detectors. The rotary switch and two pushbuttons next to it are for electromagnetic uncouplers. A thought about your dilema concerning visual display of turnout status: Use toggle switches much as I did, but have a momentary pushbutton to connect the power source. You could throw all toggles required and push the button to throw all turnouts. And the toggle handles will show which way the turnouts are thrown. Of course all the turnouts will receive power, but that should be ok. You'll need ample power, like I mentioned before. And the pushbutton will have to be heavy duty. Maybe someone else can elaborate on this, it's just off the top of my head.

Gary
 

Attachments

  • P1010544jpg.jpg
    P1010544jpg.jpg
    43.6 KB · Views: 304

engineshop

Member
Apr 29, 2003
136
0
16
61
San Rafael, CA USA
www.engineshop.org
I used a paint program to do my layout, printed it out on full sheet label paper, used a piece of PVC sheet as a support and a cover it with a thin piece of Plexiglas. Since I have no toggle switches for the turnouts only for turning of the power to the lines, it works out great and looks very clean.

Roland
www.engineshop.org
 

shamus

Registered Member
Dec 17, 2000
3,489
0
36
87
UK
I use two pieces of Perspex the right size for my panel. Next thing I did was to draw out the plan on a computer programme to A4 size. When finished I printed one copy on plain paper and another on Photo paper at top quality to use as the finished product.
Here's the finished panel

Shamus
 

Attachments

  • panel.jpg
    panel.jpg
    48.9 KB · Views: 229

RailRon

Active Member
Nov 23, 2002
1,602
0
36
80
Trimbach, Switzerland
This is the control panel for my underground storage yard, appropriately called 'Underwood'. :D

I sprayed my panel (hardboard) white. After the paint had dried thoroughly, I laid out the track lines with plastic strips which are used for pinstriping automobiles. (The color doesn't matter.)
Then I sprayed the panel green and carefully pulled away the masking strips. The lettering is done with white Letraset letters.

The small buttons control the turnouts: Pushing a button aligns all the turnouts from the yard throats (top left and bottom right) to the respective yard track. The PECO double coil turnout motors are powered by a CDU.
And the toggle switches simply kill the power to the yard tracks.
So far I didn't install indicator LEDs for turnout position or track occupancy.

Ron
 

Attachments

  • UnderwPanelfront.jpg
    UnderwPanelfront.jpg
    50.6 KB · Views: 224

Woodie

Active Member
Mar 23, 2001
2,093
0
36
Northern Rivers NSW Australia
RailRon said:
Then I sprayed the panel green and carefully pulled away the masking strips. The lettering is done with white Letraset letters.

Ron

Ahhhh.... I like that idea. :thumb: :thumb: Then I don't have to worry about the tape peeling off or shrinking or whatever, or twisting up around the drill when I drill the holes. :thumb:
 

Gary Pfeil

Active Member
May 7, 2001
2,510
0
36
Boonton NJ
Visit site
Guess I neglected to mention that I used chart tape to mask off the track lines on my panel. Same approach as Ron used, I painted the panel white, then masked off the track with tape and painted black. The chart tape and the strips used for pinstriping come in many widths. And the chart tape, at least (never used the pinstriping stuff) is low tack.
 

RailRon

Active Member
Nov 23, 2002
1,602
0
36
80
Trimbach, Switzerland
Oooooh yep, Gary - I forgot to say that :eek:ops: :

Before using the plastic strips on the panel I pressed them to a glass sheet and pulled them away again. This makes them a bit less tacky, so they won't pull away the lower paint layer.

Ron

PS: If you don't have a glass sheet at hand - there are always windows around! :D :D :D