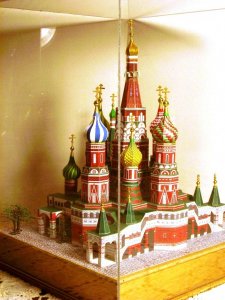
Canon Creative Park - Saint Basils model

tglenchur

New Member
Dec 22, 2004
19
0
6
Saint Basils on Moscow's Red Square

Canon Creative Park released an attractive Saint Basil’s card model pattern by M. Yukishita. The model, as built from the kit plan, provides a convincingly close facsimile of the actual prototype in Moscow. The towers and domes are modeled in octagonal forms without the complicated curves and projections of the actual prototype. Yet the overall effect is still excellent.
 

Attachments

  • IMGP2316.jpg
    IMGP2316.jpg
    114.7 KB · Views: 37

tglenchur

New Member
Dec 22, 2004
19
0
6
Starting out construction

The paper base area of the US letter size pattern measures 10.5 inches x 9.75 inches x 0.75 inches high. Gluing only the cobblestone pattern pieces to a 10.5 inch x 10.5 inch x 1 inch box of one-quarter inch plywood provides support that resists sagging over time and still fits inside a case made from standard 11 inch x 14 inch x one-eighth inch picture glass. An 11 inches x 11 inches plywood plate closes the box bottom and supports the clear case from sliding down onto the model.

Towers support onion domes above in a basilica plan arrangement.

Some of the towers slightly lean in towards the central tower despite the crossed support walls under the cardstock floor. In hind sight, there would be less center sag if the platform floor under the towers were stiffened with plywood, rigid plastic or more support cardstock walls.
 

Attachments

  • IMGP2267.jpg
    IMGP2267.jpg
    102.6 KB · Views: 20
  • IMGP2317.jpg
    IMGP2317.jpg
    129.9 KB · Views: 19

tglenchur

New Member
Dec 22, 2004
19
0
6
The Threes

I wanted to build the model with as much three-dimensional (3-D) detail as was practical. With few exceptions, the model pattern was assembled to the original Canon instructions up to the tops of the four large onion domes. The original parts were modified to better match prototype details shown in photographs.

The windows and doorways of the central tower part 6 were opened up and a back wall was positioned concentrically to it. Carpenter glue held the wall and supporting floor together. The doorway cutouts were glued onto the back wall, aligned with the outer doorway opening.
 

Attachments

  • IMGP2269.jpg
    IMGP2269.jpg
    104.3 KB · Views: 24
  • IMGP2288.JPG
    IMGP2288.JPG
    99.3 KB · Views: 17

tglenchur

New Member
Dec 22, 2004
19
0
6
Recoloring part 4 Roof Flashing

The roof flashing on part 4 was reprinted with green to match the prototype. I used 20 lb paper reprint of part 4 to glue over the white annulus of the original part 4 roof flashing.
 

Attachments

  • IMGP2269.jpg
    IMGP2269.jpg
    104.3 KB · Views: 23
  • IMGP2295.jpg
    IMGP2295.jpg
    79.2 KB · Views: 18

tglenchur

New Member
Dec 22, 2004
19
0
6
Onion Domes Assembled with Butt-Joints

Onion domes printed on 65 and 110 lb paper card stock frustrated my attempts to assemble them using the integral gluing tabs along the pattern arms. Instead, butt joints between the arms allowed for manageable pattern alignments without twisting, especially at the domes’ tops.

Because Eastern Orthodox crosses shall be used, parts 1, 59 and the other Roman style crosses may be discarded.
 

Attachments

  • IMGP2280.JPG
    IMGP2280.JPG
    116.1 KB · Views: 19
  • IMGP2289.jpg
    IMGP2289.jpg
    115.4 KB · Views: 14

tglenchur

New Member
Dec 22, 2004
19
0
6
Mirror Reprint of Reversed Dome Patterns

Photographs indicate the swirling stripe patterns were reversed on two domes.

Dome part 11 is reversed and light in color. Two of the eight arms had incomplete stripes as well. A mirror reprint of dome 11 provided replacement arms with a complete stripe pattern. Red and dark blue color pencils intensified light colored red and blue stripes of the original pattern.

Dome part 42 is reversed. Mirror reprinting corrects the striping direction.
 

Attachments

  • IMGP2314.jpg
    IMGP2314.jpg
    110.9 KB · Views: 17

tglenchur

New Member
Dec 22, 2004
19
0
6
Central Tower Details

The central tower has an outstanding amount of gold detail. The small repeated projections up the side edges would be great to model but I don’t have a convincing simulation. Eight gold ring details can be cut from aluminized Mylar polyester. An empty coffee ground wrapper provided the aluminized Mylar film. Punch out the basic circle with a 5/32 inch diameter hole punch. Punch out the center with a 3/32 inch diameter hole punch. Fasten the rings over corresponding printed shapes at the upper section of part 3. The punches are available at Harbor Freight Tools as part of a six punch set.

A greenish ring of windows circles the top of central tower part 3 by gluing a floor disk with an octagonal cut-out center to fit around the tower. Eight green card strips, 1 cm. x 0.5 cm then trace corresponding black arch lines on the central tower. The ends of the arches begin and end attached to the previous floor piece.
 

Attachments

  • IMGP2296.jpg
    IMGP2296.jpg
    112.2 KB · Views: 15

tglenchur

New Member
Dec 22, 2004
19
0
6
Gold Foil Rings at Onion Dome Bases

Gold leaf rings surround the actual onion dome bases. Gold colored wrappers from Reese’s Pieces candies provide ample gold aluminum foil that is easy to glue over the yellow rings in the original Canon pattern.
 

Attachments

  • IMGP2297.jpg
    IMGP2297.jpg
    96 KB · Views: 10

tglenchur

New Member
Dec 22, 2004
19
0
6
Supplemental Dome Parts

At this point, new parts were added to the original pattern to complete the model. Photographs provided inspiration for 3-D approximations. Dome pedestal sections were added for the central and bell towers. Vertical sections without flaring provided satisfactory effect at this small scale.

The missing dome patterns were scaled in proportion to the corresponding pedestal bases. The proportional scale factors for the central tower and bell tower were then used in scaling down the flat patterns of the smaller chapel domes:

Towers Support Base Scale Factor
Smaller Chapel Towers 23.5 mm
Bell Tower 10 mm 10/23.5
Center Tower 15 mm 15/23.5

As before, assemble the domes with butt joints.

The central dome was painted a bright gold. The bell tower dome normally appears the same color as the tower, dark forest green but was instead painted a medium pine green to contrast and set off the onion dome.
 

Attachments

  • IMGP2291.jpg
    IMGP2291.jpg
    111 KB · Views: 17
  • IMGP2292.jpg
    IMGP2292.jpg
    117.1 KB · Views: 15

tglenchur

New Member
Dec 22, 2004
19
0
6
Supplemental Dome Parts - Part II

Two sizes of Eastern Orthodox crosses are used with the onion domes. Cross patterns are printed on one layer of 110 lb cardstock. The printed page is glued to two other layers of 110 lb cardstock and allowed to dry before cutting out the individual crosses. Use a #11 razor blade to cut out the crosses. The cutting path should move from the intersections of vertical and horizontal lines to avoid bending the crosses. Leave approximately one-sixteenth inch extra length in the cross to glue into the supporting bead hole. Paint the crosses gold on all faces and edges. Leave faying surfaces (where glue is applied) unpainted.

Cones are assembled with pie-slice shapes from a circle to support gold spheres (round beads from an arts and crafts store) and the Eastern Orthodox crosses. Paint the upper two-thirds of the cone gold and the lower third with a color to match the onion dome color scheme. Leave part of the cone vertex unpainted to help epoxy glue adhere to the cone and bead. Attach the beads to the cones; then mount the crosses into the holes.
 

tglenchur

New Member
Dec 22, 2004
19
0
6
So What are Those Strips that Canon Supplies for Short Towers?

The prototype metal sculptures are intersecting helical vines with tendrils and fine details like a flag. Copper stranded filament wire wound as a single coil didn’t look right. A double helix reversing direction did look right; three spirals up a round toothpick and three spirals down it appear satisfactory. The copper can be painted with gold acrylic paint to match the gold cones.

The base of the metal helix sculptures also have cone and sphere supports. The platform under the supports can be simulated with three small squares in graduated sizes with their corners trimmed off to an octagon. Glue together the octagonal platforms. Glue the support cone bases to the platform and paint. Attach them to the four small stairway towers. Glue the double helix sculptures into the bead.
 

Attachments

  • IMGP2300.jpg
    IMGP2300.jpg
    104.8 KB · Views: 18
  • IMGP2309.jpg
    IMGP2309.jpg
    125.2 KB · Views: 16

tglenchur

New Member
Dec 22, 2004
19
0
6
Keeping the Trees Three Dimensional

Three equal lengths of 16 gauge stranded copper wire are used to make trees. The two larger trees (parts 74 and 75) look like lindens (tilia cordata) with a pyramidal shape cut to a ¾ standard that allow pedestrians to pass underneath them. Start with 5 cm wire lengths and bend lower branches horizontal, leaving the lowest 1 cm bare so people can pass under the branches. Branches shorten and bend upwards towards the tree top. Branches normally grow a series of bilateral side branches beside a center lead growth.

The smaller trees (parts 76) appear rounded but still have the lower 1 cm bare trunk for pedestrian traffic. Start with 3 cm wire length.

Paint the branches black to dark brown. Paint leaves. Add flocking to taste. Drill holes through the tree base locations. I used fiberglass window screening with two off set layers to simulate metal grating used for protecting public tree plantings from trampling.
 

Attachments

  • IMGP2302.JPG
    IMGP2302.JPG
    107.3 KB · Views: 13
  • IMGP2301.JPG
    IMGP2301.JPG
    105.8 KB · Views: 10
  • IMGP2305.JPG
    IMGP2305.JPG
    105.8 KB · Views: 9
  • IMGP2307.JPG
    IMGP2307.JPG
    113.7 KB · Views: 10
  • IMGP2308.JPG
    IMGP2308.JPG
    110.4 KB · Views: 11

tglenchur

New Member
Dec 22, 2004
19
0
6
Clear Cover Case

The clear case is 1/8 inch thick plaskolite acrylic sheet. Two side pieces 10.5 inches x 14 inches are solvent welded between two side pieces 10.75 inches x14 inches. A 10.75 inches x 10.75 inches top covers the top edges of the sides. I used methylene chloride sparingly applied to the joints from a glass eyedropper.
 

Attachments

  • IMGP2315.jpg
    IMGP2315.jpg
    124.7 KB · Views: 16
  • IMGP2316.jpg
    IMGP2316.jpg
    117.6 KB · Views: 18

tglenchur

New Member
Dec 22, 2004
19
0
6
Supplemental Part Patterns

I attach some patterns you may use to make the supplemental parts.

With best regards,

Tom G.
 

Attachments

  • Dome-Caps-Crosses.pdf
    79.5 KB · Views: 41