Build Report for PaperArts 737

BCA

New Member
Jun 22, 2008
5
0
1
Seattle
Wasn't sure where to post this - the helodiagrams in the downloads section wont open - does anyone have a copy they can send me? I used to paint 737's for Boeing. Nice job on the engines for this model - I painted left engine and wing - what a PITA to mask and paint - especially the Southwest livery.
Thanks
Gregor
 

knife

Member
Jun 23, 2007
91
0
16
The last kit of bits for this model is the main landing gear. It is a little larger and has fewer pieces than the nose gear, so it's not so hard to build. It is too long by about 11 mm if you assemble the main gear shaft pieces end to end. I built the axle the same size as printed on the parts page. That was a mistake, you end up with a butt joint when the wheel is glued on to it. This is a weak point where the weight of the whole model needs to be supported. For the other main gear, I'm going to make a longer axle from Q-tip shafts and make a hole in the wheel for the axle to fit into. One minor complaint is the fact that the designer has you cut a hole out from the center of the wheel, they you glue a flat hub cap right back into the hole. I think the hub cap could have been printed onto the same part as the wheel, making the assembly easier to build and better looking.
 

Attachments

  • Main Gear 3.jpg
    Main Gear 3.jpg
    158.8 KB · Views: 31
  • Main Gear 4.jpg
    Main Gear 4.jpg
    149.8 KB · Views: 26
  • 102_2060.jpg
    102_2060.jpg
    192 KB · Views: 30
  • 102_2061.jpg
    102_2061.jpg
    180.1 KB · Views: 24
  • 102_2062.jpg
    102_2062.jpg
    177.6 KB · Views: 25
  • 102_2063.jpg
    102_2063.jpg
    195.4 KB · Views: 28

knife

Member
Jun 23, 2007
91
0
16
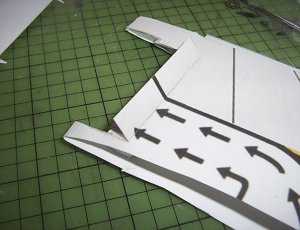
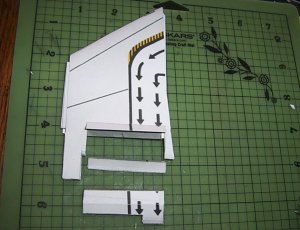
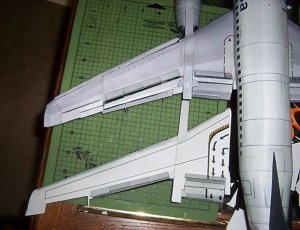
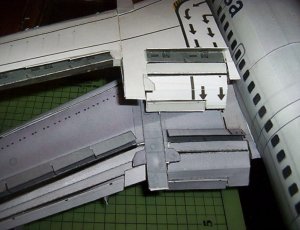
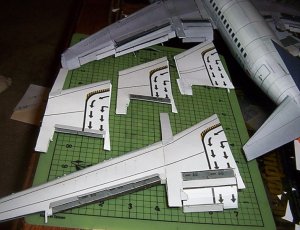
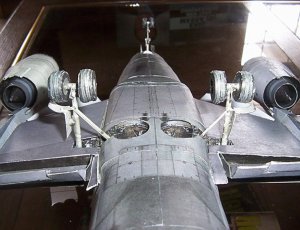
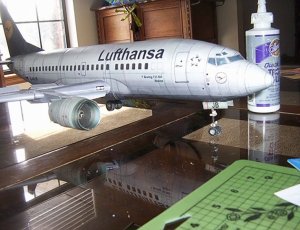
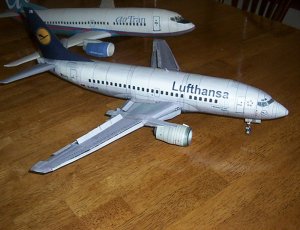
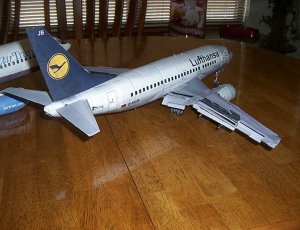
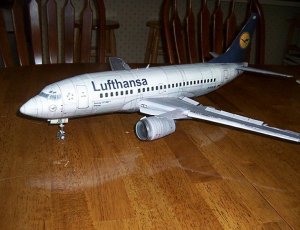
This build is stock, mostly to figure out how it all goes together. I think I will make another one incorporating some changes, mostly in the wings. The internal bits need to be recessed, the flaps need to be resized, the flap actuators need fine tuning, the leading edge internal structure is not accurate, the leading edge slats aren't correct, the landing gear attachment needs reinforcement, and the entire underside is too dark and needs detailing. Other than that, this is a great model. The designer took a lot of time detailing the flaps and slats, something I haven't seen before in airline models. His use of photo-realistic textures is another innovation. And then he made the whole thing free, allowing others to share in his creation.
 

knife

Member
Jun 23, 2007
91
0
16
For sjsquirrel, this is the complete listing of the sayings painted on Flying 101:

The captain’s window is marked with the big cheese (”captain, my captain!”), the co-pilot’s window with co-captain (the other pilot on the PA system) and the jump seat is for wannabe pilots.

In addition, the following descriptions can be found:
* galley (cuppa anyone?)
* avionics (fancy navigation stuff)
* windows (best view in the world)
* wing #1 and #2
* engine #1 and #2 (26 000 pounds of thrust)
* emergency exit = throne zone (more leg room baby!)
* seats (better than taxi seats)
* some windows = kulula fans (the coolest peeps in the world)
* black box (which is actually orange)
* landing gear (comes standard with supa-fly mags)
* back door (no bribery/corruption here)
* tail (featuring an awesome logo)
* loo (or mile-high club initiation chamber)
* rudder (the steering thingy)
* stabiliser (the other steering thingy)
* a.p.u. (extra power when you need it most)
* galley (food, food, food, food…)
* boot space
* ZS-ZWP (OK-PIK) = secret agent code (aka plane’s registration)
* overhead cabins (VIP seating for your hand luggage)
* fuel tanks (the go-go juice)
* cargo door
* aircon ducts (not that kulula needs it… they’re already cool)
* front door (our door is always open … unless we’re at 41 000 feet)
* cockpit window = sun roof
* nose cone (radar, antenna, and a really big dish inside)
 

knife

Member
Jun 23, 2007
91
0
16
I built up the second main gear using an extended axle and overlapping the main strut pieces. Finally got a semi-acceptable wheel on the last one. Then I added the VHF antennas and the rotating beacons. The front lower VHF antenna is the wrong color, it should be red like the back bottom antenna. I just turned it inside out and used a red magic marker to make it the correct color.
 

Attachments

  • 102_2064.jpg
    102_2064.jpg
    184.8 KB · Views: 25
  • 102_2066.jpg
    102_2066.jpg
    175.3 KB · Views: 21
  • 102_2067.jpg
    102_2067.jpg
    178.6 KB · Views: 20
  • 102_2068.jpg
    102_2068.jpg
    182.1 KB · Views: 23

knife

Member
Jun 23, 2007
91
0
16
Here's some shots of the real airplane the model is based on. Note that the forward bottom antenna is red, not grey like on the model.
 

Attachments

  • Lufthansa 2.jpg
    Lufthansa 2.jpg
    152.3 KB · Views: 21
  • Lufthansa 3.jpg
    Lufthansa 3.jpg
    93.8 KB · Views: 22

knife

Member
Jun 23, 2007
91
0
16
Finally, here is the complete model. I left off the pitot tubes from the nose and a few other small bits and pieces. Overall it turns out nice, but now I'm ready to attack the files and see if I can improve them.
 

Attachments

  • 102_2071.jpg
    102_2071.jpg
    184.1 KB · Views: 48
  • 102_2072.jpg
    102_2072.jpg
    181.5 KB · Views: 43
  • 102_2073.jpg
    102_2073.jpg
    196 KB · Views: 48
  • 102_2074.jpg
    102_2074.jpg
    198.5 KB · Views: 43
  • 102_2075.jpg
    102_2075.jpg
    181.2 KB · Views: 41

GluedFingers

New Member
Jul 2, 2009
10
0
1
Coventry
NICE :thumb: model! I'm not particularly keen on passenger jets (too boring for me, big splashes of silver and grey and a few black bits) BUT I would have LOVED to have this one standing on my sideboard!
 

knife

Member
Jun 23, 2007
91
0
16
Here's how I would have made the wings. I joined the outer four pieces and made them into one piece. That means the small end pieces around the flaps and slats have to be printed out separately so everything can fit together. Then I copied the internal parts for the spoilers and made it a separate piece so the original can be cut out and the new part glued in place to give it some depth. The leading edge is repainted to represent it's chrome finish, and a duplicate part made to allow me to cut out the leading edge and use the clone to sink it into the wing. Then the wing is repainted to show the vortex generators on the top and fuel tank access panels on the bottom.

This drawing has exactly the same outline as the PaperArts pieces, and should be a direct substitute for the original.
 

Attachments

  • Left WIng Modified.jpg
    Left WIng Modified.jpg
    12.8 KB · Views: 46

knife

Member
Jun 23, 2007
91
0
16
Here's how the original designer had the wings. I modified it using Paint.Net, a FREE graphics program downloaded from the internet.
 

Attachments

  • Boeing-737 Page 22.jpg
    Boeing-737 Page 22.jpg
    64.7 KB · Views: 35

sjsquirrel

Member
Feb 9, 2006
541
22
18
64
British Columbia, Canada
stevebondy.ca
Keep em coming

Your upgrades are looking good Knife. I hope you'll share them. Watching this build has got me excited about doing an airliner now. The only problem is that now I have too many to choose from :)

Looking forward to seeing your modified build.

Steve
 

knife

Member
Jun 23, 2007
91
0
16
Here's how my version of the wing goes together. I cut out the spoiler portion from the wing, and glued the clone in it's place giving it a little depth. I then folded up the squared up trailing edges, and gently bent the leading edge to form the airfoil. I then cut out the leading edge, saving the cut out part to form the slats. I then glued the recessed leading edge in place. Fold the wing back up, glue up the tailing edge, and there you have it. I split up the spoilers, bent the leading edge to shape, and glued them both the wing. I used a couple of small paper spacers to get the slats offset from the leading edge.
 

Attachments

  • 102_2076.jpg
    102_2076.jpg
    176.9 KB · Views: 21
  • 102_2077.jpg
    102_2077.jpg
    123.2 KB · Views: 20
  • 102_2078.jpg
    102_2078.jpg
    163.5 KB · Views: 20
  • 102_2080.jpg
    102_2080.jpg
    192.8 KB · Views: 21
  • 102_2081.jpg
    102_2081.jpg
    153.6 KB · Views: 20
  • 102_2083.jpg
    102_2083.jpg
    178 KB · Views: 19

knife

Member
Jun 23, 2007
91
0
16
Here's how my wing compares with the original wing. The leading edge changes don't leap out, but the spoilers look alot better coming from a recessed pocket.
 

Attachments

  • 102_2084.jpg
    102_2084.jpg
    177.7 KB · Views: 23
  • 102_2085.jpg
    102_2085.jpg
    180.3 KB · Views: 26

knife

Member
Jun 23, 2007
91
0
16
One other advantage of the redesigned wing is that the spoilers can be glued in the down position, leaving a smooth wing surface.
 

knife

Member
Jun 23, 2007
91
0
16
I've modified the wing root, combining the first two wing sections into one. I cloned the internal structure of the leading edge slats and the spoilers so I can cut out the original and recess the new parts. I shrunk the flaps slightly so they fit. The trailing edge parts that bend over to form the wing bottom were lengthened to better align the sides where the flaps attach to the wing. Then everything was repainted to match the new paint scheme on my outer wing.
 

Attachments

  • 102_2086.jpg
    102_2086.jpg
    139.1 KB · Views: 23
  • 102_2087.jpg
    102_2087.jpg
    174.3 KB · Views: 19
  • 102_2088.jpg
    102_2088.jpg
    178.5 KB · Views: 21
  • 102_2090.jpg
    102_2090.jpg
    180.7 KB · Views: 19
  • 102_2091.jpg
    102_2091.jpg
    148.3 KB · Views: 22
  • 102_2092.jpg
    102_2092.jpg
    161.5 KB · Views: 20

knife

Member
Jun 23, 2007
91
0
16
I'm working on consolidating and improving my mods. It takes several attempts to get the parts just right. When finished, I will put them into a pdf file as an upgrade kit if there is any interest.

Also ordered some red river foil paper and may try a metal version.

All this is assuming I can get the original away from the guard dog.
 

Attachments

  • 102_2095.jpg
    102_2095.jpg
    175.7 KB · Views: 32
  • 102_2096.jpg
    102_2096.jpg
    160.5 KB · Views: 30
  • 102_2097.jpg
    102_2097.jpg
    186.1 KB · Views: 32
  • 102_1983.jpg
    102_1983.jpg
    171.3 KB · Views: 29

Cybermac

Member
Jan 29, 2006
16
0
16
Manchester
...

Excellent job Knife!:thumb:

Nothing more I can say...

My 737 have to wait till I'll finish my flat refurbishement:-(

Best regards!
 

gregh

New Member
Nov 17, 2007
23
0
6
Your mods are super, thanks. looking forward to see them made available to us. your work is really cool !!!!