Y-WING BUILD - Construction continues...
- Thread starter Chuffy70
- Start date
You are using an out of date browser. It may not display this or other websites correctly.
You should upgrade or use an alternative browser.
You should upgrade or use an alternative browser.
Stephen wrote about his model:

It does look good though. I would say that this is the most detailed Y-Wing paper model available at the moment."This is designed from a number of image references but have used my own creative license to add a few tweaks!
Its also my first model so please accept my appologise for it, there are a number of parts that will need to be tweaked/adjusted as you build it."
The studio scale kit was acquired from a guy called Jay Boden at monsterroomprops who I believe was mould making for STEVE NEISEN at Nice-N Model Designs, but it was a very painful purchase, communication was poor, took forever to deliver and ended up being my second most expensive model kit at initial purchase of £583.10 + £159.08 import charges = £742.18 STAY WELL CLEAR!Oh, It looked ok by itself. I would not say it is so off. May I ask who produced the studioscale kit?
Last edited:
I know Niesen had this delivery problems. The price puted me off to purchase some of studio scale star wars models. Finaly I decided to make my own detailed models from paper in half the scale (1:48) for space reasons. But with all possible details of Studi Scale models. It is much more fun for me than "just asseble" finished model.
Good on ya...yes the average price of a sci-fi kit always seems to be more than any other kits! I paid for this kit only on the say-so of another modeller who recommended the supplier. It was a grail kit for me, so I dived into savings for it...don't get me wrong, its a fabulous model, but the whole deal was so off!I know Niesen had this delivery problems. The price puted me off to purchase some of studio scale star wars models. Finaly I decided to make my own detailed models from paper in half the scale (1:48) for space reasons. But with all possible details of Studi Scale models. It is much more fun for me than "just asseble" finished model.
Paper modelling is my first love for now, cheap, almost instant results and the satisfaction of having to create parts from flat pictures is miraculous!
...and this site is a blessing too, so much love and help, rather than all the bitching which goes on elsewhere
Last edited:
Carrying on with the BTL this week, a few small bits and pieces done...which are as follows...
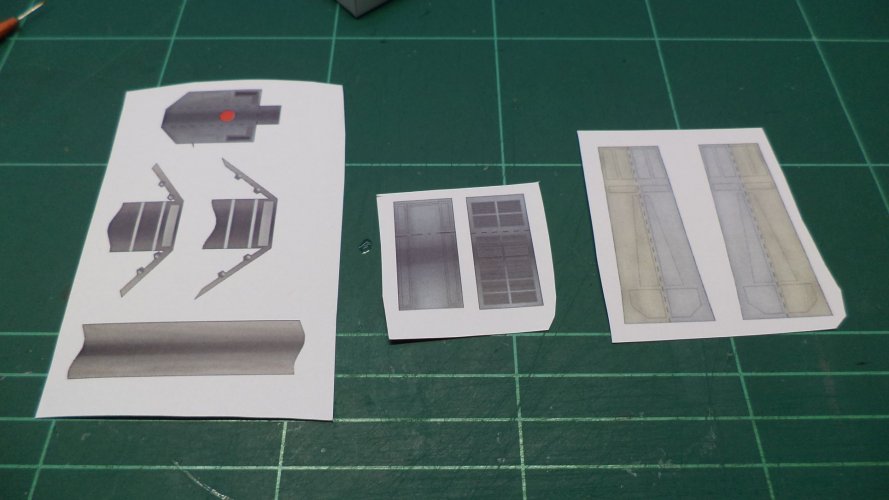
Front undercarriage parts here and gear door flaps
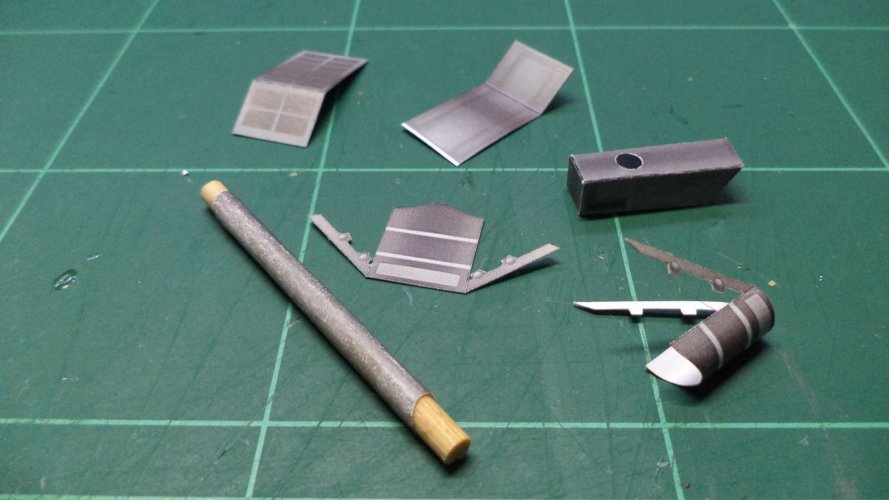
Main front skid formed and wooden dowel inserted for strength
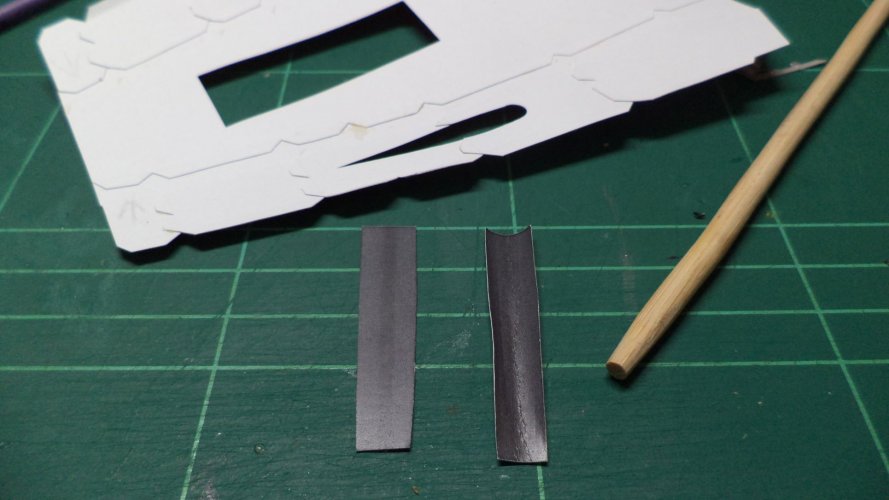
Whilst the gear was being constructed, some half pipes were formed to be added over the bottom cannon/photon/proton launchers
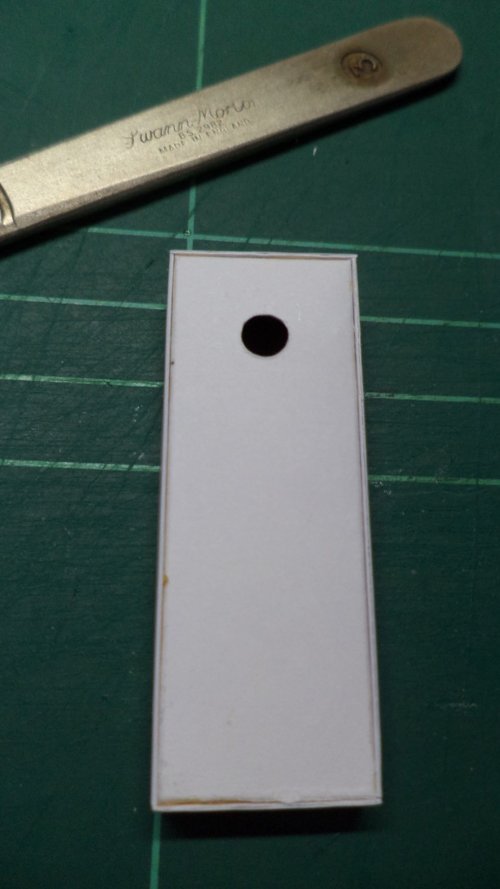
Gear-well constructed, but the sides were flimsy, so I added some doubled up stock to strengthen and straighten them.
Gear-well and half-pipes installed into the bottom of the nose section

Top nose section added to internal frame structure, ready to accept the bottom half.
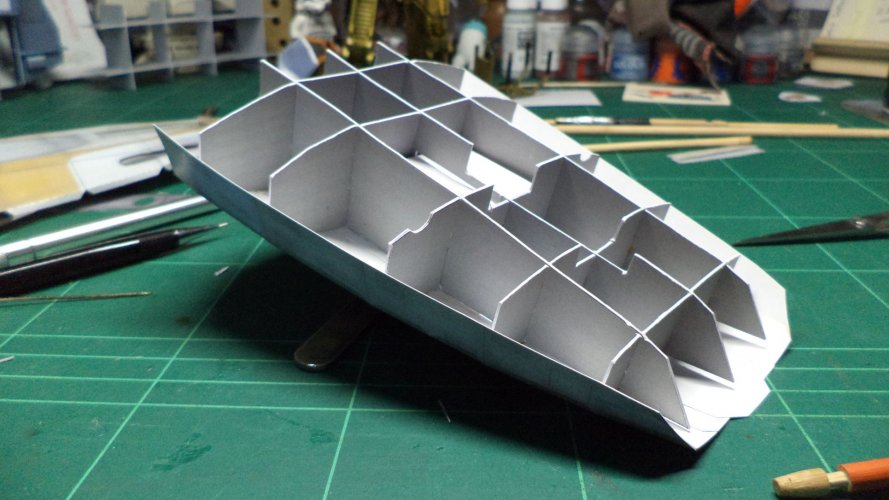
I'm going slow on the bottom at one tab a day - so I can get maximum glue strength on each tab.
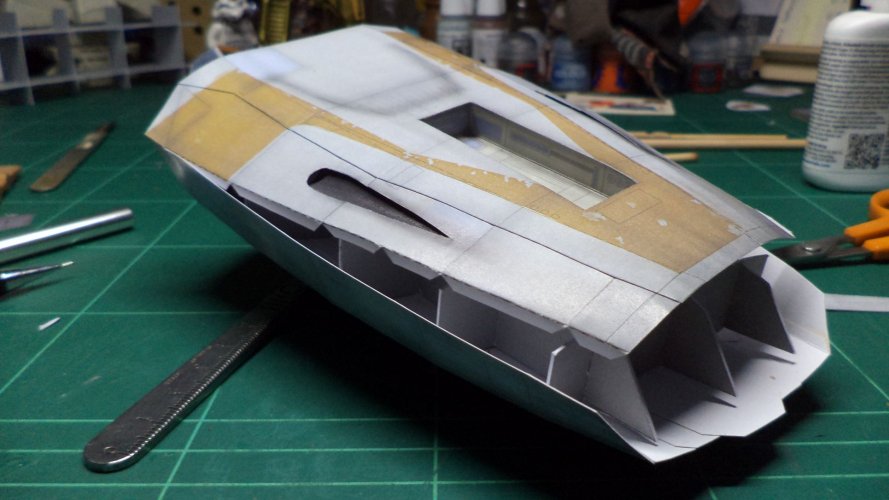
Moving backwards from the nose section, parts for the mid-section have been reprinted onto new stock, ready for action!
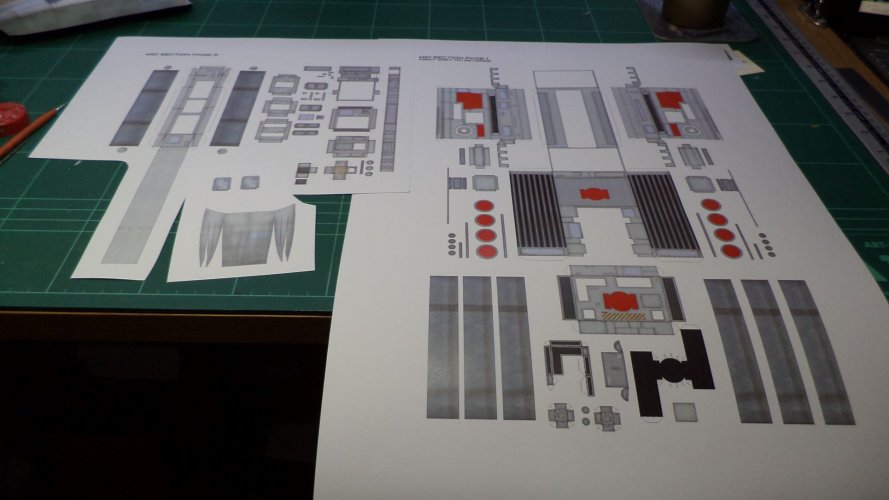
Lots of little squares and greeble action to contend with here...
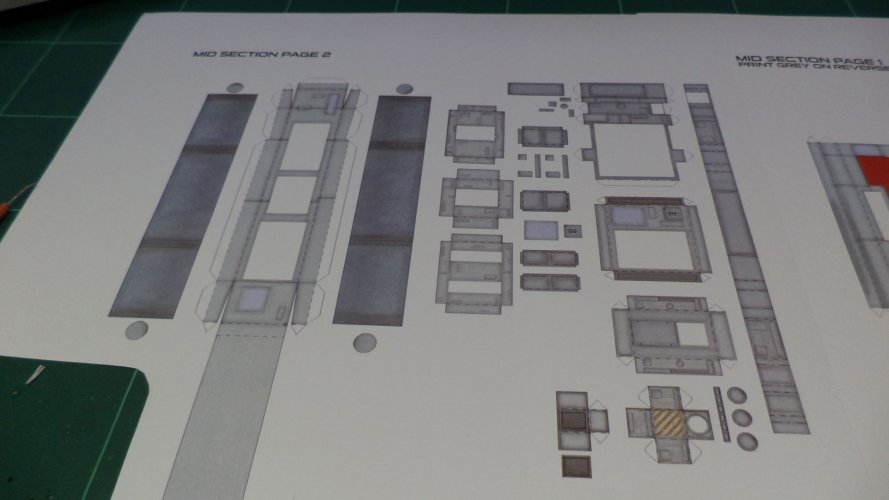
These parts follow the nose section underneath to the mid-section. Two large pipes formed again over some bamboo rods from my stock.
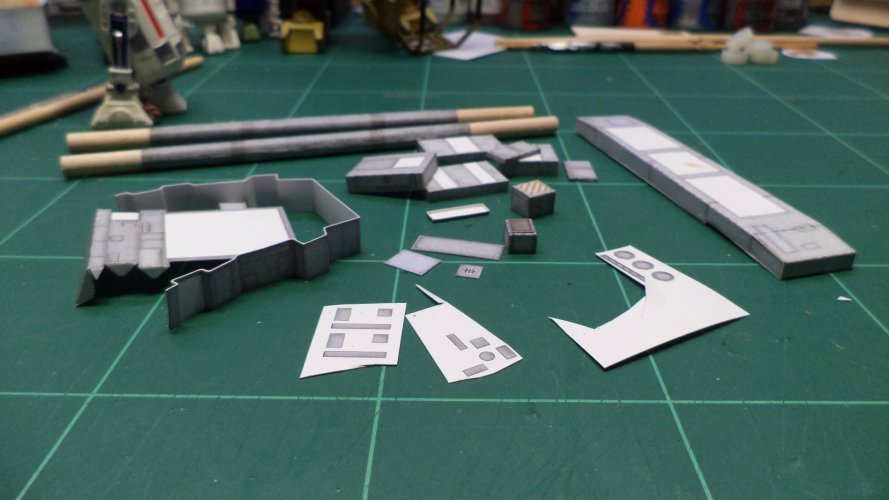
This was a fun section to construct. Lots of castellations to deal with, but the part fitted like a dream - tiny nicks were made on the triangulated tabs for a snug seated fit
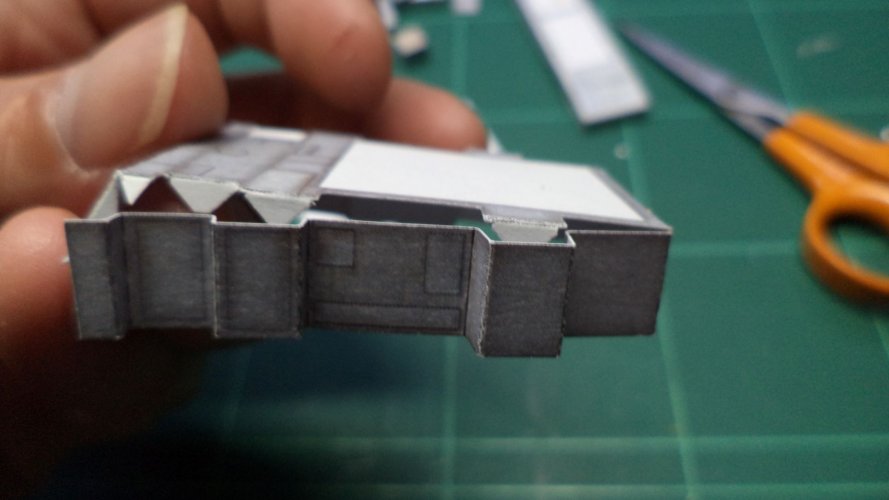
Constructed parts so far for the mid-section bottom and a couple of the top parts started
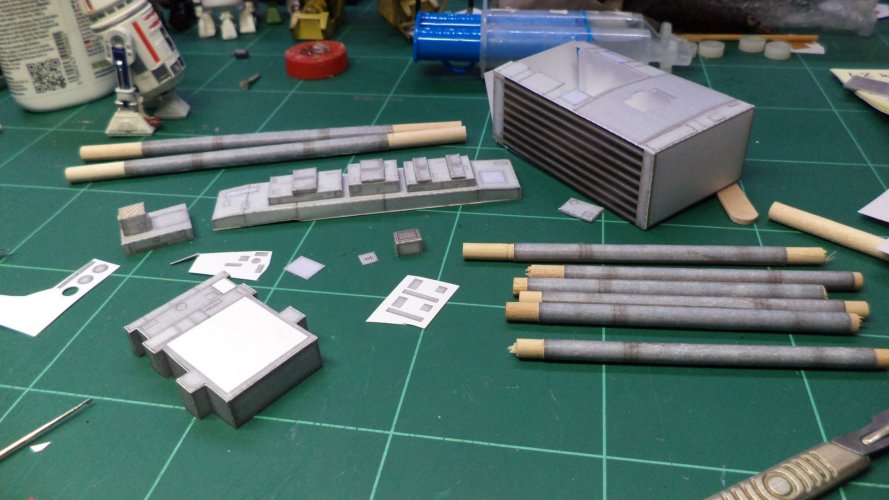
Well, lots of little parts constructed and a few sub-assemblies made, slow and tedious...just how I like it!
Also a bit of head scratching and viewing of the computer graphics/3d model to see where most of these go and their orientation and relation to each other was needed.
I'm really glad too that I kept all those little bamboo and wooden rods from various meals out..burger sticks, meat skewers etc..have at last all become useful!
My partner always stashes these away for me in her handbag, knowing I'll find a use for them...somewhere
Front undercarriage parts here and gear door flaps

Main front skid formed and wooden dowel inserted for strength

Whilst the gear was being constructed, some half pipes were formed to be added over the bottom cannon/photon/proton launchers

Gear-well constructed, but the sides were flimsy, so I added some doubled up stock to strengthen and straighten them.

Gear-well and half-pipes installed into the bottom of the nose section

Top nose section added to internal frame structure, ready to accept the bottom half.

I'm going slow on the bottom at one tab a day - so I can get maximum glue strength on each tab.

Moving backwards from the nose section, parts for the mid-section have been reprinted onto new stock, ready for action!

Lots of little squares and greeble action to contend with here...

These parts follow the nose section underneath to the mid-section. Two large pipes formed again over some bamboo rods from my stock.

This was a fun section to construct. Lots of castellations to deal with, but the part fitted like a dream - tiny nicks were made on the triangulated tabs for a snug seated fit

Constructed parts so far for the mid-section bottom and a couple of the top parts started

Well, lots of little parts constructed and a few sub-assemblies made, slow and tedious...just how I like it!
Also a bit of head scratching and viewing of the computer graphics/3d model to see where most of these go and their orientation and relation to each other was needed.
I'm really glad too that I kept all those little bamboo and wooden rods from various meals out..burger sticks, meat skewers etc..have at last all become useful!
My partner always stashes these away for me in her handbag, knowing I'll find a use for them...somewhere

Last edited:
Despite it being hotter than hell currently in the UK, I braved the back room to crack on with the 'Y'
A few little wins were had, but there was trouble ahead...
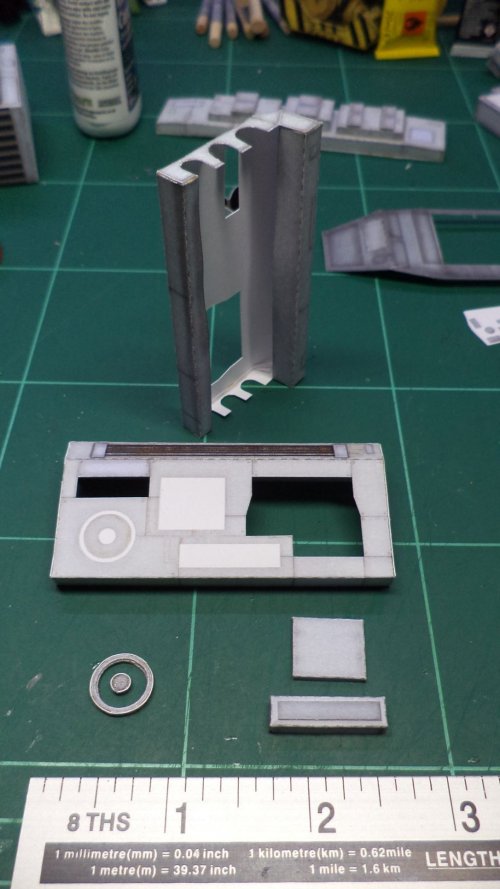
Side pods had two circular add-ons, which were laminated out of multiple layers, unfortunately the circular part was too large for the outer band.
Not really much fun cutting through three layers on tiny round bits! The red circle is what the size should have been.
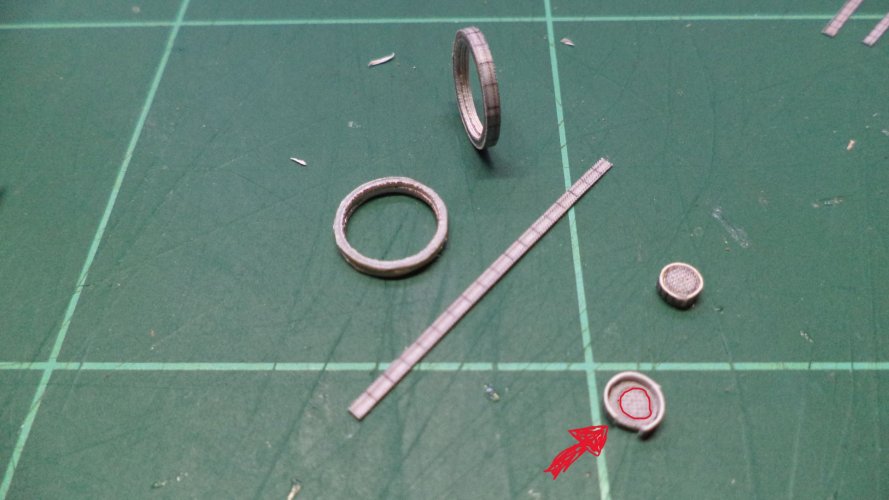
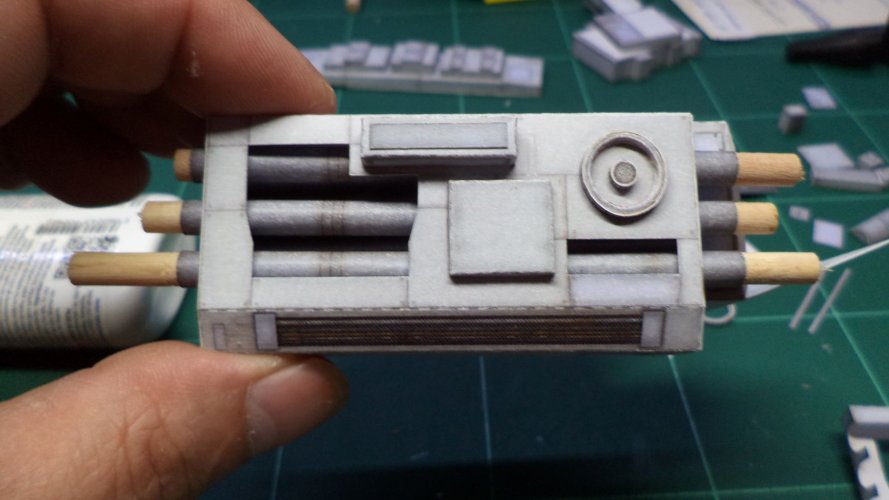
With the round parts cut and other greeblies found, it was time to add them.
Grebblies added and tubes dry fitted to check the look.
Now the head started to itch as to where this little blighter needed to go, as it appeared to be the wrong shape to fit the blank?
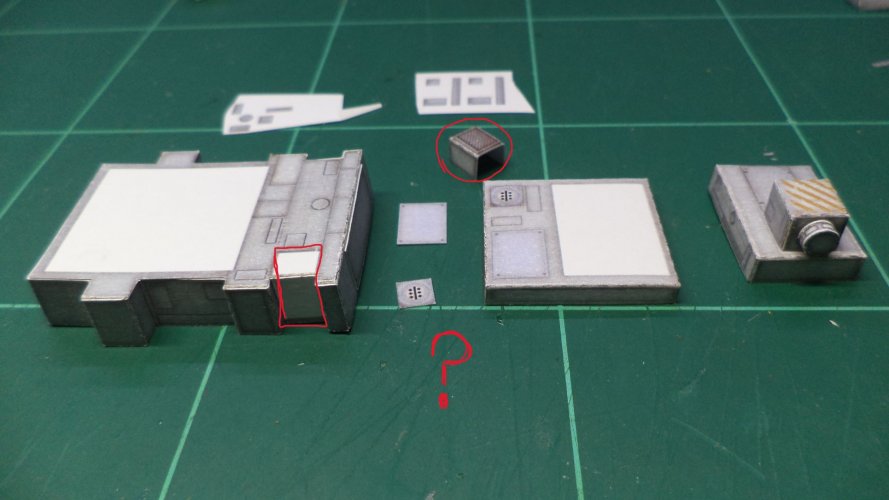
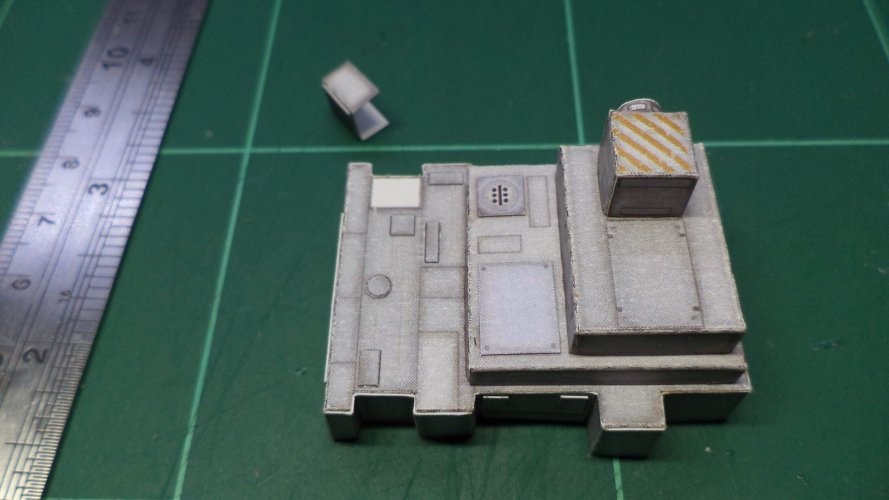
A view of the CGI model shows it might go here, so that's where I'll shove it...but wait!
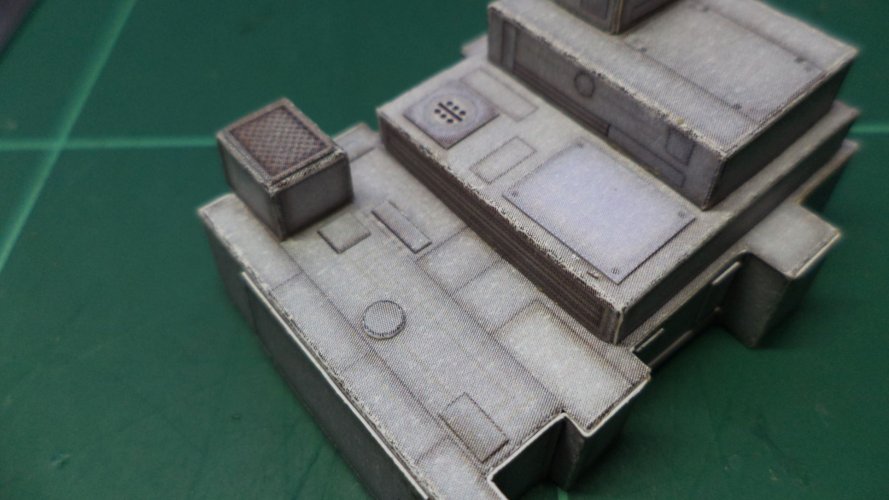
A dry fit of the internal bracing did not look right. The internal parts were sticking up too high, making it impossible to add the greeble to the spot.
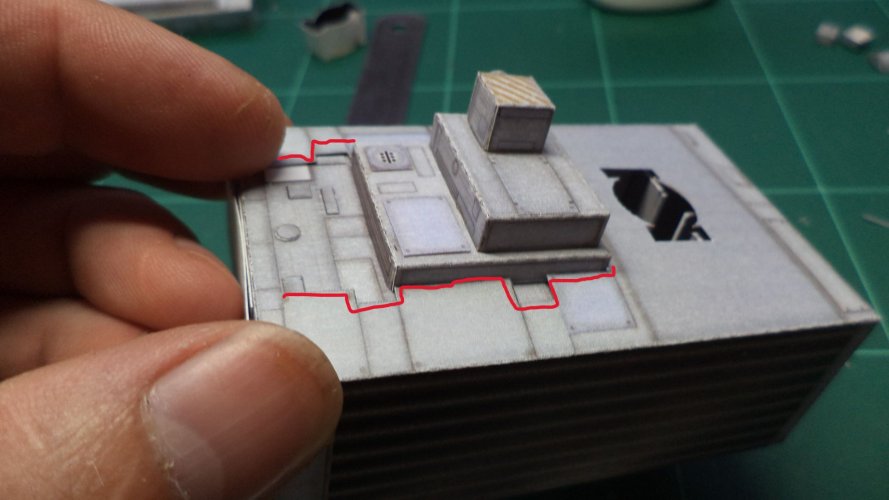
Circled is the possible add-on, and the shadows showing the whole affair needs to be lower.
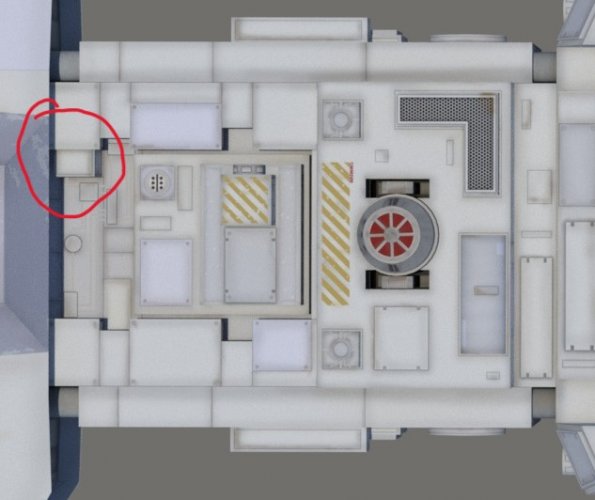
Another shot showing the assembly recess shadows and a sunken look

With the assembly on the internal structure, you can now clearly see the height discrepancy - a few choice words were shouted, then I calmed down.
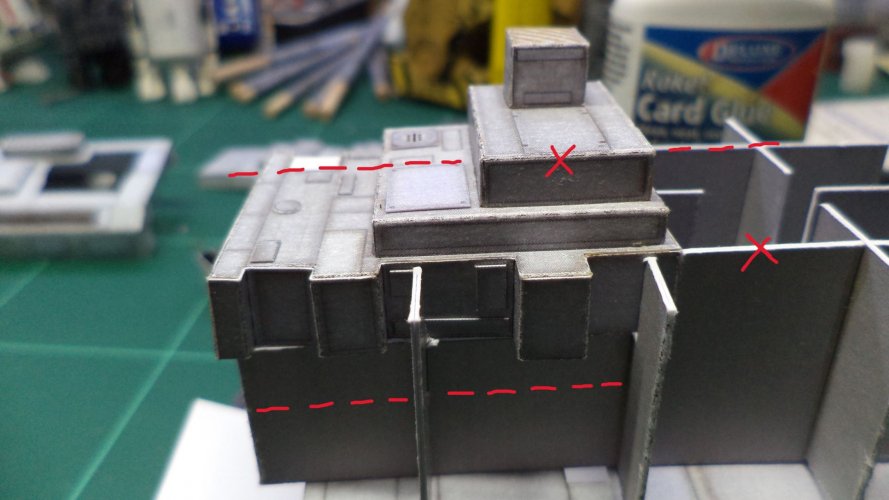
Right then, as I had already glued these parts together I was in for chopping-out! 10mm was the order. so a few lines were drawn and battle commenced
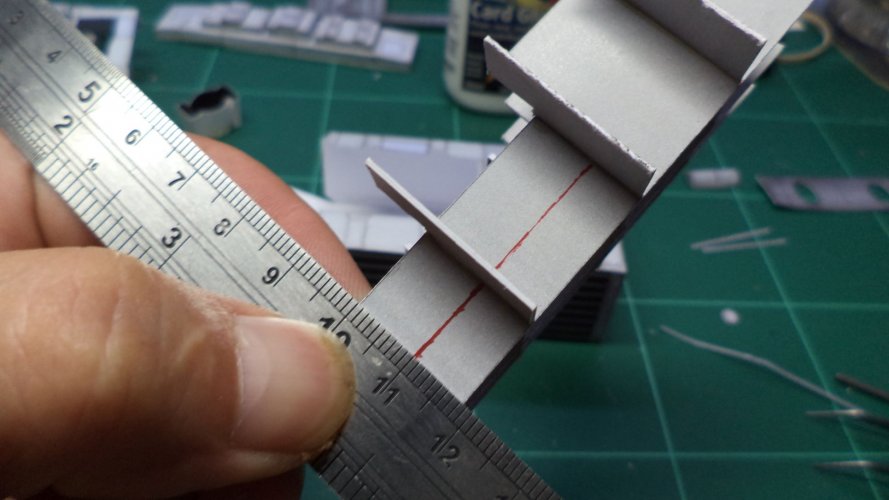
A right bloody mess was made, curse words aplenty, but the chosen depth was reached

Sitting snuggly into the 'hacked' structure
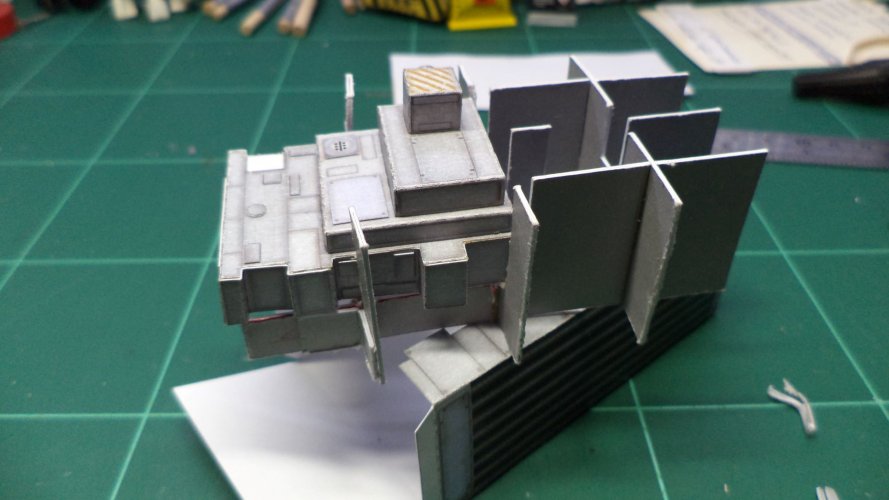
The assembly now sits at the correct height
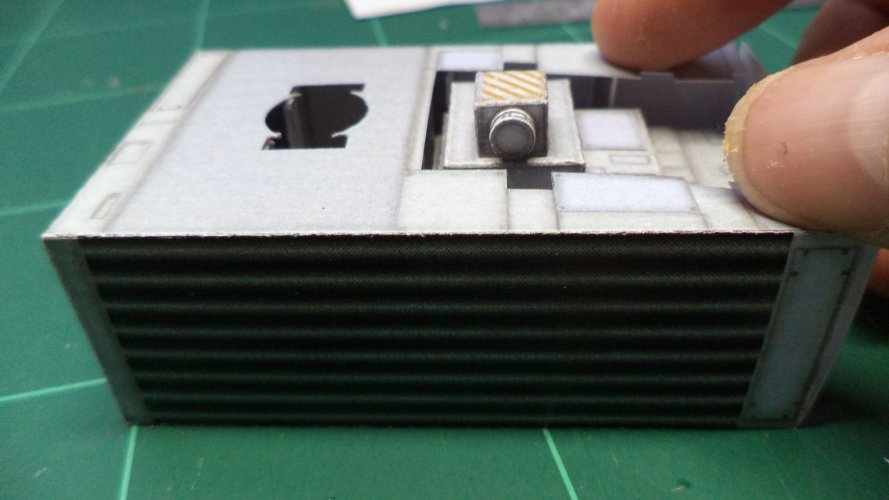
In closing on this escapade, I was ready to give the kit up...all that chopping of the internals was a frustrating set-back and has now weakened that part and I won't be happy with it!
The ribbing will have to be re-printed and sorted to accommodate the structural weakness, also some kind of gubbins will have to be put into the voids which are now showing up either side of the sunken part, more work than I was hoping for...
perhaps all those miss-prints I had a few weeks ago might just come in handy after all?
A few little wins were had, but there was trouble ahead...
Side pods had two circular add-ons, which were laminated out of multiple layers, unfortunately the circular part was too large for the outer band.
Not really much fun cutting through three layers on tiny round bits! The red circle is what the size should have been.

With the round parts cut and other greeblies found, it was time to add them.

Grebblies added and tubes dry fitted to check the look.

Now the head started to itch as to where this little blighter needed to go, as it appeared to be the wrong shape to fit the blank?


A view of the CGI model shows it might go here, so that's where I'll shove it...but wait!

A dry fit of the internal bracing did not look right. The internal parts were sticking up too high, making it impossible to add the greeble to the spot.

Circled is the possible add-on, and the shadows showing the whole affair needs to be lower.

Another shot showing the assembly recess shadows and a sunken look

With the assembly on the internal structure, you can now clearly see the height discrepancy - a few choice words were shouted, then I calmed down.

Right then, as I had already glued these parts together I was in for chopping-out! 10mm was the order. so a few lines were drawn and battle commenced

A right bloody mess was made, curse words aplenty, but the chosen depth was reached

Sitting snuggly into the 'hacked' structure

The assembly now sits at the correct height

In closing on this escapade, I was ready to give the kit up...all that chopping of the internals was a frustrating set-back and has now weakened that part and I won't be happy with it!
The ribbing will have to be re-printed and sorted to accommodate the structural weakness, also some kind of gubbins will have to be put into the voids which are now showing up either side of the sunken part, more work than I was hoping for...
perhaps all those miss-prints I had a few weeks ago might just come in handy after all?
Last edited:
Thanks for the boost of encouragement mijob - means a lot, onwards and upwardsKeep on going your are doing a great job with all your bug fixing.

Last edited:
- Apr 5, 2013
- 13,891
- 10,252
- 228
This is coming out extremely nice. The frame work inside will keep that model in shape for decades. The paper piece looks more realistic than the plastic ones. You will notice this more and more as you get into paper models. Generally speaking, I use 110 lb. and 67 lb. card stock for almost everything. 
Cheers buddy,
"by Grabthar's hammer!" I'll finish her...or do it in with a hammer! yes when everything goes together they look great, just when there's lazy production and no instructions is can get very frustrating...
Currently on new 67lb-180g stock and its working nicely, some delamination on tiny parts, but not much
"
Last edited:
Great decision to carry on. It is part of papermodeling to solve this kind of troubles with free papermodels. I know this feeling, I encountered it manytimes.
Lazy production, maybe. But you must understand that designer made this model for himself. He published it only on the demand of people that liked his creation. That is why there are no instructions. He states that model will need some modification to fit. Instructions would be great but making them takes lots of additional time, designer did not want to invest, and I understand it.
That is why your build thread will be goldmine of information and "mustread" for future builders.
All humbly noted, I do tend to be overly critical sometimes and no disrespect is meant towards the designer Stephen - to which he does note all the maladies you will expect along the way.Great decision to carry on. It is part of papermodeling to solve this kind of troubles with free papermodels. I know this feeling, I encountered it manytimes.
Lazy production, maybe. But you must understand that designer made this model for himself. He published it only on the demand of people that liked his creation. That is why there are no instructions. He states that model will need some modification to fit. Instructions would be great but making them takes lots of additional time, designer did not want to invest, and I understand it.
That is why your build thread will be goldmine of information and "mustread" for future builders.
I absolutely love the fact he produced this at all, my favourite ship by far and designed 100% better than I could.
I have been spoilt with all my builds so far - thus this particular model is testing my metal, mental and modelling skills to new limits - being a bit more respectful in future for something that is gratis, I bow to thee...
Last edited:
It takes a lot of time to write a good building instruction. You have tobe sure not to forget a step in the instruction. So I cam understand why some builders dont make a instruction. In my opinion the creator of a model needs to make a instruction.
All humbly noted, I do tend to be overly critical sometimes and no disrespect is meant towards the designer Stephen - to which he does note all the maladies you will expect along the way.
I absolutely love the fact he produced this at all, my favourite ship by far and designed 100% better than I could.
I have been spoilt with all my builds so far - thus this particular model is testing my metal, mental and modelling skills to new limits - being a bit more respectful in future for something that is gratis, I bow to thee...
I can fully understand you. The Aston Martin I'm building at the moment is driving me nuts and yesterday I had someIt takes a lot of time to write a good building instruction. You have tobe sure not to forget a step in the instruction. So I cam understand why some builders dont make a instruction. In my opinion the creator of a model needs to make a instruction.


 moments. The model itself is beautiful but the instructions are an absolute disaster. I don't blame anything to anyone, even a few instructions are better than none at all, but if they are misleading or incomplete something has got lost "in translation" and it makes for a very frustrating building experience.
I can fully understand you. The Aston Martin I'm building at the moment is driving me nuts and yesterday I had somemoments. The model itself is beautiful but the instructions are an absolute disaster. I don't blame anything to anyone, even a few instructions are better than none at all, but if they are misleading or incomplete something has got lost "in translation" and it makes for a very frustrating building experience.
Full credit for you taking the DB5 on in the first place, all those curves would 'drive' me potty! ...just one slip in the wrong direction does makes you want to bash your nugget against the wall - or a Platoon knee drop shaking those fists skywards
Last edited:
Thank you!  The curves are relatively easy. It is mostly the lack of placement marks, flaps, numbered assembly steps and missing parts I'm dealing with. If those things had been sorted out, the kit would have been perfect. In addition, the wheels are somewhat overdesigned. I spent a few days cutting and assembling (BLIND AGAIN!) but you don't see any of that work on the finished model. Yesterday evening I saw that the rear mirror was not included. Of course I found that out AFTER I had installed the cabin...

Last edited:


