Warhound Titan challenge
- Thread starter Resurrected Hobbyist
- Start date
You are using an out of date browser. It may not display this or other websites correctly.
You should upgrade or use an alternative browser.
You should upgrade or use an alternative browser.
The Titan continues to take shape! Now I'm working on the main body.

As you can see I've got the Mesh covering that I made previously mounted atop the central body. The right power plant and shoulder wing have been assembled. I added additional details to the back of the power plant with a vent cover and access hatch. The Access hatch is just a straight forward cut and paste part. Nothing really notable. Though I did use a mini-hole punch to punch out small discs and glued them down on the corners of the hatch.
No, the vent cover is the more note worthy part. Like the mesh covering, I wanted to build it from scratch. I wasn't sure how to do that initially, but I thought on it and I broke it down into smaller parts.
Obviously the first thing I needed was a backing. Something to be the size of the vent. So I went into photoshop, pulled the template up and measured out a space 2mm in from the edges of the panel where the vent would go. That gave me this piece:

The next thing I needed was a series of slanted slates. This was a bit trickier but I hit on the idea of making a series of 3mm stripes and stagger them so that the lower 1.5mm of the strip would be on top of the upper 1.5mm of the strip below it.
So I started with one strip:

And then I started gluing down each successive strip, until I had covered the entirety of the base plate:

Now I needed a cover frame. So I took the original base plate and measured out a space that was 1mm in from it's edge and cut that space out giving me a frame. I then used white glue to attach this over top of the slats.

Once that dried I trimmed the excess from the slates. It was a bit sloppy and I wanted to clean it up. So I ran a strip of paper around the edge of the entire assembly. All of that resulted in this:


As you can see I've got the Mesh covering that I made previously mounted atop the central body. The right power plant and shoulder wing have been assembled. I added additional details to the back of the power plant with a vent cover and access hatch. The Access hatch is just a straight forward cut and paste part. Nothing really notable. Though I did use a mini-hole punch to punch out small discs and glued them down on the corners of the hatch.
No, the vent cover is the more note worthy part. Like the mesh covering, I wanted to build it from scratch. I wasn't sure how to do that initially, but I thought on it and I broke it down into smaller parts.
Obviously the first thing I needed was a backing. Something to be the size of the vent. So I went into photoshop, pulled the template up and measured out a space 2mm in from the edges of the panel where the vent would go. That gave me this piece:

The next thing I needed was a series of slanted slates. This was a bit trickier but I hit on the idea of making a series of 3mm stripes and stagger them so that the lower 1.5mm of the strip would be on top of the upper 1.5mm of the strip below it.
So I started with one strip:

And then I started gluing down each successive strip, until I had covered the entirety of the base plate:

Now I needed a cover frame. So I took the original base plate and measured out a space that was 1mm in from it's edge and cut that space out giving me a frame. I then used white glue to attach this over top of the slats.

Once that dried I trimmed the excess from the slates. It was a bit sloppy and I wanted to clean it up. So I ran a strip of paper around the edge of the entire assembly. All of that resulted in this:

Last edited:
This is fantastic! I have always loved Warhammer 40K stuff, there is just something about the mechs...
I have used the same technique for making louvered vents for many models. You are doing a GREAT JOB!
So name of the day is guns. Well one gun. Well okay half a gun. Um well one of the 2 barrels of the gun... 'cept it's 5 barrels of the total of 10... anyway. I'm working on the Vulcan Mega-bolter. Specifically the barrels for it.

I used a process similar to the pistons to make these barrels. 6.5" of paper glued to a Q-tip body and then wrapped up with layers of glue between each wrap. I then had to make a cover to bring the details. So I did some numbers, and made some parts in Photoshop. I had to adjust the numbers and re-make the parts a couple times but ultimately it worked out.

I mounted the barrels on a disc of cardboard. Punching holes gave me a place to pass the Q-tip bodies through which give the mounting more security.

You can't see it, but I used the remains of my development barrel as a spacer in between the 5 main barrels.

A wrap around on the barrels for a heat sheath.

I used a process similar to the pistons to make these barrels. 6.5" of paper glued to a Q-tip body and then wrapped up with layers of glue between each wrap. I then had to make a cover to bring the details. So I did some numbers, and made some parts in Photoshop. I had to adjust the numbers and re-make the parts a couple times but ultimately it worked out.

I mounted the barrels on a disc of cardboard. Punching holes gave me a place to pass the Q-tip bodies through which give the mounting more security.

You can't see it, but I used the remains of my development barrel as a spacer in between the 5 main barrels.

A wrap around on the barrels for a heat sheath.
Last edited:
So we're talking about joints. No not that those kinds of joints! Specifically the shoulder joint on the war hound where you mount weapons! As I previously stated this turned into a challenge to see just how far I can go with just paper and the like. Now I could just make a box or barrel and glue the weapon to that and then that to the shoulder, buuuut I want to be able to swap weapons. the local groups have been talking about doing a large tyranid enemy campaign and the idea of Twin inferno canons sounds just sooo nice for that sort of party. So my first thought was to use a length of PVC piping and a twist joint. But I want to try and do everything with paper and cardboard. So that wasn't an option. So what was I to do? Well I was looking at another cardboard model I had done some time ago when I was looking at the main turret mount. The turret mount on the Baneblade is a large drum loaded with reinforcement. Once the glue all dried it's very rigid and solid, with a strength approaching plastic. So why couldn't I build the twist joint out of paper? Well that's what I did.

The shoulder joint for mounting the weapons. This is actually 3 parts jointed together. The first part is the larger segment closer to my hand. It's 20mm deep, and nothing but rolled paper saturated in white glue. The second part is the 2 half rings closer to the camera. It's the same as the first segment, just 5mm deep instead of 20mm and had segments cut out of it. The final part is the sheath along the outside that actually builds everything into a single component.

This is the mount that is going on the weapon body itself that will go into side the shoulder joint.

This is the entire shoulder joint assembled.
So what is this joint for? Well for the one weapon I have to work with at this moment of course!

The Vulcan Mega-bolter!

I liked the exposed ammo in design. For the ammunition in the hopper, I used lengths of Q-tip body cut to length and glued into place.

The shoulder joint for mounting the weapons. This is actually 3 parts jointed together. The first part is the larger segment closer to my hand. It's 20mm deep, and nothing but rolled paper saturated in white glue. The second part is the 2 half rings closer to the camera. It's the same as the first segment, just 5mm deep instead of 20mm and had segments cut out of it. The final part is the sheath along the outside that actually builds everything into a single component.

This is the mount that is going on the weapon body itself that will go into side the shoulder joint.

This is the entire shoulder joint assembled.
So what is this joint for? Well for the one weapon I have to work with at this moment of course!

The Vulcan Mega-bolter!

I liked the exposed ammo in design. For the ammunition in the hopper, I used lengths of Q-tip body cut to length and glued into place.
Last edited:
With the conclusion of my live stream tonight I have some updates on the titan. Well a part of the titan. Well a piece of one part of the titan. I mostly finished one barrel of the turbo laser!

I made a rather large mistake with the barrel, or rather the forward section of it.the inner section of the barrel was supposed to be about half as thick as it is going from the largest outer diameter (the one in cardboard) down to a middle down to the smallest at the tip of the barrel. But I messed up and cut the wrong size. Oh well. This is where I say "I meant to do that!"


If I'm honest, the main body for the turbo laser is rather boring looking. So I've opted to design a new body using the Plasma blast gun main body as the basis. This is the beginning of that effort. the port connectors on the side are the biggest point to talk about. What I did was first I made a series of 4 copies of the side of the body and I cut out the space for the connectors on 3 of them. I then glued all 4 sections together. I used a 1/4" hole punch to punch out discs of cardboard and then glued those to a sheet of card stock. Left them to dry for about half an hour then I went in with a 1/6" hole punch and punched out holes in each of the discs. Coming back with the 1/4" punch I then... well punched out the connectors. Little but of white glue and there we go.

I made a rather large mistake with the barrel, or rather the forward section of it.the inner section of the barrel was supposed to be about half as thick as it is going from the largest outer diameter (the one in cardboard) down to a middle down to the smallest at the tip of the barrel. But I messed up and cut the wrong size. Oh well. This is where I say "I meant to do that!"


If I'm honest, the main body for the turbo laser is rather boring looking. So I've opted to design a new body using the Plasma blast gun main body as the basis. This is the beginning of that effort. the port connectors on the side are the biggest point to talk about. What I did was first I made a series of 4 copies of the side of the body and I cut out the space for the connectors on 3 of them. I then glued all 4 sections together. I used a 1/4" hole punch to punch out discs of cardboard and then glued those to a sheet of card stock. Left them to dry for about half an hour then I went in with a 1/6" hole punch and punched out holes in each of the discs. Coming back with the 1/4" punch I then... well punched out the connectors. Little but of white glue and there we go.
Last edited:
Hey all, gonna be doing a live stream today starting at 4PM est and going till 10pm est where I will be working on the War hound. So if you want to swing by and say hi, or check out how I'm working on this project or just hang out and listing to the music, come check it out at https://www.twitch.tv/resurrectedhobbyist


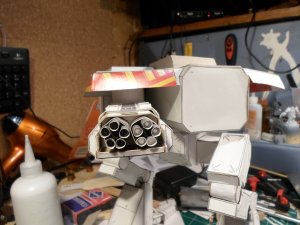
"I am authorized to use lethal force!"
During the stream tonight I finished work on the vulvan mega-bolter!
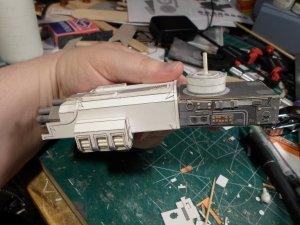
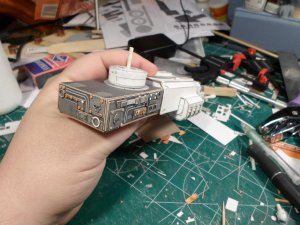
So now the beast has 2 weapons it can use:
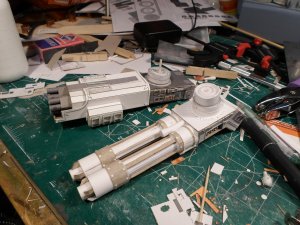
One thing I've discovered, and by discovered I mean I've never heard anyone mention this before: the location of the mounting point for the weapons is very close to the main body. Like almost too close to be viable:
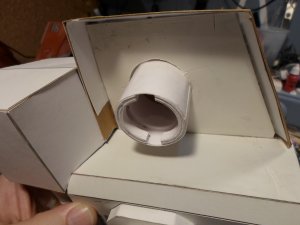
When I do the mark... whatever... mark 4.0 I guess I'll call it, I'm definitely situating the mounting joint further out from the body.
Fantastic work so far! I love your detailed descriptions. You really invite the audience to participate. 
Fantastic work so far! I love your detailed descriptions. You really invite the audience to participate.
It's the primary effort to a project like this. I started my blog (and then my facebook page, Twitter, Twitch stream, Instagram, pinterest) as a means to encourage in the hobby, as well as inviting critique on my own work. If I get more people involved, that just furthers the effort.
These weapons look FANTASTIC! I really like the greebling that you put into them! You are doing a GREAT JOB!!!
These weapons look FANTASTIC! I really like the greebling that you put into them! You are doing a GREAT JOB!!!
and cue 10 degrees of Wikipedia....
- Apr 5, 2013
- 13,876
- 10,215
- 228
Most Warhammer stuff doesn't really make sense, but it looks neat. There is no provision for reloading those weapons either, but don't let reality get in the way of fun and fantasy. 
Hey all, gonna be doing a live stream today starting at 5PM est and going till 9pm est where I will be working on some manner of paper-crafting. Probably a Land Speeder. So if you want to swing by and say hi, or check out how I'm working on this project or just hang out and listing to the music, come check it out at https://www.twitch.tv/resurrectedhobbyist

