

I couple months ago my club decided to change part of the mountain area a bit and that involved building a new, shorter trestle. I was the one nominated to build it. I did alot of research into the real thing so it would look as convincing as possible. Last year RMC did a story on trestle building which was invaluable as well I attended a clinic at a MR meet last spring that gave me alot of info as well. While I was at it I needed one trestle bent for my own layout so I built it while I built the others. I took a few pictures as I built so here they are:

Here's a completed trestle bent. I drew the plans for it on the peice of paper and pinned the plan onto a piece of blue insulation foam along with a sheet of wax paper on top of it. As I added wood parts to the bent I pined them in place on the plan so I would end up with bents with equal lengths. I needed 6 bents to buld the 70 foot trestle. This as actually the bent that I built for my layout. Below it is the footing that I built at the same time.

This isn't a very good picture but it does show how the stingers and crossbracing go. There is alot more structure in a real trestle than I see modelers add in their own. I page through older MR magazines and see most of the trestles leave out the crassbracing which in real life would make the trestle fold over like a deck of cards.

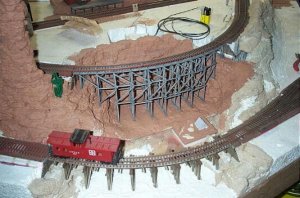
This is the completed trestle on the club layout. It was also built on a curve which made assembly difficult. I had to pin the top stingers together and laminate them out of two strips so they would hold the cuvature. Then I glued the bents on, assembling the trestle upside down. You can't see in this picture but I 'faked' hardware buy using a fine tipped felt pen.
Finally be perpared to buy a large amount of stripwood when bulding these. This 70 foot trestle (scale feet) ate up almnost 40 (real feet) of lumber.
Here's a completed trestle bent. I drew the plans for it on the peice of paper and pinned the plan onto a piece of blue insulation foam along with a sheet of wax paper on top of it. As I added wood parts to the bent I pined them in place on the plan so I would end up with bents with equal lengths. I needed 6 bents to buld the 70 foot trestle. This as actually the bent that I built for my layout. Below it is the footing that I built at the same time.
This isn't a very good picture but it does show how the stingers and crossbracing go. There is alot more structure in a real trestle than I see modelers add in their own. I page through older MR magazines and see most of the trestles leave out the crassbracing which in real life would make the trestle fold over like a deck of cards.
This is the completed trestle on the club layout. It was also built on a curve which made assembly difficult. I had to pin the top stingers together and laminate them out of two strips so they would hold the cuvature. Then I glued the bents on, assembling the trestle upside down. You can't see in this picture but I 'faked' hardware buy using a fine tipped felt pen.
Finally be perpared to buy a large amount of stripwood when bulding these. This 70 foot trestle (scale feet) ate up almnost 40 (real feet) of lumber.


")