Thunderbird 3

Sky Seeker

Well Established Member
Jun 1, 2015
1,251
1,282
95
Everyone,

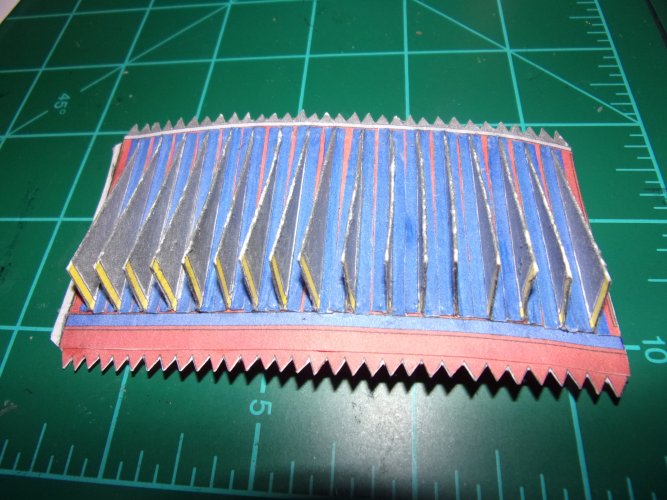
It's been a while since I posted here. Been a bit busy with home / work / volunteering in various community projects. Recently a friend of mine and I got into a conversation about how when he was younger he had a whole collection of the Thunderbird toys from the late 60's / early 70's. However, one day he came back home from college and found that his whole collection of toys from the era disappeared from his room! Remembering this I looked at the collection of templates and thought I'd maybe give him a gift of cardstock. The templates I had were Thunderbirds 1-4. Of the models Thunderbird 3 looked like a great candidate. However, the template that I had for that one had NO DIRECTIONS, NO NUMBERS NOTHING! I did find a couple of pics to work off of, but that's it

The template I'm working off of is Hiro's Design of Thunderbird 3.
1741469416060.jpeg
So here we are


1741469801634.png
Sky Seeker
 
In doing this model I'm going to have scans of the template in jpeg form then have explanations of the pieces as assembly is done.

1741470354950.jpeg

page 1

1741473226174.jpeg
The area circled in gold called nose cone part 1 - will be done first. Please notice the blue circle areas with arrows. The arrows indicate which parts go together.
1741473695901.jpeg
Nose cone templates cut out.

1741473877514.jpeg

Nose cone - note the top cone and other templates. All tabs have been cut and glued in place.


1741473973481.jpeg

Nose cone - top cone and other templates. Note the slight curl on some of the templates. Just hold one end with one hand and trace your thumb from one side to the other to create a curl. This allows for the ends to eventually be brought together.

1741474148347.jpeg

Nose cone - note top cone mounted on top of a mid section.

1741474293575.jpeg

Nose cone - note top cone and other section ends joined together. Note also the areas near when the bodies joined together are penciled in to avoid the glare of the white portions. The tab on the bottom will be used to join with the next section of Thunderbird 3.

1741474561938.jpeg

Nose cone - note the penciled in areas. Also - note the lining up of the letters to form "thunder" along one side.

1741474713308.jpeg

Nose cone - assembled

That's it for now!:)

Sky Seeker
 
Middle section
1741477620549.jpeg

1741477642070.jpeg
Note the holes cut out in the middle section for wings and the top having the templates for the ring.
Ring
1741477723180.jpeg

1741477775526.jpeg
Coloring the center strip with a silver marker. The marked portion looks brighter in strong light. Note the use of a straight piece of card stock to color the edges in the desired areas.

1741478207782.jpeg

1741478216841.jpeg
1741478264865.jpeg
Note the coloring of the edges with a silver marker.

1741478306123.jpeg
1741478331026.jpeg
Ring - done
Sky Seeker
 
It appears that you are off to a great start with this project. I am looking forward to seeing how this turns out.

Just an FYI, in the RESOURCE SECTION, There is a category for Thunderbirds that has all five the the Thunderbirds vehicles (made by Gary Pilsworth)
Rhaven,

Thanks for the heads up!:) Will check it out. At least this will give future builders other options in building this great model. Good series as well. Lots of detail for a "kids show".

Sky Seeker
 
1741569005327.jpeg
intermediate fuselage section - circled in yellow

1741569129290.jpeg

intermediate fuselage section with rectangles - please note that the rectangles are folded to become triangles. However, the original template was tiny. So the rectangles have been modified to make them bigger. Another reason is that I kept losing the tinier rectangles and they were very hard to work with. See below:
1741569261155.jpeg
Template for rectangles
1741569659056.jpeg
Tabs added to the upper and lower sections of the intermediate fuselage section.
1741569446745.jpeg

The rectangles are folded then applied onto the vertical dashes at the top of the intermediate fuselage section. Be sure to line them up along the red line. The ring is to be positioned on top of the triangles on the white section.

1741569484685.jpeg
Please note that the tab on the left hand side is NOT cut off. Normally tabs are cut to give a flush appearance, however in this case you want the cut sections to line up properly. Note also that the areas near the tabs are colored in pencil to remove glare. I didn't have the right color of red for this one that's why that was done.

1741569949307.jpeg
Intermediate fuselage section rolled together and joined.
1741570029714.jpeg
Note the placement of the triangle at the seam near the top of the intermediate fuselage section.
1741570134220.jpeg
Intermediate fuselage section - ring is added to the top section that had the white area. Feel free to be generous with the glue to reinforce the ring.

That's it for now.


Sky Seeker
 

Attachments

  • 1741569758132.jpeg
    1741569758132.jpeg
    610.1 KB · Views: 1
Last edited:
Rhaven,

Thanks for the heads up!:) Will check it out. At least this will give future builders other options in building this great model. Good series as well. Lots of detail for a "kids show".

Sky Seeker
Rhaven,

Just looked at the resource section. I noticed that there were no copies of Thunderbird 1. I have Hiro's design template only - no directions. Do you want it?

Sky Seeker
 
Last edited:
Intermediate section with fins
1743090500731.jpeg
Intermediate section - tabs assembly - bottom and top tabs glued in place

1743090545014.jpeg

Intermediate section - tabs assembly - bottom and top tabs glued in place
1743090641044.jpeg
Intermediate section - fins - cut - there are 18 fins to cut and assemble!
1743090664466.jpeg

Intermediate section - fins - Decided to color the fins in silver to make it more reflective and make it look like it's assembled out of aluminum or titanium ;)
1743090774157.jpeg

Intermediate section - on the white areas on the edges pencil was used to diminish glare
1743090891319.jpeg

Intermediate section - fins colored - to give you an idea how shiny some of the areas are the areas that look white are actually silver.

1743091060916.jpeg

Intermediate section - fins glued together
1743091112686.jpeg

Intermediate section - fins glued on to Intermediate section. Note that the fins are positioned on the rectangular sections on the model.
1743091137986.jpeg

Intermediate section - most fins glued on - please note that this is done while the main model portion is roughly flat.
1743091284851.jpeg

Intermediate section - most fins glued on and main intermediate section has the ends together to form a cylinder. Note the tab was cut and glued back on to have a smooth outer cylindrical surface - per standard procedure on this forum. All credit goes to ZAthrAs for that.:)
1743091699674.jpeg
Intermediate section - most fins glued on and main intermediate section has the ends together to form a cylinder. Note that the final fin is NOT added yet. After the ends are joined then the final fin can be added.
1743091380740.jpeg

Intermediate section - all fins glued on. The final fin covers the seam of the intermediate section.
1743092010925.jpeg

1743091886385.jpeg
Intermediate section - edges of the fins have glare removed by the silver marker. Stray fibers in previous pictures were smoothed over with the marker.

That's it for now!

Sky Seeker
 

Attachments

  • 1743091269657.jpeg
    1743091269657.jpeg
    535.1 KB · Views: 0
  • 1743090677107.jpeg
    1743090677107.jpeg
    554.9 KB · Views: 0
Intermediate section - skirt
1743092605827.jpeg
Intermediate section - skirt

1743092664976.jpeg

Intermediate section - skirt - tab cut and reassembled on skirt and with ends joined together
1743092681183.jpeg

Intermediate section - skirt - vertical seams lined up with other vertical seam on finned portion. Note that when the skirt is lined up with the vertical seam seam the skirt is on the edge where the tabs of the intermediate section form a horizontal seam and provide a "shelf" for the skirt to line up on the horizontal portion.
1743092856817.jpeg

Intermediate section - skirt - seams lined up - internal view - partial gluing. Start gluing with some tabs inside to get the skirt in position then glue in segments, about 5 tabs at a time, around the internal circumference of the skirt until done.
1743092908469.jpeg

Intermediate section - skirt - internal view all tabs glued in place. This is NOT very easy and the tabs sometimes fold up where you DON'T want them. The tolerances are pretty tight internally so it does take some time, but as you can see it's possible.
1743093500163.jpeg

Intermediate section - skirt - DONE!
1743093637416.jpeg
Intermediate section - Note that in real life you can't see stray fibers on the edge of the fins. These are all magnified due to the position of the camera taking the shots. I might have to take a nail file and run it on the edges later. If anyone has some suggestions I'm certainly open to them.:)

Sky Seeker
 
Intermediate fuselage section - wings
1743285705283.jpeg

1743285836006.jpeg

Intermediate fuselage section - wings - score tabs
1743285850806.jpeg
Intermediate fuselage section - wings - folded wing and rolled side strut
1743285908007.jpeg
Intermediate fuselage section - wings - cut stripes - cut the stripes only part way to allow the strips to be properly aligned on the wing
1743285976025.jpeg
Intermediate fuselage section - wings - left to right - Rolled and glued strut -
center - wing glued and square tabs added to area with triangular tabs
right side - strips - edges colored with black marker to remove glare

1743286085786.jpeg

Intermediate fuselage section - wings - close up of tab section on wing - try to form a rectangular section instead of cutting along the triangles for better attachment later on
1743286719654.jpeg

Intermediate fuselage section - wings - stripes added to wings. Note the alignment of the stripes. Black mark on the far lower right side made to allow for the white section of the struts to be attached later on after the lower rocket nacelles are added later (much later). Also this determines the placement of the stripes.
1743286291097.jpeg
Intermediate fuselage section - wings - Extraneous card stock (in white) cut away from the stripes. Glare removed by coloring with a black marker.
1743286488263.jpeg

Intermediate fuselage section - wings - back side of the stripes prior to folding over
1743286593292.jpeg

Intermediate fuselage section - wings - stripes to folder over - Note if the strips don't extend all the way to the edge of the wing just color them in with marker or make longer stripes. Note also the top edge of the wing has the rectangular sections known on the Thunderbird 3. There's no need to make another piece to form the rectangular edges.
1743286889519.jpeg

Intermediate fuselage section - wings - stripes to folder over - back side. Note the black mark on the right side. Any stripes extending over the side are cut flush with the edge of the wing.
1743286983657.jpeg

Intermediate fuselage section - wings - all wings and struts cut formed and assembled. Note the top of the struts which are white. They form a pocket to receive the lower edge of the wing. Also note areas colored in red to minimize glare. In real life you can barely tell where the wings are colored. The flash on the camera brings out the color more.
1743287397218.jpeg
That's it for now!

Sky Seeker
 

Attachments

  • 1743285922213.jpeg
    1743285922213.jpeg
    575.6 KB · Views: 0
Last edited:
Intermediate fuselage section - skirt / ring section
Sometimes you have to go back before you go forward.
skirt - removed tab and joined again

1743291942460.jpeg
skirt - joined ends together
1743291974091.jpeg
Intermediate fuselage section - ring section. As can be seen the top of the ring became slightly warped. Also, it looked like the tabs jutting out from the top are not high enough to receive the nosecone and maintain it in place. It is recommended for future builders that the internal tabs of the top rings are removed for ease of attachment of the nosecone.

1743292149637.jpeg

Intermediate fuselage section - ring section - To overcome the above problem a solution was found where a new ring was cut out and colored by a silver marker. All tabs were removed. Four tabs were made with scrap card-stock. These tabs will be used to join the nose cone with the intermediate fuselage section.
1743292293610.jpeg
1743292418757.jpeg
Intermediate fuselage section - ring section
First tab installed

1743292462732.jpeg
Intermediate fuselage section - ring section
All tabs installed

1743292581486.jpeg
Intermediate fuselage section - ring section - Skirt colored in silver, ring, and intermediate section with tabs to be joined to the nosecone.
1743292660686.jpeg
Intermediate fuselage section - skirt section - Skirt seam is lined up with the main seam on the intermediate section.
1743292769543.jpeg
Intermediate fuselage section - skirt section - bottom view - some tabs are glued and allowed to set in place. Sometimes you have to press in portions of the model in place due to a tight fit with the skirt and the intermediate section.
1743292836991.jpeg
Intermediate fuselage section - skirt section - bottom view - the remaining tabs are glued usually five at a time and allowed to dry and set in place until all tabs are glued.
1743292926075.jpeg
Intermediate fuselage section - skirt section - assembled!
1743293132313.jpeg

Intermediate fuselage section - all ready to put on the wings and THEN the nose cone.
1743293182857.jpeg

Sky Seeker
 
Last edited:
Intermediate fuselage section - wing assembly
Note the overgluing on the joined section.

1743293627687.jpeg
Intermediate fuselage section - wing assembly - Second wing added
1743293716882.jpeg

Intermediate fuselage section - wing assembly - Note the tabs folded inside of the main fuselage of the intermediate fuselage and glued in place. Recommend that a stylus or a pencil is used to fold the tabs as big fat fingers can't get inside that space. ;)
1743293743552.jpeg
Intermediate fuselage section - wing assembly - Final wing added
1743293948322.jpeg

That's it for now! :)

Sky Seeker
 
Last edited: