Wicked Wench model designed by Robert Nava.
Model is available as a FREE download from http://www.disneyexperience.com/
If you have never been to this site before I highly reccomend taking some time and checking out everything that is on offer here. It is a wonderful site that has much more than just paper models on offer.
The model consists of 26 pages of parts and you will also need to print the first page of the instructions for the scroll that is used as the name plate on the stand. I did not print out the rest of the instructions since my build area is on my desk right next to the computer and it saves on paper and ink. All pages were printed on 110# card, there is no suggestions as to what paper to print on in the directions.
The Build:

First off is the stand and name plate. This is simple and straight forward, instructions are clear and the simple diagrams are easy to follow. The textures alone on the stand are amazing to say the least. I did have one problem here, no matter how i tried I could not get the scroll/name plate to print out at the right size (page size in the PDF file is different from that of the parts pages) so Instead of wasting time trying to be smarter than my computer I decided to modify part 1J ( the back of the scroll) and cut it down to fit the smaller scroll I ended up with.
The finished stand

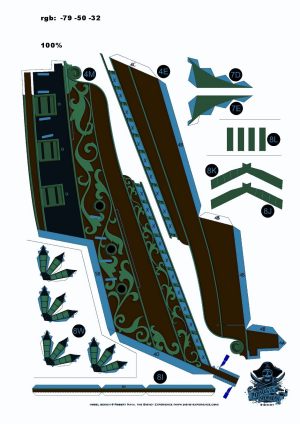
Next is the hull. Note: part 2A does not connect to 2B with the tabs like they are marked, the tabs actually connect to part 2H. Same goes for part 3A, the tabs marked 3B actually connect to part 3H.
No real problems with the hull. There are no formers (wich confused me at first lol) you just follow the instructions and pretty soon you have a hull! My port side hull came out a little long and my starboard side came out a little short. This is due to my apparent lack of skill and is in no way the fault of the design of the model. The upper hull walls are tricky to get in to place right but with a little patience and a bit of luck (in my case anyways) they come out perfect. With every piece that I add to this model the hull just kinda pulls itself into the right shape, It is very interesting seeing it gradually take the proper shape instead of having it just be right or wrong from the start. I don't know if this is designed this way or not but it sure is working for me!
Finished upper hull walls

Upper inside hull. 2 parts are labeled 4F, the part located in "parts_4.pdf" that is marked 4F should be part 4D, it isn't hard to figure out though since they will only fit on one side of the ship anyways.Building the inner hull and deck is extremly straight forward and posed no problems for me at all. One note though, the directions do not tell you to reinforce the deck. I went on the assumption that all ship decks need to be reinforced and used some nice thick illustration board. Adding the deck and inner hull is a bit tricky since it is all built first and then added to the hull as one piece. Instructions say "take your time" and I have to agree 100%. The extra weight from the illustration board doesn't seem to be a problem for the model and it actually made the hull a bit more rigid. If I didn't strengthen the decks then this would be the end of this build. The model could not take the force needed to place the masts on the decks (at least mine wouldn't have). I highly reccomend reinforcing the decks. Unfortunatly the 6 pics i took at this step did not come out (you think I would check them, ya right!) so a pic of some detail work on the bow will have to do.

Masts: Since I have never made a mast before I was expecting the worst but it turns out that I actually like making masts and it didnt take long to get the hang of it! What can you say about masts? They are long roud things that stick out of the deck and you hang sails on them lol. Actually had no problems with them at all. As stated before, I sure am glad that I reinforced the decks since you have to press down and hold when attaching the masts.The fore mast is split into two parts and is meant to look broken, first time I have seen this feature on a model and its kinda cool.
Instructions for the main mast has you build the crows nest before assembling the two parts of the mast. If you have large fingers or are not an expert builder I would reccomend to add the base of the crows nest only, then build the mast and after it is done go back and add the remaining parts of the crows nest. There are four parts that have to be added that are inside of the nest and it would be extremly difficult to get them right if the nest was built first. To be fair here I am saying that from the standpoint of a novice model builder and don't mean that the instructions are wrong or anything like that, just telling the way I found easiest to get the job done.
Broken Fore mast

Crows nest

Side view

Well, that is about as far as I have gotten so far. Any questions or comments are welcome!
Thanks for looking!
More to come soon!
Model is available as a FREE download from http://www.disneyexperience.com/
If you have never been to this site before I highly reccomend taking some time and checking out everything that is on offer here. It is a wonderful site that has much more than just paper models on offer.
The model consists of 26 pages of parts and you will also need to print the first page of the instructions for the scroll that is used as the name plate on the stand. I did not print out the rest of the instructions since my build area is on my desk right next to the computer and it saves on paper and ink. All pages were printed on 110# card, there is no suggestions as to what paper to print on in the directions.
The Build:
First off is the stand and name plate. This is simple and straight forward, instructions are clear and the simple diagrams are easy to follow. The textures alone on the stand are amazing to say the least. I did have one problem here, no matter how i tried I could not get the scroll/name plate to print out at the right size (page size in the PDF file is different from that of the parts pages) so Instead of wasting time trying to be smarter than my computer I decided to modify part 1J ( the back of the scroll) and cut it down to fit the smaller scroll I ended up with.
The finished stand
Next is the hull. Note: part 2A does not connect to 2B with the tabs like they are marked, the tabs actually connect to part 2H. Same goes for part 3A, the tabs marked 3B actually connect to part 3H.
No real problems with the hull. There are no formers (wich confused me at first lol) you just follow the instructions and pretty soon you have a hull! My port side hull came out a little long and my starboard side came out a little short. This is due to my apparent lack of skill and is in no way the fault of the design of the model. The upper hull walls are tricky to get in to place right but with a little patience and a bit of luck (in my case anyways) they come out perfect. With every piece that I add to this model the hull just kinda pulls itself into the right shape, It is very interesting seeing it gradually take the proper shape instead of having it just be right or wrong from the start. I don't know if this is designed this way or not but it sure is working for me!
Finished upper hull walls
Upper inside hull. 2 parts are labeled 4F, the part located in "parts_4.pdf" that is marked 4F should be part 4D, it isn't hard to figure out though since they will only fit on one side of the ship anyways.Building the inner hull and deck is extremly straight forward and posed no problems for me at all. One note though, the directions do not tell you to reinforce the deck. I went on the assumption that all ship decks need to be reinforced and used some nice thick illustration board. Adding the deck and inner hull is a bit tricky since it is all built first and then added to the hull as one piece. Instructions say "take your time" and I have to agree 100%. The extra weight from the illustration board doesn't seem to be a problem for the model and it actually made the hull a bit more rigid. If I didn't strengthen the decks then this would be the end of this build. The model could not take the force needed to place the masts on the decks (at least mine wouldn't have). I highly reccomend reinforcing the decks. Unfortunatly the 6 pics i took at this step did not come out (you think I would check them, ya right!) so a pic of some detail work on the bow will have to do.
Masts: Since I have never made a mast before I was expecting the worst but it turns out that I actually like making masts and it didnt take long to get the hang of it! What can you say about masts? They are long roud things that stick out of the deck and you hang sails on them lol. Actually had no problems with them at all. As stated before, I sure am glad that I reinforced the decks since you have to press down and hold when attaching the masts.The fore mast is split into two parts and is meant to look broken, first time I have seen this feature on a model and its kinda cool.
Instructions for the main mast has you build the crows nest before assembling the two parts of the mast. If you have large fingers or are not an expert builder I would reccomend to add the base of the crows nest only, then build the mast and after it is done go back and add the remaining parts of the crows nest. There are four parts that have to be added that are inside of the nest and it would be extremly difficult to get them right if the nest was built first. To be fair here I am saying that from the standpoint of a novice model builder and don't mean that the instructions are wrong or anything like that, just telling the way I found easiest to get the job done.
Broken Fore mast
Crows nest
Side view
Well, that is about as far as I have gotten so far. Any questions or comments are welcome!
Thanks for looking!
More to come soon!
 ops: ) I get around to building the Wicked Wench.:grin: