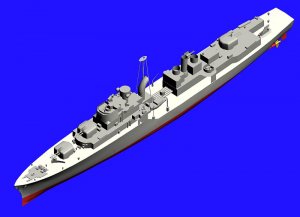
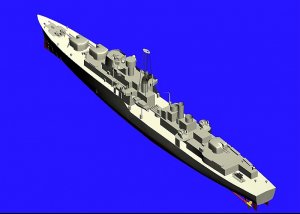
Barry has done such an awesome job continuing on with the 3D model, I am really keen to start knocking the superstructure together but I'm determined to get the whole "underwater" section finished before I get too far ahead of myself.
It's coming along nicely though, with the whole underwater section now ready to assemble in time for the final coat(s) of red paint.
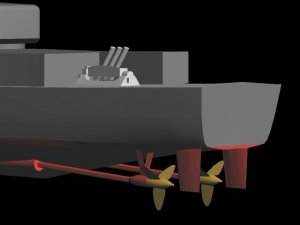
Barry sent me the metasequoia model of the props instead of a PDO, and as much as I tried to get it to unfold into a buildable state, I had no idea what I was doing and kept unfolding the whole boat, which got a bit messy.
I resorted to scratch building in the end, all except for the bits where the prop shaft exits the hull. Yes, as you can see I'm pretty good with my technical naval terminology... I'm sure those bits have a name.
I cut my rudders out using a stencil I drew by eye looking at the plans. The rudders themselves attach to a bit of wooden skewer with a strip of card glued to it, to give the rudders their tapered shape.
I already had a PDO for the shaft hangers, these and the "bits where the shaft exits the hull" were the only two printed parts, the rest I made by hand. I made a couple of tubes for the propshafts to sit in, where the hanger bits attach. For the prop shafts, I used wooden skewers, then wrapped standard copying paper around the shaft till I had the thickness I wanted, then added extra strips for the wider part that sits in the hanger.
I also cut a couple of strips to use as bilge keels.
Here's some pics to try and make sense of the rubbish I just typed, unfortunately I still have no camera of my own and this one isn't a big fan of macro / close up shots:

And of course, with the obligatory coat of black paint (hopefully the last time I need it, as I just ran out doing these parts).

Then some red....

I really should have built and painted this whole underwater section in one go, but impatience got the better of me. So far the model hasn't suffered for it though.
Next I will attach all these bits, take care of any gaps or rough spots, then the whole underside will get a fresh coat or two of red. It's had a lot of paint thrown at it by now, but it's also had a lot of sanding as well so there's black paint starting to show in the spots I cleaned up for the shafts etc to be attached.
Here's some close up shots of a few of the parts, to show the kind of finish I achieved. they look and feel like plastic parts already, without their final cleanup... ignore the fingerprints, that was Mr Impatience again.
Rudders:

Prop shaft:

Shaft Hangers:

The props themselves are done, in brass, but I'm not happy with them, they got a bit stained somehow by the epoxy I used so I think I might do them again at a later date, unless they can be cleaned / polished.
It's coming along nicely though, with the whole underwater section now ready to assemble in time for the final coat(s) of red paint.
Barry sent me the metasequoia model of the props instead of a PDO, and as much as I tried to get it to unfold into a buildable state, I had no idea what I was doing and kept unfolding the whole boat, which got a bit messy.
I resorted to scratch building in the end, all except for the bits where the prop shaft exits the hull. Yes, as you can see I'm pretty good with my technical naval terminology... I'm sure those bits have a name.
I cut my rudders out using a stencil I drew by eye looking at the plans. The rudders themselves attach to a bit of wooden skewer with a strip of card glued to it, to give the rudders their tapered shape.
I already had a PDO for the shaft hangers, these and the "bits where the shaft exits the hull" were the only two printed parts, the rest I made by hand. I made a couple of tubes for the propshafts to sit in, where the hanger bits attach. For the prop shafts, I used wooden skewers, then wrapped standard copying paper around the shaft till I had the thickness I wanted, then added extra strips for the wider part that sits in the hanger.
I also cut a couple of strips to use as bilge keels.
Here's some pics to try and make sense of the rubbish I just typed, unfortunately I still have no camera of my own and this one isn't a big fan of macro / close up shots:
And of course, with the obligatory coat of black paint (hopefully the last time I need it, as I just ran out doing these parts).
Then some red....
I really should have built and painted this whole underwater section in one go, but impatience got the better of me. So far the model hasn't suffered for it though.
Next I will attach all these bits, take care of any gaps or rough spots, then the whole underside will get a fresh coat or two of red. It's had a lot of paint thrown at it by now, but it's also had a lot of sanding as well so there's black paint starting to show in the spots I cleaned up for the shafts etc to be attached.
Here's some close up shots of a few of the parts, to show the kind of finish I achieved. they look and feel like plastic parts already, without their final cleanup... ignore the fingerprints, that was Mr Impatience again.
Rudders:
Prop shaft:
Shaft Hangers:
The props themselves are done, in brass, but I'm not happy with them, they got a bit stained somehow by the epoxy I used so I think I might do them again at a later date, unless they can be cleaned / polished.