Tabs or no tabs?

Rogerio Silva

Active Member
Hi,

I keep repeating myself when I say I'm a newbie and started on this hobby a couple of months ago, but I just want to emphathize my (low) level of expertise. And I don't know if this is the right place for this thread, but it looks as though it is.
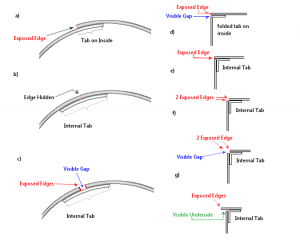
Well, cutting to the chase: tabs are a newbie's "best friend", since they help a lot to assemble the model. But, IMHO, they make a "step" between the edges of the pieces they connect, and it really doesn't look so good.
Eliminating the tabs is not so easy for me right now; I've been reading posts about double-faced tapes and pieces of paper on the inside, and even rolled pieces of paper to glue the top of a cylinder (now THAT'S GOOD!:thumb:). Problem is: what if you have a piece to glue on a closed part, and nothing of that applies, e.g. a large piece that closes something else (let's say, the bottom of a display stand, like the one shown on http://www.zealot.com/forum/showpost.php?p=959817&postcount=37)? It's round, it's big, and it's not easy to apply double-faced tape, because of its round shape.
I'm sorry to make you see my thread, I just wanted to give you an example. Sorry that you had to see this.
Comments, please?
 

Rhaven Blaack

!!!THE MAN BEHIND THE CURTAIN!!!
Staff member
Administrator
Moderator
You can go ahead and try the "NO TABS" technique on simple models to get to know how it all works.

As for your other question. You can use small strips of paper and make your own "TABS" on the inside of the circle and then glue the flat part on to it.

What you can do to practice, is cut out two circles (about 5 cm in diameter) then cut a strip that is about 2 cm wide and as long as the circumference of the circles.
edge glue the two end of the long strip together, the glue a small strip on the inside of the tube over the seam. then take small strips (about 1cm long and about 2mm wide) and glue them all along the insie of the edge of the tube to where about half of the strip is still showing. Bend teh remaining part of the strips inward. Attach the circle.
There you have it.

Good luck with it.
 

Rogerio Silva

Active Member
Nice one!

You can go ahead and try the "NO TABS" technique on simple models to get to know how it all works.

As for your other question. You can use small strips of paper and make your own "TABS" on the inside of the circle and then glue the flat part on to it.

What you can do to practice, is cut out two circles (about 5 cm in diameter) then cut a strip that is about 2 cm wide and as long as the circumference of the circles.
edge glue the two end of the long strip together, the glue a small strip on the inside of the tube over the seam. then take small strips (about 1cm long and about 2mm wide) and glue them all along the insie of the edge of the tube to where about half of the strip is still showing. Bend teh remaining part of the strips inward. Attach the circle.
There you have it.

Good luck with it.

Nice one, Rhaven, I'll make sure to try it, although I do not feel so confident yet. But as Thomas Wayne said to his son Bruce: "Why do we fall, Bruce? So that we can learn to pick ourselves up".
Thanks!
 

Rogerio Silva

Active Member
Thinking...

Rhaven

I was thinking... I sometimes see some models with internal enforcing "bulkheads". I think that is this exceptional case we could leave the tabs, because they won't show, neither influence in any seam. What do you think?
 

Rhaven Blaack

!!!THE MAN BEHIND THE CURTAIN!!!
Staff member
Administrator
Moderator
Rhaven

I was thinking... I sometimes see some models with internal enforcing "bulkheads". I think that is this exceptional case we could leave the tabs, because they won't show, neither influence in any seam. What do you think?

Internal enforcing "bulkheads", AKA "FORMERS" as they are referred to, are GREAT to add if you have a large area of open space or you need that extra re-enforcement to a particular area that is supporting additional weight (or just need added strength).

You can add extra formers where you feel you need them. There really are no (set in stone) rules (that I know of) that you can or can not add extra formers to where ever you feel you need them. Just remember though the more paper you add to more weight you add as well. So you will have to take that (as well as the construction of the model) into consideration when adding formers.

Just practice and have fun with it. You can also post such and ask for help or advice if needed.

Either way, I wish you all the best of luck with it.
 

Rogerio Silva

Active Member
No tabs, then!

Hi,

To all that come view this thread, I have decided that I will no longer use tabs. I have read some other threads about this, and a technique that has called my attention was something called, I think, "butt-glueing".
"Butt-glueing", if you haven't heard of it, consisting of glueing pieces edge to edge. The only thing I have added to this is nothing new: when the pieces suffer some more tension, just add some tape, and it will hold in place. The results I have achieved are impressive!
Thanks for reading!:thumb::wave:
 

Rhaven Blaack

!!!THE MAN BEHIND THE CURTAIN!!!
Staff member
Administrator
Moderator
Hi,

To all that come view this thread, I have decided that I will no longer use tabs. I have read some other threads about this, and a technique that has called my attention was something called, I think, "butt-glueing".
"Butt-glueing", if you haven't heard of it, consisting of glueing pieces edge to edge. The only thing I have added to this is nothing new: when the pieces suffer some more tension, just add some tape, and it will hold in place. The results I have achieved are impressive!
Thanks for reading!:thumb::wave:

This technique is also referred to as "EDGE GLUING".

I am glad to hear that you have found a technique that will work for you. :thumb::thumb::thumb:
 

the_colonel

New Member
I just found this thread and it really helps me. I was always thinking on "how do they build those models without those tab"? There is the answer ...
 

Rhaven Blaack

!!!THE MAN BEHIND THE CURTAIN!!!
Staff member
Administrator
Moderator
I just found this thread and it really helps me. I was always thinking on "how do they build those models without those tab"? There is the answer ...

That is the GREAT thing about this site. There is always something new to dicover.
 

Zubie

New Member
I just found this thread and felt like putting my 2 cents in because I'm not totally anti-tab. Undoubtedly using internal tabs will generally result in a nicer finish, however it is possible to make an argument in their favor particularly where novices are involved. Actually on some level it's akin the argument for trimming off location pins on injection kits.
The attached image illustrates the typical situations. In figure "a" you have joined skins, where one has a tab that fits under the other. This leads to an exposed edge and a visible step. The thicker the stock and the more colorful the model the more noticeable this is. It is also hard to blend with a pencil or pen without marking the other skin. The solution is figure "b", an internal tab to butt join the edges. The edges are hidden and problem solved. Unfortunately it is possible to introduce the problem shown in figure "c" where the edges didn't quite butt against each other when the glue set. Now you have exposed edges and a visible gap which might be of a strong contrasting color. For a beginner, getting a long seam to perfectly set with the edges against the edges may be difficult so the builder needs to judge for themselves which method for this join they prefer.
In the second situation (figs d,e,f,g) is a corner join. With a folded tab ("d"), there will be an exposed edge and likely a visible gap where the tab folds in as the card stock will have a very slight curve at the fold and not set flat against the opposing piece. This gap can be ameliorated by scoring the fold point ahead of time and is less noticeable on plain paper as opposed to heavier stock. The other solution is the usage of an internal tab as shown in "e" which while still leaving an edge can hide the gap. Typically this edge can be easily blended in with a color pencil or felt tip pen. Unfortunately there are 2 possible problems that this solution can introduce, particularly for the beginner. One is placing the internal tab flush with the edges which will result in exposing both edge as shown in "f". This might not be serious as you may still be able to blend these edges in. The second problem is actually bad placement of the internal tab and the edges don't meet in figure "g". You have either exposed edges and a visible gap as shown or an even worse situation if the tab is short from the edge exposing the under surface. While the problems of "g" can happen with folded tabs as well it does limit the problem to only one edge.
As I've said on other threads, tabs make life easier for the novice, but there are many situations where things will look better if you do use internal bracing instead and set edges on edges. A novice may also consider if the benefit outweighs other issues they might consider important like build time. From my point of view when designing a model, the builder can always cut the tab off.
 

Attachments

  • TabsPicture.png
    TabsPicture.png
    40.4 KB · Views: 38

zathros

*****SENIOR ADMINISTRATOR*****
Staff member
Administrator
Moderator
You will always make a better model with the tabs removed. If you start out doing this, you will learn how to make better models better, and sooner. As far as exposed tabs on 90 degree corners, this can be easily addressed by putting each part on the edge of a flat surface, and sanding the edges 45 degrees, on each surface to be joined still they match up. Attached tabs, as opposed to inside glued on separate strips, will always cause a mismatch on the surface, exacerbating the edge discoloration, and making a smooth surface impossible.

Even with plastic models, unless the molds are new, or extremely well made, the pins, and corresponding holes often cause the model to separate at that point. I cut them off with an Exacto blade, making sure I do not distort the edge that is needed.

If a person uses "novice" techniques, the end will result will be a model that looks like it was built by a novice. Having spent most of my life in the Aerospace industries, there was never a way for people who were starting out, and someone who was a master in their field, there was only one way. In model making, the only way is the way the yields the best aesthetic result. In that regard, one is better off using the best methodology from the beginning, and never use a method that is considered "novice", as this methodology would always be the wrong methodology.

This is especially true with very young modelers. They are the ones most open to learning, and as children are far smarter than given credit for, I sometimes wonder if the word "novice' really has a place in this hobby. Inexperienced, yes, you can learn by experience, but when you are making the object, and can see and have the power to select how the parts join, then, again, there is only one way, the right way, which is the way the yields the best looking result, which can always be strengthened, or fortified from the unseen side. If the model is to be painted, your options increase, as there are fillers which can be used for gaps, and the edge issue becomes moot. Tabs, however, will make the surfaces mismatch, which no amount of paint will fix. :)
 

Zubie

New Member
I think figure "a" in the attached image illustrates what zanthros is talking about. It's akin to the kind of thing you would do in wood joinery to hide the joint. For a simple right angle you need to get both edge parts to 45 degrees by filing or cutting with a sharp edge. The parts are then joined edge to edge, preferably with tacky glue that sets relatively quickly. The join angle will vary if the corner is at something other than 90 deg.

Cutting and controlling lightweight stock can be tricky so another version of this I've seen on build threads is to build up the edge by laminating strips of stock on the edge (figure "b"). This edge is then cut or filed to the right angle for the join. The thickness of the lamination might preclude usage of additional tabs or reinforcements.

These methods do require more time for prep and execution, but the results may well be worth it in the improved finish. Some burnishing techniques can go even further in melding the edges together, but I haven't tried that myself. It can be practiced on scrap before trying it out on an actual project.

From a design point of view, the best is to eliminate the visibility of the join in the first place. By this I mean consider the possibility of hiding the edge behind an obvious detail. A lot of the stuff I do are SF subjects which have visible paneling, "greeblies", or other parts that can be conveniently aligned or placed on the seam. In these cases a seam is not a bug but a feature. Join issues in these hidden edges then become less important.
 

Attachments

  • TabsPicture2.png
    TabsPicture2.png
    12.6 KB · Views: 49
justo lo que me venia preguntando,a mi me sorprendio mucho y se ,me hace dificil el no ver las pestañas,algo que no estoy muy acostumbrada,pues mi nivel es bajo aun...tuve que crearle pestañas para hacer el mini r2d2 del modelo x-wing..me quede fria cuando me di cuenta el detalle,estoy avanzando lentamente pero si me es dificil ojala conforme valla avanzando no se me complique.
como hicieron con el r2d2?yo le tuve que poner pestañas ,me quito tiempo,pero no entendi bien

just what came asking me, to my surprised me a lot and makes me difficult not to see the tabs, something I'm not used to, because my level is low even ... I had to create you tabs to make the mini r2d2 x-wing..me model remains cold when I realized detail, I'm moving slowly but hopefully I is difficult as moving fence is not complicated me.
as they did with the R2D2? I had to put her eyelashes, I take my time, but I did not understand well
 

zathros

*****SENIOR ADMINISTRATOR*****
Staff member
Administrator
Moderator
You are better off cutting off the tabs and creating you own. You can adjust them as you need.
 
Top