Star Wars lightsaber (new texture) under construction

Craftman

Active Member
Alright, time to build some Star Wars-models. One or two at least.
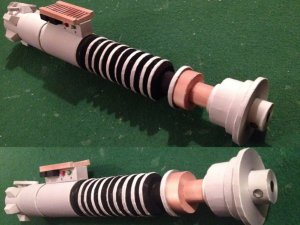
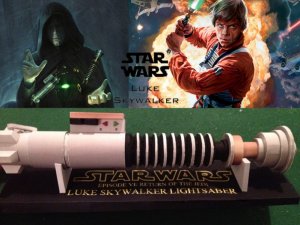
I am starting with this build, something that will hopefully become Luke´s second lightsaber! :)

First off, the texture on the model I found was a little bit too cartoony, even though the model itself was beautiful!
A quick search on the Internet for some good textures of silver & copper and then some time spent in Photoshop made it ready to go!
I also moved some pattern parts around and that resulted in six sheets of paper instead of the initial eight being printed.

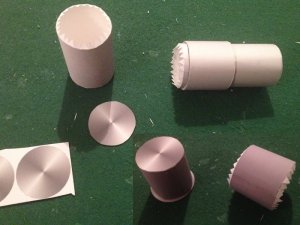
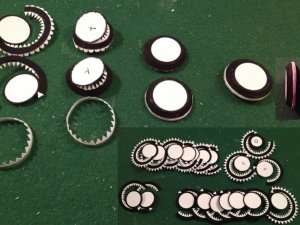
OK, let´s start this build! :)
 

Attachments

  • Saber01.jpg
    Saber01.jpg
    189.1 KB · Views: 13

Craftman

Active Member
The template for the ring that attaches to a belt was static on the model I found, so I decided to change it and make it moveable.
Small parts are hard to work with but I knew I had to make it move!
If not for myself, then for my friends that would probably brake that part right away if it was only glued in place.
And I would like to keep this saber on display! :)
 

Attachments

  • Saber02.jpg
    Saber02.jpg
    183.8 KB · Views: 8

Craftman

Active Member
Next came the button to switch it on and off. As this was also a piece just to be glued in place I decided to make it moveable as well!
I have to be able to turn my lightsaber on, right!?! :)
 

Attachments

  • Saber03.jpg
    Saber03.jpg
    178.7 KB · Views: 9

Craftman

Active Member
After that it was time to glue on the small red & green lights (VERY small, got lots of glue on my fingers) and the top part of the ignitor.
As I had previously changed the texture to have two small silver screws, there was no need to build them (under the lights) and they were very small so that felt good!
 

Attachments

  • Saber04.jpg
    Saber04.jpg
    181 KB · Views: 5

Craftman

Active Member
When it was time to add the six outer bottom parts (wings) to the bottom inner part (the tube itself) I went online to see if there was a specific order to their placement.
And it was! I had no idea about this, but apparently the part (wing) with the triangle-shaped ring in it is supposed to lean a bit to the left so the tip of it meets the left "wall" of the on/off/ignitor-part.
Luckily I found a great drawing/blueprint that showed the exact spots where each part (wing) was supposed to be attached!
 

Attachments

  • Saber05.jpg
    Saber05.jpg
    166.6 KB · Views: 12

Craftman

Active Member
Then it was time for all the many similar parts! So many! And tricky to get them just right!
Time is your friend in these moments of repetition that I love (and when I say "love", I mean "can hardly stand"), as I have to start over as soon as a part is done.
NINE times! But it got done! :)
 

Attachments

  • Saber06.jpg
    Saber06.jpg
    186.9 KB · Views: 11

Craftman

Active Member
After all the similar parts were finished, it was time to glue them all together. While keeping the "tower" being built in a straight line!
The parts that meet are white in this texture-version as the original ones that were all black were going to take to much ink from my printer.
I have no problem getting new ink, but if I can save some, why not?! :)

After they were all glued together I added the (new texture) shiny copper parts and...
 

Attachments

  • Saber07.jpg
    Saber07.jpg
    154.8 KB · Views: 10

Craftman

Active Member
...it´s done! I have a lightsaber!! :)

On the top part I changed the texture to contain two holes (as seen on the "real" prop), one on the side of the very top part and one on the very top where the beam is supposed to come out. The holes go into the parts, with tubes glued to them from the other side, the side one not so deep, the top one a little bit deeper.

The original patterns for this model are fantastic and the person who created this saber has my deepest respect!
Totally amazing that this could be constructed out of paper! :)

Now, let´s build a display stand for it...
 

Attachments

  • Saber08.jpg
    Saber08.jpg
    176.6 KB · Views: 10

Craftman

Active Member
...so I can show it to my friends! :)

The stand parts were actually part of the build patterns, so I just printed them and glued them all together!
Again, it´s great that someone actually took the time to create these patterns for me to find!!

With everything done, it´s just a question of putting the saber on the display stand...
 

Attachments

  • Saber09.jpg
    Saber09.jpg
    161.4 KB · Views: 12

Rhaven Blaack

!!!THE MAN BEHIND THE CURTAIN!!!
Staff member
Administrator
Moderator
You did a GREAT job on this!
I like how you made the switches and the ring move.
It looks REALLY GOOD!!!
 

Craftman

Active Member
To Rhaven Blaack;
Thank you! Always nice to be able to to customize the build a little bit so it will be one of a kind! :)

To Rogerio Silva;
Thank you so much!! :)

To Draegor;
Thanks! This model is life size! Of course... :)

To Revell-Fan;
Thank you very much! :) Oh, the amazing "V"-blaster from you and Rhaven Blaack is just two builds away! And yes, I have a long list of things to build! :)
 

Revell-Fan

Co-Administrator
Staff member
Administrator
Moderator
Wow! Great to hear that you are tackling the V blaster. Please let me add one thing before you start making it: The connection between the front and back part of the blaster may be a bit weak because it consists only of one small tube and a trapezoid structure. I thought of revising the kit and trying to at least make the laser tube run from front to the back of the barrel. That would increase stability a lot, but I would have to see how the internal formers would have to look like then. So if you tackle it, you may give it a try and insert a longer tube and cut the formers to shape or create some kind of stabilizer of your own. :wave:
 

Craftman

Active Member
To Revell-Fan;
Sure, I will certainly do what I can when I get to that, it´s a model I really want to build so I will (with your permission) do what I can to stabilize it! :)
Just two more builds now before I finally get to that precious V-blaster on my list!
First an AT-ST Scout Walker for a friends birthday and then the Lawgiver from Judge Dredd (1995) to complete my "movie prop kit" with badge, law book and gun on a plaque!
And I am halfway through with the AT-ST build! :)
You see, I have a thing for Star Wars...
 
Top