Staging Help Needed

Pitchwife

Dreamer
Apr 23, 2001
1,728
0
36
71
The middle of nowhere Oregon
Visit site
Need Staging Help

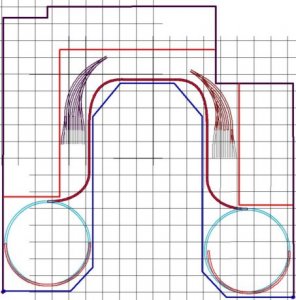
I have been trying to revise my lower level hidden staging/storage area and am not making much progress. So I will lay the problem at the feet of the gurus of The Gauge. :thumb: :thumb: The attached diagram shows what I have to work with. The two circles are helixes and the red line connecting them is the mainline. Black lines are walls and the other red lines are depth dimension limits. The grid is 6" and the scale is N. The depth of the shelves should not be much more than 1' as the distance between levels will only be about 8". All of the shelving will be open to the inside of the U, making this a "viewable" hidden yard, able to be seen from the operating area. Prototypical isn't an issue, functionality is. I would like to use the pinwheel curved staging shown as it greatly increases the usable track space. They are made up of #4 Atlas Customline switches. The biggest bottleneck is the upper right corner where the water heater is. Any ideas on how to get through there efficiently will be appreciated.
I am also including a link to my Atlas RTS File where anyone who would like to can download it and use it with their RTS program. It was created on version 5.0. I note this because I have found that files created in one version of RTS are not necessarily compatible with other versions. :mad: :mad:

Desired Specifications:
Staging can be attached to the mainline anywhere and as many times as necessary, although two entrant/exit points should be enough.
There should be a dedicated arrival/departure track.
There should be sufficient runarounds for the switch engine to operate without fouling the main.
Traffic should be able to flow in both directions.
All turnouts will be #4 Atlas Customline, except for turnouts between the mainline and the A/D track, which will be #6 Atlas Customline turnouts. Anything bigger would take up too much space. This shouldn't be a problem as most of the traffic in the classification yard will only be a few cars long.

I will appreciate all of the help anyyone is willing to give.
Thanks
 

Attachments

  • Layout Help.jpg
    Layout Help.jpg
    41.3 KB · Views: 66
Clark, I'm confused...

Where are the helix entrance/exit points on the staging level? Is that the "mainline" you show (i.e. the mainline running through lower level staging), or is that the main level mainline and the staging entrance/exit is 'free form' off the helix?
 
What is in the open spaces on the right and upper left?

The reason I ask is bescause it would make the yard much more useful to be double ended, and with lots of capacity. If you could cut out (cut into?) those areas, you gain lots of extra space.

You may need to separate your levels by a few more loops of helix, in order that everything is "reachable".

Andrew
 

Attachments

  • clark layout.jpg
    clark layout.jpg
    41.6 KB · Views: 71
Hi all :wave:
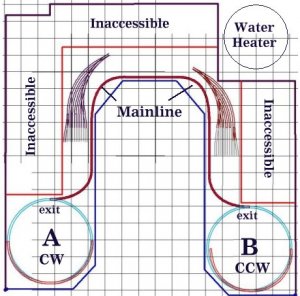
Let me see if I can make this clearer than mud. :rolleyes: kchronister, you are looking at the lower level. The A helix runs CW and comes down from the main level. The exit point is at the top of the circle where the mainline (red track) leaves it. The B helix is the same except that in runs CCW.

MasonJar, those areas, if I understand which ones you mean, cannot be cut into. Because of my particular situation, the lower level (the one in the diagram) will be aprox. 27" above the floor and the upper level will only be 8" or 9" above that. These are fixed conditions and I am unable to change them. Since the two levels are so close together, a depth of 1' is the only way I could reliabily access them. As much as I would like, I don't see any way to utilize that space and still be able to get at it.

The only absolutely unchangable features are the walls, the highth of the levels, the helix's, and the path of the mainline. The area past the red lines could be used if you can come up with an idea of how to access them, given the above limitations.

I hope that this clears things up a little.
 

Attachments

  • Staging Layout Help.jpg
    Staging Layout Help.jpg
    53.6 KB · Views: 69
Clark,

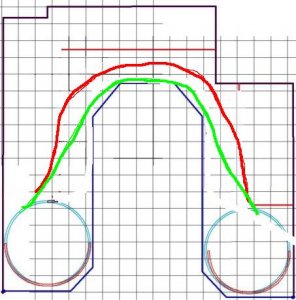
Can you change the exit points of the helix? If the "main" came off "A" at 3 o'clock and when straight up, and came off "B" at 9 o'clock, then you would be able to immediately go into a yard similar to what I proposed. And you would not have any reach issues.

Of course, this means that you many have to "flip" your helices, and probably increase the depth of your top level to accomodate an exit from the helices closer to the walls.

Also - what does the top level look like?

Andrew
 

Attachments

  • clark layout 2.jpg
    clark layout 2.jpg
    49.3 KB · Views: 65
Changing the direction of the helixs would mean a total redesign of the upper level, something I wouldn't look forward to. As it is, I'm pushing the limits of accessability. The depth of the layout is 33", with the upper outside of the helix's a tough reach already. If I were to change it as you suggest, I might as well throw the whole thing out and start from scratch. I've been working on this plan for so long that this is the 20th or 30th version, trying to get it to work, have all of the aspects that I want, and be something that I would be able to build myself (a major obstacle in itself).

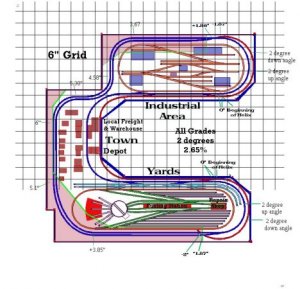
This is what I have planned for the upper level.
 

Attachments

  • upper_w_grid.jpg
    upper_w_grid.jpg
    57.4 KB · Views: 63
What if....
the upper level became the lower level, and the lower level moved to the upper level back against the walls, maybe behind a valence to hold lighting for the now lower level? You could then put staging all the way around the room, if you wanted to.

What's the pink shading?

Jeff

Cancel the whole thought. It wouldn't work. Don't know where the brain was.

The pink is an upper upper level?

I see the problem. the staging has to be under, but it has to be near the front so you can reach/see it. Hmm.....
 
The pink shaded areas are areas that are beyond a 24" reach. I put them in so that I could identify difficult to access areas.
What I really need is a way to use the lower level to the best advantage.

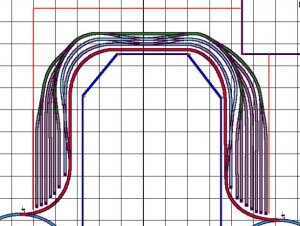
Here is one of my earlier plans for the lower level. The problem is the mass of spagetti at the top center. I just haven't figured out a way to eliminate it. Also notice that there is some room at the top, up to the red line, that can be used.
 

Attachments

  • lower_grid_pinwheel.jpg
    lower_grid_pinwheel.jpg
    60.7 KB · Views: 60
What if you took one side all the way to the top and went double ended around the corners? You'd have some really long, and some shorter, but less backing and crossover switching.

Jeff
 
Maybe leave the helix about 45 degrees earlier, main runs on a diagonal toward the corner, staging tracks leave to the outside, meet the same way on the opposite side. don't know how the radii will work out.

Jeff
 
Another thought, what if you use your scheme, but leave out the middle light blue track? The other still keeps the main clear, I think. Hmm. There was a posting on some forum a couple weeks ago about bowtie staging. There might be ideas there, I think that's about what ou have. I'll look around.

Jeff
 
I understand now the reach/access issues you have. The top level makes that much more apparent... thanks for the info.

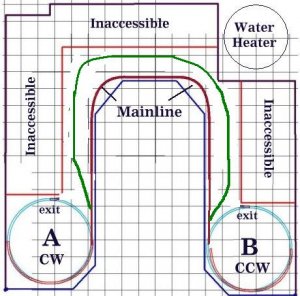
How about if you flip the yard(s) with the main? Since you need to crawl into that "inaccessible" space to access the unreachable parts of the helices, why not have the main come off a little earlier and go around the outside of the lower level. This gives you the added bonus of having the yard tracks that much closer to where you will be most of the time. Sort of like my pic in post #3, but with the red being the main...

Andrew
 
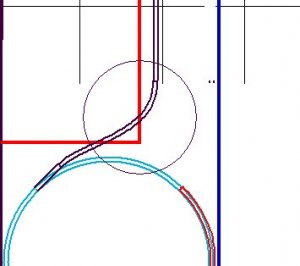
That would be a good idea Andrew, except that it compromises the radius of the curve coming off of the helix. This is what it would look like if I came off of it 45* earlier. You can see the nasty "S" that I'm sure would cause no end of problems.
 

Attachments

  • Layout help_2.jpg
    Layout help_2.jpg
    14 KB · Views: 65
Try what you just did, but come off the helix on a tangent for a 8ish inches, then turn, whatever radius you are using and see where it ends up. Maybe staging on both sides of the main, maybe a wye turnout or a three way?

Jeff
 
There should be a dedicated arrival/departure track.
There should be sufficient runarounds for the switch engine to operate without fouling the main.
That doesn't sound like a staging yard; that's a full-blown classification yard. Staging doesn't need leads or runarounds, as only whole trains move through it. (Irrelevant note: Also, a classification yard shouldn't be more than half-full most of the time; a staging yard can be close to full, because it doesn't need to be switched.)
 
Triplex said:
That doesn't sound like a staging yard; that's a full-blown classification yard. Staging doesn't need leads or runarounds, as only whole trains move through it. (Irrelevant note: Also, a classification yard shouldn't be more than half-full most of the time; a staging yard can be close to full, because it doesn't need to be switched.)
You know something Triplex, you might just be on to something there. I hadn't really thought about the difference between staging and classification yards. That puts things in a whole new light. I think that that has been my problem all along. After all, it is basically storage. All I really would need is a way to switch the engine or consist from one end to the other. Trains go through the layout proper in one direction and then back through the other way. Thanks for pointing out an overlooked solution. Now, back to the drawing board with a new perspective. :thumb: :D
 
Actually Andrew, that's part of the problem. I'm in a wheelchair and the lower level is just high enough for me to be able to get under it so it's as low as it can go. Same with the upper level. If I make it any higher I would hardly be able to access it at all. As it is, it's a stretch to get at the very back areas. That's one of the reasons that I've put so much into the planning stage. I need to have it as bullet proof as possable before I start because finding that somethng won't work halfway through would be a real bummer.