

Hello. and good day, I have finally gotten a chance to retrieve an old and as yet unfinished model, but it features a test run on my idea of achieving realistic looking photo voltaic grids or arrays.
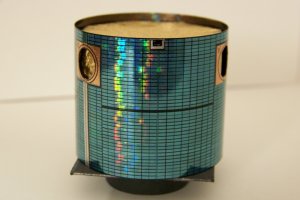
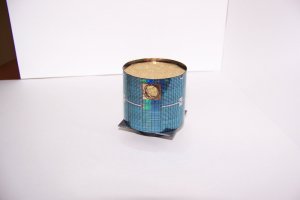
The model in these pictures is a couple models thrown together quick for structure, printed from one of the links at the ninfinger site.
I will try to make this short and sweet.
The first thing i did was print the solar cell grid onto a piece of clear acetate that had a blue tiny to it
After printing the solar cell pattern on the acetate, I lightly sprayed it with a gloss protective coat and let it dry.
I then reprinted that same image onto a sheet of both gold and silver bare metal foil, so that individual elements could be cut free and applied to the surface of the satellite shroud, where appropriate. You can see where that is done.
The last think I did was to take a sheet of that silver prism adhesive myllar sticker sheets you can get at craft stores, and lined the pattern up so it was straight with the grid lines, and working forward, to avoid trapping any air bubbles or wrinkles, carefully, laid the acetate image printed side down against the sticker surface, then burnished it down and there it was.
Since doing this test run, I have tried mylar prism sheets with different patterns on it, and the one that I have decided looks the most accurate, is a sheet thaat has that pattern that looks fractal and like metallic shards of broken glass, pressed paper thin.
I applied that to the back of a piece of clear blue acetate as well as just plain clear, with a grid printed on it, and the result looks spot on.
I hope this all makes sense and helps anyone who is interested.
Note though, that it is trial and error, as I tried this on another piece of acetate, and when trying to print the image of the grid, the ink was not nearly as successful. for some reason, subsequent print trials on different acetates,had the ink pooling or beading up.
I dont know what the difference was in my first couple trials, except beginners luck, but the pictures show that the method is effective if you have the correct acetate material.


")
 :mrgreen:
 ).
).