Hi there custom1106. Collyn's excellent suggestion about dipping the track work got me thinking on how to give you a longer run in the space required. I came up with this (see below) and I had some old set radius track laying around.(15" as luck would have it
")
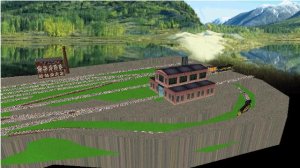
) I mapped out your usable area on the floor and started fiddling with the track. The first bmp I hope I have successfully downloaded here shows the general idea. However I did see a problem with steep grades and interference at the rear tunnel mouth. So in the second bmp I jogged the upper level over to give more clearance (gradewise)at the back. They are close in clearance width wise), but the last part of the decsending grade is going to be hidden anyways. The colours are meant as a guide. The red in the first pic' is where the tracks are above one another.
Apart from the grade problem, I don't know the height of American trains and stock. I can get away with a 3 inch difference in track bed levels if I use thin ply on the upper level well supported and glued rather than pinned (spiked)
The left side of the design is basebard level and 2nd level. The right side is set midway between the two to allow shallower grades. Even so I think they are steep.
The design does require the use of a curved switch up on the top right. Without it you simply can't get the extra few inches to start the two top grades, or get the reverse loop to comfortably come back across the layout. I found that the extra few inches it saved improved both features implementation.
The second pic shows how I adjusted the tunnel mouths (shown as 2 red horseshoes)
Anyway, just my 2c worth for the space provided. Fingers crossed it got the pics on here.