Repair split axles on Bachmann's N scale 4-8-4 locomotives.

Ray Marinaccio

Active Member
This is how I repair the split axles on Bachmann N scale locomotives.
The materials required are.
3MM ID brass tubing
Loc-Tite (super glue will work but sets up faster)
 

Attachments

  • Nov22^07.JPG
    Nov22^07.JPG
    31.3 KB · Views: 123

Ray Marinaccio

Active Member
To dissassemble the locomotive, remove the screw in the smoke stack and lift the front of the boiler and slide the shell to the back off the tabs on the rear of the frame.
 

Attachments

  • Nov22^46.JPG
    Nov22^46.JPG
    39.4 KB · Views: 135

Ray Marinaccio

Active Member
Remove the pilot and trailing trucks. Note the location of the electrical contacts.
 

Attachments

  • Nov22^38.JPG
    Nov22^38.JPG
    45.7 KB · Views: 82
  • Nov22^39.JPG
    Nov22^39.JPG
    44.5 KB · Views: 122

Ray Marinaccio

Active Member
Remove the screws holding the main weight and the pilot.
 

Attachments

  • Nov22^35.JPG
    Nov22^35.JPG
    36.5 KB · Views: 110
  • Nov22^34.JPG
    Nov22^34.JPG
    32.9 KB · Views: 62

Ray Marinaccio

Active Member
The front side frame rail screws must be loosened to release the light wires before the weight is removed. The cylinder block can be pulled downward to access the screws.
 

Attachments

  • Nov22^29.JPG
    Nov22^29.JPG
    36.4 KB · Views: 61

Ray Marinaccio

Active Member
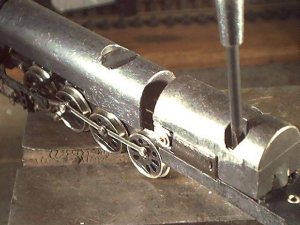
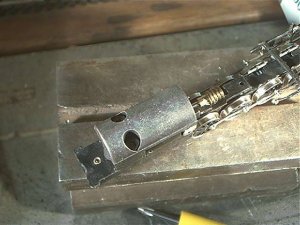
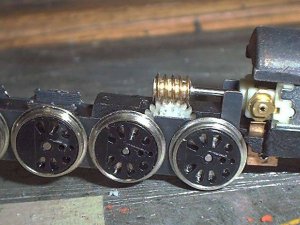
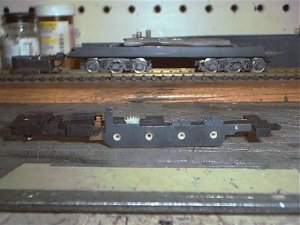
Remove the crank pins on the second set of drivers and remove the cylinder block and valve gear.
then remove the remaining crank pins and siderods. The pins are pressed in and can be pried out with a small screwdriver.
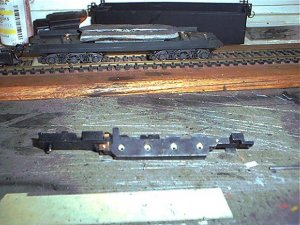
Remove the drivers from the frame by prying them outward with a small screwdriver.
 

Attachments

  • Nov26^01.JPG
    Nov26^01.JPG
    44.8 KB · Views: 77

Ray Marinaccio

Active Member
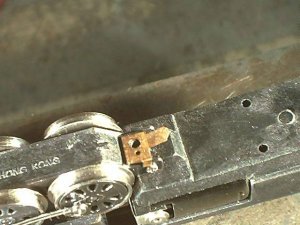
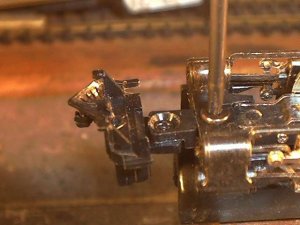
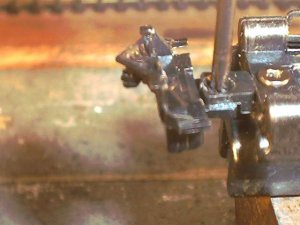
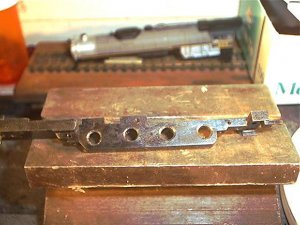
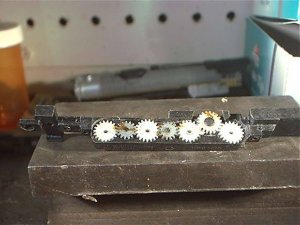
Remove the side frame rail screws, remove the frame rails and gears.
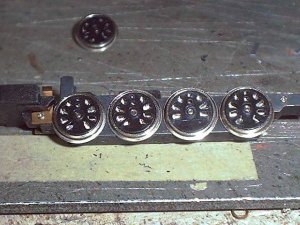
Wash all the parts ( except motor) with warm soapy water and dry thoroughly.


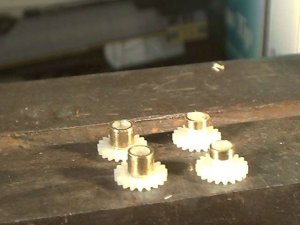
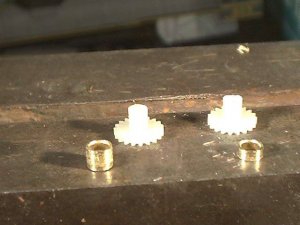
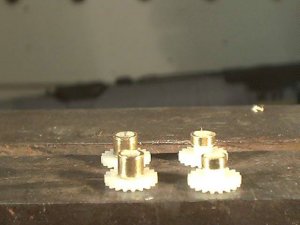
Cut 4 sleeves from 3mm ID brass tubing.
2 .130"
2 .065"
The 2 sleeves on the rear axles must be shorter to provide clearance for the reduction gear.
 

Attachments

  • Nov22^04.JPG
    Nov22^04.JPG
    34 KB · Views: 138

Ray Marinaccio

Active Member
Apply a thin coat of Loc-Tite on the stem of the gear and press the sleeves in place.
 

Attachments

  • Nov22^06.JPG
    Nov22^06.JPG
    26.9 KB · Views: 88

Ray Marinaccio

Active Member
The axle holes in the main plastic frame must be bored to 3/16" to allow clearance for the sleeves.
 

Attachments

  • Nov22^12.JPG
    Nov22^12.JPG
    45.7 KB · Views: 79

Ray Marinaccio

Active Member
Reinstall the gears in the frame and apply a small amount of grease on the gears.
Then reinstall the side frame rails and screws.
 

Attachments

  • Nov22^10.JPG
    Nov22^10.JPG
    38.5 KB · Views: 83
  • Nov26^02.JPG
    Nov26^02.JPG
    63.8 KB · Views: 137

Ray Marinaccio

Active Member
Installing the drivers.
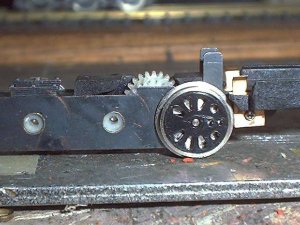
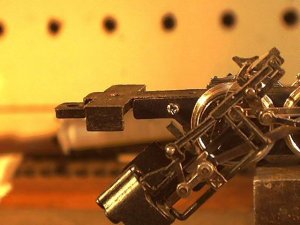
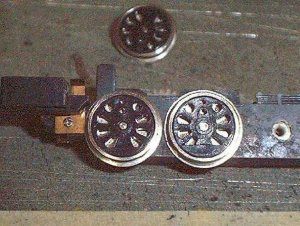
I start with the right rear driver. Put a dab of grease on the driver bearing and a small amount of Loc-Tite on the axle and press the driver into the axle center.
Rotate the the reduction gear counterclockwise untill the crank pin on the rear driver is at the 12 O'clock position. This takes the play out of the gear train.
 

Attachments

  • Nov27^03.JPG
    Nov27^03.JPG
    37.2 KB · Views: 125

Ray Marinaccio

Active Member
Lube and Loc-Tite the next driver and press it in with the crank pin in the 12 O'clock position. Rotate the gear train by the reduction gear to verify the 2 drivers are in time. Re adjust the driver if necessary. If you use super glue instead of Loc-Tite this must be done quickly before it sets.
 

Attachments

  • Nov26^09a.jpg
    Nov26^09a.jpg
    52.8 KB · Views: 65

Ray Marinaccio

Active Member
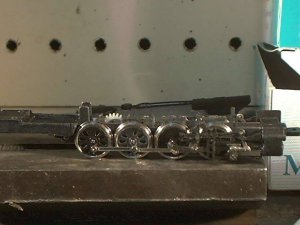
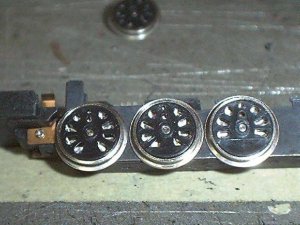
Rotate the drive train until the 2 installed drivers are in the 12 O'clock position, then lube and Loc-Tite the next driver and install it in the 12 O'clock position. Rotate the gear train by the reduction gear to verify the 3 drivers are in time. Readjust the driver if necessary.
 

Attachments

  • Nov26^10.JPG
    Nov26^10.JPG
    51.5 KB · Views: 63

Ray Marinaccio

Active Member
Rotate the drive train until the 3 installed drivers are in the 12 O'clock position, then lube and Loc-Tite the next driver and install it in the 12 O'clock position. Rotate the gear train by the reduction gear to verify the 4 drivers are in time. Readjust the driver if necessary.
 

Attachments

  • Nov26^11.JPG
    Nov26^11.JPG
    59.7 KB · Views: 61

Ray Marinaccio

Active Member
To install the drivers on the left side, put the driver on the right side in the 12 O'clock position, lube and Loc-Tite the driver and press the driver into the axle with its crank pin in the 3 O'clock position.
 

Attachments

  • Nov26^14.JPG
    Nov26^14.JPG
    55.8 KB · Views: 112

Ray Marinaccio

Active Member
Repeat this process with the rest of the drivers on the left side, quartering each left hand driver with the right hand driver on the same axle.
 

Attachments

  • Nov26^17.JPG
    Nov26^17.JPG
    56 KB · Views: 53

Ray Marinaccio

Active Member
Install the side rods, cylinders and valve gear.
The ecentric on the crank pin should be set just to the rear of the driver center.
 

Attachments

  • Nov22^17.JPG
    Nov22^17.JPG
    32.3 KB · Views: 64

Ray Marinaccio

Active Member
Roll the chassis on a piece of track to check for binding.
If you got all the drivers on the right in time and the left driver in quarter with it's right hand driver you will have a smooth running chassis.

Install the motor and rear weight.
 

Attachments

  • Nov22^22.JPG
    Nov22^22.JPG
    45.5 KB · Views: 69

Ray Marinaccio

Active Member
Check the mesh of the worm and reduction gears.
I found this loco needed to have this clearance adjusted. This was done by removing a small amount of material from the frame to lower the motor.
 

Attachments

  • Nov26^21.JPG
    Nov26^21.JPG
    51.7 KB · Views: 76
Top