I built this kit when it first came out in 1998, I did a write up for "Starship Modeler dot com" The write up is still posted along with the photos I took.
By Micah Rogers
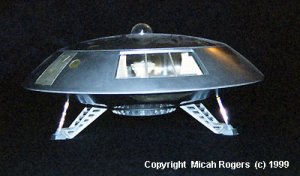
Finally, after 20+ years, an injection molded model of the Jupiter 2! I was actually "giddy" when I heard the announcement that Polar Lights was going to release an injection molded Jupiter 2. I preordered two, and paid for them in advance. Fast foreword six months, the call comes in from the local hobby shop, "Your Jupiter 2's are here!" The "kid in the candy store" syndrome over took me. One kit was opened and inspected right there in the hobby shop. My first impression, "Wow, the hull is molded in silver plastic."
Ok. This is supposed to be about building the J2, not about my regression back to childhood. I pushed three other kits off of the workbench to start on the J2. I spread out the parts trees so I could see all the pieces, glance at the instructions, and start to dry fit the pieces together.
The dry fit process is a necessity with this kit, since it allows you to establish the assembly order. The lower deck walls don't lock together very well, so I used CA to tack them together in the proper alignment. Be careful though, you don't want to glue the walls to the lower deck floor yet.
Once the proper relationship between the pieces has been determined, I broke the CA joints and prepped all the pieces for painting. I chose Testor Model Master (TMM) Radome Tan FS 33613 as my light wall and floor color. For the darker brown color I used TMM Dark Tan FS 30219.
The elevator grill frame was painted in TMM Aluminum. I used Micro-Scale Liquid mask to protect the clear areas ( I didn't feel like cutting them out ). Micro-Scale also makes a nice clear parts adhesive, which I used to attach all the clear parts.
A coat of Future floor wax protects the enamels from the wash of oils that I used to bring out the raised detail on the lower deck walls. After the oils dried, a good week later, a coat of flat lacquer restored the matte finish. Then I added details , like the cylinders on the lab wall and the view screens.
After painting the walls and lower level floor, I assembled the lower deck and placed it inside the lower hull. This revealed that portions of the inside surface of the lower hull would show between the walls. I used a pencil and marked off the outline of the lower deck on the inside of the lower hull and painted it to match the lower deck floor. Then I glued the lower deck to the lower hull. (As an aside, I have now removed the out of scale lower deck from my J2, in favor of adding detailed landing gear wells).
The main deck is beautiful, in stark contrast to the lower deck. It doesn't interlock any better than the lower deck does, but it is very well detailed. The main inaccuracies on the upper deck are the seats, too wide and not enough detail. Also, the first run kits, like both of mine, have the inner airlock door molded upside down.
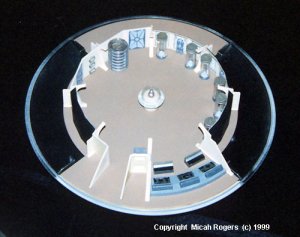
Don't make the mistake I did: I forgot to paint the Dark tan inner circle on the main deck floor ( Ah well... another thing to fix on the redo ). I used the same colors for the main deck floor as used for the lower deck floor and walls. Be sure to study any photos you can find, to get the proper amount of detail on the wall panels. Unlike the lower floor, the main deck can be painted and assembled pretty much according to the instructions. Care is needed when assembling and painting the freezing tubes and elevator cage. The center island (the Astrogator ) can use a little correcting. The miniature J2 is all wrong, and it is on too thick a support.
Finally, I got to the outer hull. The parts are done nicely, but there are swirl marks in the pieces, so get out the sand paper and polishing kit. I started with 600 grit (the marks aren't that bad after all, but they will be noticeable under a metallic finish) and ran the range up to 12000 grit. I finished with a soft cloth and a little fine polishing compound. (Jeweler's Rouge, available at places like Wal-Mart, works great here).
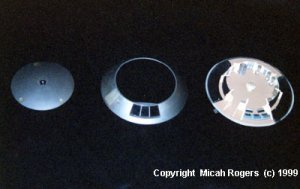
Pick the metal color of your choice, just remember, the studio model was a very dark Aluminum. I painted mine with TMM Metallizer Aluminum Plate, and had to strip it and repaint in TMM Metallizer Titanium. The Aluminum Plate was just too bright.
The construction of the landing gear is simple and straightforward. They consist of two pieces each. They do, however, have large gaps which need to be filled, and are also not accurate to the studio miniature. Once all the gaps are filled, I sanded and polished the outside surface. The outer "door" sections of the landing gear were painted in TMM Metallizers Titanium to match the outer hull color. The inside "step" areas were painted TMM Steel, and the "Oleo" portions of the support were covered in Bare Metal Foil.
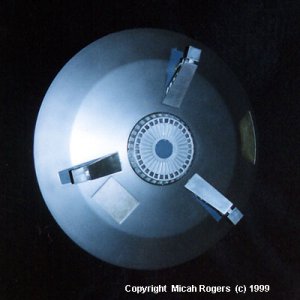
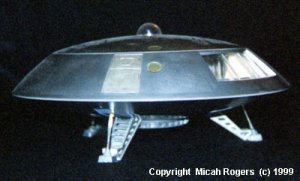
The Fusion Core is molded from one piece of clear plastic and attaches to the bottom of the lower hull. Once again, I used Liquid Mask to mask off the areas that were to remain clear. I then Painted TMM Metallizers Titanium, only to find that to my horror, Metallizers don't work over clear!!! So I painted over the Metallizer finish with plain old TMM Chrome Silver. Not exactly the effect I was looking for, but it works ok.
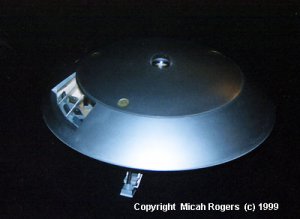
Next, I corrected the profile of the upper "sensor dome". I sat it on a flat surface covered with sanding film, and carefully sanded the bottom edge off until it was closer to the profile I wanted. I then polished the "sensor dome" and the front "windscreen".
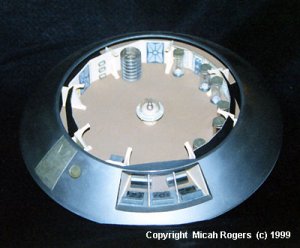
Final assembly was a simple matter of gluing the landing gear and Fusion Core to the lower hull. I then set the upper deck on the lower deck, glued the windscreen to the middle hull,and fit the middle hull on the lower hull. Then I glued the upper Sensor Dome to the upper hull, and sat it on top of the middle hull. Finished!

All in all, a model simple enough for a beginner to do well, but with enough "problems" to fix to make it challenging for an advanced modeler. My Jupiter 2 now sits on my shelf proudly, patiently waiting the start of it's redo. I plan on replacing the kit seats, making detailed landing gear bays, and adding lights to the fusion core at least.
The article is re posted here just in case the other site should go away.
copyright Micah Rogers (c) 1999, 2020.

By Micah Rogers
Finally, after 20+ years, an injection molded model of the Jupiter 2! I was actually "giddy" when I heard the announcement that Polar Lights was going to release an injection molded Jupiter 2. I preordered two, and paid for them in advance. Fast foreword six months, the call comes in from the local hobby shop, "Your Jupiter 2's are here!" The "kid in the candy store" syndrome over took me. One kit was opened and inspected right there in the hobby shop. My first impression, "Wow, the hull is molded in silver plastic."
Ok. This is supposed to be about building the J2, not about my regression back to childhood. I pushed three other kits off of the workbench to start on the J2. I spread out the parts trees so I could see all the pieces, glance at the instructions, and start to dry fit the pieces together.
The dry fit process is a necessity with this kit, since it allows you to establish the assembly order. The lower deck walls don't lock together very well, so I used CA to tack them together in the proper alignment. Be careful though, you don't want to glue the walls to the lower deck floor yet.
Once the proper relationship between the pieces has been determined, I broke the CA joints and prepped all the pieces for painting. I chose Testor Model Master (TMM) Radome Tan FS 33613 as my light wall and floor color. For the darker brown color I used TMM Dark Tan FS 30219.
The elevator grill frame was painted in TMM Aluminum. I used Micro-Scale Liquid mask to protect the clear areas ( I didn't feel like cutting them out ). Micro-Scale also makes a nice clear parts adhesive, which I used to attach all the clear parts.
A coat of Future floor wax protects the enamels from the wash of oils that I used to bring out the raised detail on the lower deck walls. After the oils dried, a good week later, a coat of flat lacquer restored the matte finish. Then I added details , like the cylinders on the lab wall and the view screens.
After painting the walls and lower level floor, I assembled the lower deck and placed it inside the lower hull. This revealed that portions of the inside surface of the lower hull would show between the walls. I used a pencil and marked off the outline of the lower deck on the inside of the lower hull and painted it to match the lower deck floor. Then I glued the lower deck to the lower hull. (As an aside, I have now removed the out of scale lower deck from my J2, in favor of adding detailed landing gear wells).
The main deck is beautiful, in stark contrast to the lower deck. It doesn't interlock any better than the lower deck does, but it is very well detailed. The main inaccuracies on the upper deck are the seats, too wide and not enough detail. Also, the first run kits, like both of mine, have the inner airlock door molded upside down.

Don't make the mistake I did: I forgot to paint the Dark tan inner circle on the main deck floor ( Ah well... another thing to fix on the redo ). I used the same colors for the main deck floor as used for the lower deck floor and walls. Be sure to study any photos you can find, to get the proper amount of detail on the wall panels. Unlike the lower floor, the main deck can be painted and assembled pretty much according to the instructions. Care is needed when assembling and painting the freezing tubes and elevator cage. The center island (the Astrogator ) can use a little correcting. The miniature J2 is all wrong, and it is on too thick a support.
Finally, I got to the outer hull. The parts are done nicely, but there are swirl marks in the pieces, so get out the sand paper and polishing kit. I started with 600 grit (the marks aren't that bad after all, but they will be noticeable under a metallic finish) and ran the range up to 12000 grit. I finished with a soft cloth and a little fine polishing compound. (Jeweler's Rouge, available at places like Wal-Mart, works great here).

Pick the metal color of your choice, just remember, the studio model was a very dark Aluminum. I painted mine with TMM Metallizer Aluminum Plate, and had to strip it and repaint in TMM Metallizer Titanium. The Aluminum Plate was just too bright.
The construction of the landing gear is simple and straightforward. They consist of two pieces each. They do, however, have large gaps which need to be filled, and are also not accurate to the studio miniature. Once all the gaps are filled, I sanded and polished the outside surface. The outer "door" sections of the landing gear were painted in TMM Metallizers Titanium to match the outer hull color. The inside "step" areas were painted TMM Steel, and the "Oleo" portions of the support were covered in Bare Metal Foil.


The Fusion Core is molded from one piece of clear plastic and attaches to the bottom of the lower hull. Once again, I used Liquid Mask to mask off the areas that were to remain clear. I then Painted TMM Metallizers Titanium, only to find that to my horror, Metallizers don't work over clear!!! So I painted over the Metallizer finish with plain old TMM Chrome Silver. Not exactly the effect I was looking for, but it works ok.
Next, I corrected the profile of the upper "sensor dome". I sat it on a flat surface covered with sanding film, and carefully sanded the bottom edge off until it was closer to the profile I wanted. I then polished the "sensor dome" and the front "windscreen".

Final assembly was a simple matter of gluing the landing gear and Fusion Core to the lower hull. I then set the upper deck on the lower deck, glued the windscreen to the middle hull,and fit the middle hull on the lower hull. Then I glued the upper Sensor Dome to the upper hull, and sat it on top of the middle hull. Finished!

All in all, a model simple enough for a beginner to do well, but with enough "problems" to fix to make it challenging for an advanced modeler. My Jupiter 2 now sits on my shelf proudly, patiently waiting the start of it's redo. I plan on replacing the kit seats, making detailed landing gear bays, and adding lights to the fusion core at least.

The article is re posted here just in case the other site should go away.
copyright Micah Rogers (c) 1999, 2020.

