On30 Turnout Kitbash

Status
Not open for further replies.

Lighthorseman

Active Member
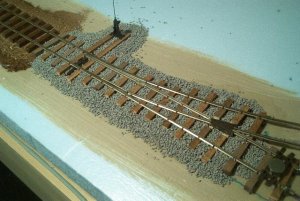
As requested, here is a step-by-step pictorial of how I convert Atlas HO code 83 turnouts to On30.

I went this route for two reasons.

One - The Peco On30 track is lovely, but I wanted code 83 rail, not code 100.

Two - I had loads of code 83 track and turnouts, and being a cheap fella, wanted to use that up. :p

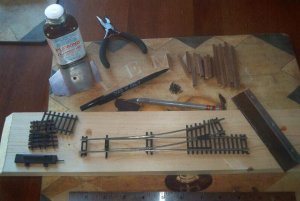
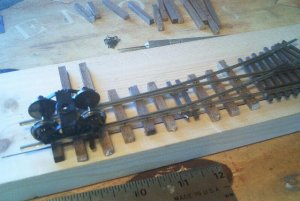
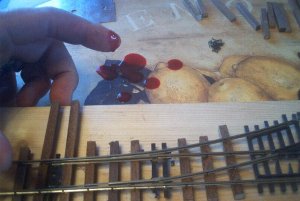
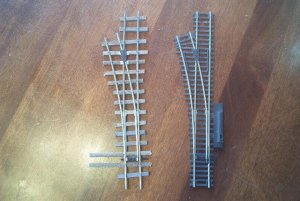
So, off we go. Here are what I started with; rather than laboriously identify each item, I'll just include what I used in the picture.
 

Attachments

  • step 1 - atlas code 83 turnout.jpg
    step 1 - atlas code 83 turnout.jpg
    44.1 KB · Views: 881

Lighthorseman

Active Member
..

First, I stripped some of the ties from the turnout, keeping some at the end to keep the rail roughly in gauge.
 

Attachments

  • step 2 - first ties removed.jpg
    step 2 - first ties removed.jpg
    38.4 KB · Views: 858

Lighthorseman

Active Member
...

I flipped the turnout upside-down, and applied "Pliobond" glue to the bottom of the rails, being very careful not to glue the moving rails. (Points? Slidey-things??):confused:
 

Attachments

  • step 3 - pliobond on rail bottom.jpg
    step 3 - pliobond on rail bottom.jpg
    37.2 KB · Views: 871

Lighthorseman

Active Member
....

Back over goes the turnout, and ties are placed underneath. The Pliobond holds them in place, although not too well, but enough to start spiking.
 

Attachments

  • step 4 - ties placed.jpg
    step 4 - ties placed.jpg
    47.7 KB · Views: 857

Lighthorseman

Active Member
.....

Now it's time to start spiking. I use a small pair of pliers, although I've heard of spiking tools. (?) While spiking, it's important to keep the rails in gauge. I use the NMRA standards gauge, and for funsies, run a wheelset along the rail.
 

Attachments

  • step 5 - spiking.jpg
    step 5 - spiking.jpg
    44.7 KB · Views: 842

Lighthorseman

Active Member
......"Ow!"

Then, it's time to trim around the frog. Remember...X-Acto knives are sharp . Ouch. This is NOT how you stain the ties.;)
 

Attachments

  • step 5a - be careful.jpg
    step 5a - be careful.jpg
    44.8 KB · Views: 836

Lighthorseman

Active Member
.......

Sorry 'bout that. :D 
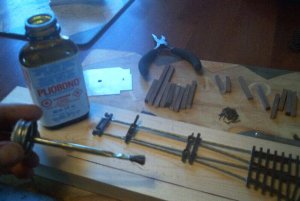
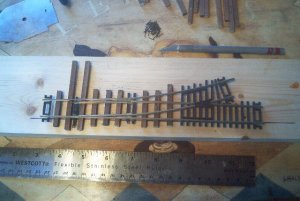
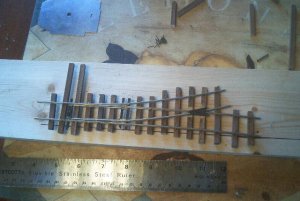
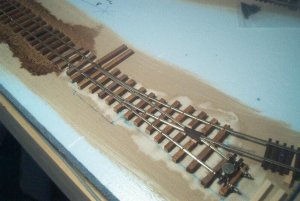
Now, the frog has been trimmed, and I do not try to file the bottom of the frog down to the level of the rail; rather, I notch the ties under it. Here they are, all fitted in, ready for spiking.
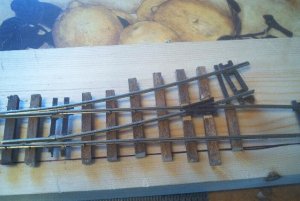
 

Attachments

  • step 6 - frog notched.jpg
    step 6 - frog notched.jpg
    45.9 KB · Views: 828

Lighthorseman

Active Member
........

Well, we're getting there. The last HO ties have been removed, and the new ties spiked down.
 

Attachments

  • step 7 - almost there.jpg
    step 7 - almost there.jpg
    46.5 KB · Views: 812

Lighthorseman

Active Member
..........

Now that it's been built at the "workbench" (kitchen table), :D it's time to install the thing on the layout. Here it is, glued down.
 

Attachments

  • step 9 - glued down.jpg
    step 9 - glued down.jpg
    43.7 KB · Views: 824

Lighthorseman

Active Member
...........

Oncethe glue had dried, it was time for my favourite part. The test run. Here it is.
 

Attachments

  • step 9a - test run.jpg
    step 9a - test run.jpg
    39.8 KB · Views: 817

Lighthorseman

Active Member
Next...

Once I have ballasted this section, I'll post a follow-up picture.

I have no idea if this is actually useful, but it was a fun pictorial to put together. :)
 

Lighthorseman

Active Member
Following Up...

Thanks so much for all the kind words, folks!

Catt - Go right ahead. I'd be honoured. :eek:ops:

Shaygetz - That would be some careful work in HOn30. Beyond my fine-motor skills, I suspect! :D

RailRon - I intend to have a manual under-the-table system involving an inexpensive slide-switch. Will post on this soon.

Narrowsteam - Here is a link to the thread I posted when looking for switch stands.

http://www.the-gauge.com/forums/showthread.php?s=&threadid=4377&highlight=switch+stand


I have put down some ballast, and here is the result. Next is to scenic around the turnout, paint the rail, and touch up with a little stain here and there.
 

Attachments

  • step 10 - ballasted.jpg
    step 10 - ballasted.jpg
    59.9 KB · Views: 626

ezdays

Out AZ way
This thread was moved to the Academy November 2005. Some posts were deleted to provide clarity and continuity the this important thread. It has been locked, so if you have any comments on this thread, please make them in the appropriate forum. Thanks.
 
Status
Not open for further replies.
Top