

ngauger - challenge #1
- Thread starter N Gauger
- Start date
You are using an out of date browser. It may not display this or other websites correctly.
You should upgrade or use an alternative browser.
You should upgrade or use an alternative browser.
Well, I finally got some more time to work on the challenge ")
In order to make a good final display, You have to have a prototype
http://www.detrick.army.mil/cutting_edge/index.cfm?chapter=chapter10
Note the open pit between the rails, and the concrete on either side, presumidly keeping the rails in gauge
In order to make a good final display, You have to have a prototype
http://www.detrick.army.mil/cutting_edge/index.cfm?chapter=chapter10
Note the open pit between the rails, and the concrete on either side, presumidly keeping the rails in gauge
Now, for my next step, I had to build a rail support and also design something to keep these rails from spreading open. I decided that a good foundation of 2 x 4's would carry the weight of the Bachmann Climax, so I cut out the middles of the ties, cut 2 2x44's to fit under the track, painted them white and set it all up as below.
Attachments
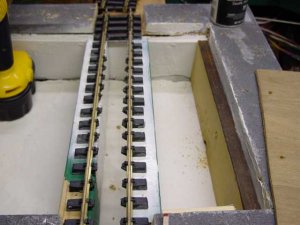
After screwing it all together, I re checked the level of the tracks (Close enough) 
And then started the positioning of the wood for the supports of the rails... That piece of 1/4" plywood is 5 1/2" x 16 1/2".... I set the wood against the ends of the ties.. this is what keeps it in line...
And then started the positioning of the wood for the supports of the rails... That piece of 1/4" plywood is 5 1/2" x 16 1/2".... I set the wood against the ends of the ties.. this is what keeps it in line...
Attachments
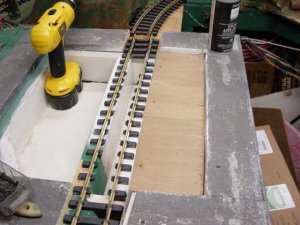
Next problem..... Note on the prototype, the concrete comes almost to the rails... I need some more wood here.. After measuring with a scrap piece of 1/4" - I found I was 1/8" short... Spacers are a good thing!!!!! I put some spacers cdown, then cut and set the "top" pieces of 1/4" a little higher than the railheads
Attachments
Now we're close to the prototype... Both ends of the ties are tightly wedged in between the wood. The rails are not moving "outward, (They will move in, but teh flanges on the cars and engines will compensate for that)
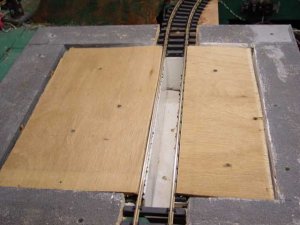
Now... concrete... hmmmmmmmmmm
I always wanted to try spackle as concrete.. I decided that this would be a good test...
Step 1 -- Take a good portion of spackle and put it on the wood...
Step 2 -- Get a small bowl of water
Step 3 -- Wet you rhands and smear the spackle around.. This is the fun part!!!!
Step 4 -- Use a paint stick (wet it first) to smooth it out as much as you can. Remember - you can always come back for a second coat in a day or 2 when this first coat dries...
Step 5 -- When you finally have all the spackle totally smoothed out, go wash your hands... and stand back (3 ft) and Look!!!!!!
Both ends of the ties are tightly wedged in between the wood. The rails are not moving "outward, (They will move in, but teh flanges on the cars and engines will compensate for that)Now... concrete... hmmmmmmmmmm
I always wanted to try spackle as concrete.. I decided that this would be a good test...
Step 1 -- Take a good portion of spackle and put it on the wood...
Step 2 -- Get a small bowl of water
Step 3 -- Wet you rhands and smear the spackle around..
This is the fun part!!!!Step 4 -- Use a paint stick (wet it first) to smooth it out as much as you can. Remember - you can always come back for a second coat in a day or 2 when this first coat dries...
Step 5 -- When you finally have all the spackle totally smoothed out, go wash your hands... and stand back (3 ft) and Look!!!!!!
Attachments
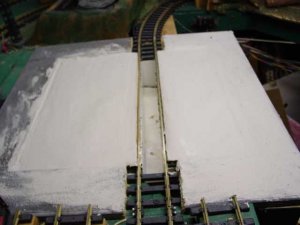
Now, take one finger and wet it and clean off the spackle on the rails
Now you got it!!!!
A repair pit for a car or locomotive.... Of course, Sizes vary. You might not need a 16" long one for your Ho cars But since my cars are a foot long, I thought 2" on either end would be ok...
I'll have to see how this dries to see if I need a second coat...
Now you got it!!!!
A repair pit for a car or locomotive.... Of course, Sizes vary. You might not need a 16" long one for your Ho cars
But since my cars are a foot long, I thought 2" on either end would be ok...I'll have to see how this dries to see if I need a second coat...
The hardest part was finding scrap 1/4" plywood, with a straight edge  2 of them no less!!!! sign1 sign1 sign1 sign1
2 of them no less!!!! sign1 sign1 sign1 sign1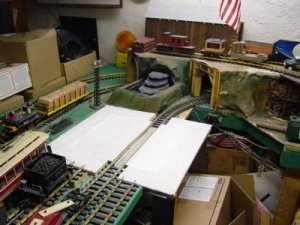
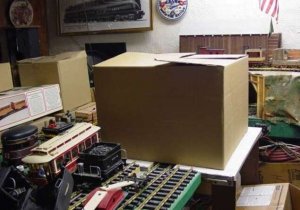
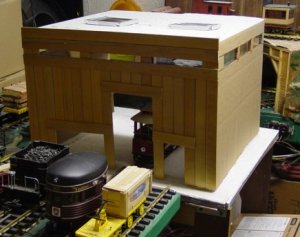
The trolly stops intside just to get a good look... The front has the wood panels in place, theright side shows the side of the cardboard box that I used as a base. The long slits are windows, that i cut plexiglass for.... The orange wires ahe holding the plexi in place. The 2 smallesquare windows are skylights (Plexiglass) and have extruded aluminum frames.
It measures 21 X 21 X 16" tall
The front has the wood panels in place, theright side shows the side of the cardboard box that I used as a base. The long slits are windows, that i cut plexiglass for.... The orange wires ahe holding the plexi in place. The 2 smallesquare windows are skylights (Plexiglass) and have extruded aluminum frames.It measures 21 X 21 X 16" tall