Need advice about RC options for ultralight paper airframe project

liftline

Member
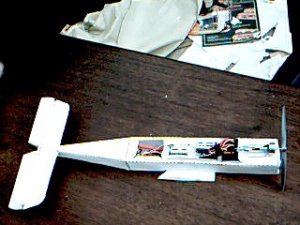
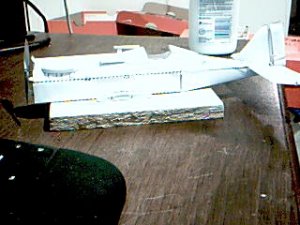
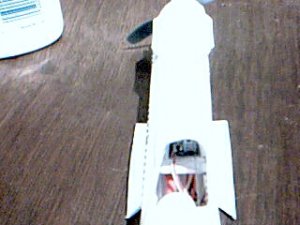
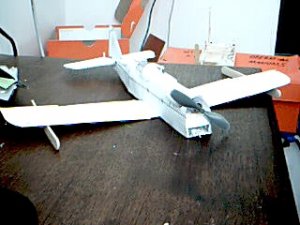
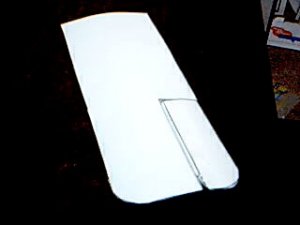
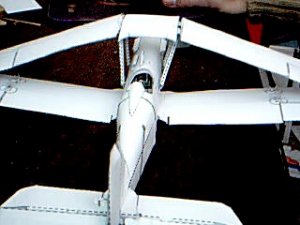
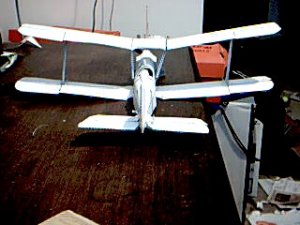
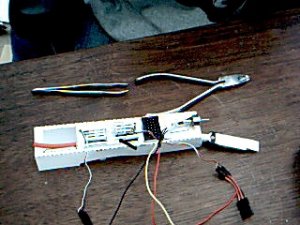
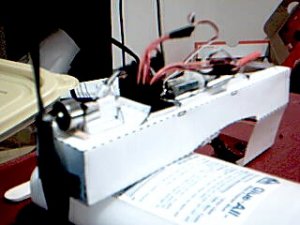
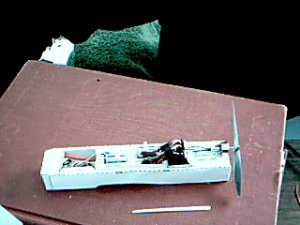
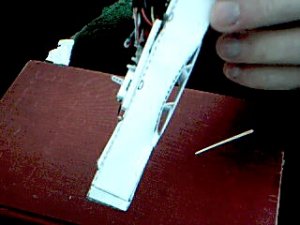
The glue has dried, so I thought I'd do a little weight check (OK, mass check). Forward fuselage, RX, motor & mount, battery & box, ESC, 2 servos, all plugs & wires come to 26g. Add 1 gram for the prop. The entire paper & glue airframe comes to 17.5 g. So, I feel very confident the entire takeoff weight will be less than 43.5 g. most likely in the vicinity of 42 g since the forward fuselage paper weighs 1.5 g. My pushrods weigh next to nothing.

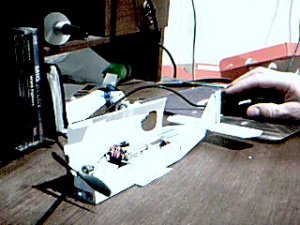
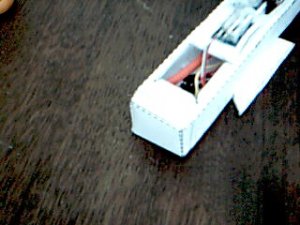
I think I can live very nicely with a nominal takeoff 0.47 thrust to weight ratio! I hope to shave a few excess grams in future with lighter plugs and wires. The wheels and axles offer potential savings too. Maybe the battery case depending upon how the CG pans out.

The big unknown is my piloting skills. I'll see how she does in taxi tests fairly soon. Still scouting indoor venues.

Wool earring would sell very well in Yellow Springs, Ohio - an incredible little college town just North up the highway from where I live.
 

Attachments

  • Picture 51.jpg
    Picture 51.jpg
    36.8 KB · Views: 59

schorhr

Member
Well, perhaps you can put in a little more V-shape into the wings (if none allready) and a little low center of gravity so it's a bit more self stable... then nothing can go wrong :)

.47... sounds great! That should be more then sufficient.

Hehe.. right now I printing a set of ball-in-wireframe earrings, but the first set failed (too low support material angle ending in a messy print before it even started) :) So much testing to do .-))
 

liftline

Member
Inherent stability of the Se5a is one of the reasons I chose this design for my first RC scratch built. Lots of dihedral and it initiates beautiful banked turns with just rudder. Still, with 0.47 T/W it may be a bit hot for me.

The prop is on. Just enough clearance. Probably should have soldered the engine leads to the plug first. Oh well. I'm hoping to get all the electrics soldered up and tested sometime late in the day. Got slightly detoured with how to attach the radiator - the next version will be a bit more sophisticated so I can access the engine better.

You seem to be making solid progress with the art of 3D printing. Enjoy!
 

schorhr

Member
Well, that's the way to lean how to improve things the next time :mrgreen:

Yep, I really am
http://wap.cc/wp-content/uploads/2011/01/IMG_7551_Grau.jpg
(left: almost cleaned, right: as-printed)

I just need to clean the printhead and plattform, as it caused some rough spots :) After painting it will be fine...
And follow the companies debuging instructions to solve my raft-issues.

I wonder if I can print a whole plane out of ABS without making it too heavy :D
 

liftline

Member
Your caged ball earrings are way cool.:cool: Very ambitious and the the artistic aspect is great IMHO. I don't see why you can't ultimately carve an airplane "out of the solid" as the Brits like to say. Go for it :thumb: Nothing is too heavy with enough power - although I do recall you saying something about a model weight limit in German airspace.

As planned, I soldered the lead extensions and connected everything up to the RX. Next time I'll know it's better to seal the bottom cover after pushing the plugs onto the RX pins. Enough force to seat the connector plugs can crush the frame if not I'm not careful. Fortunately, a popsicle stick inserted into the ample battery box provides the required counter force on the RX to cancel the downward push on the pins. Is there nothing popsicle sticks can't fix?

Took the rig for a test spin and every item worked perfectly. That little motor sure can pull. I know it's a bit of a tangle in it's current configuration, but some electrical tape and ad hoc wire bundle mounts will take care of that. My salvaged phone cord wires are a bit stiff, & probably too thick, but they match my excessively large pin connectors. Weight the model can lose in future.

Time to head out for a bit of celebratory beer and music.aussie

I know the 2 attached pics don't completely support the following statement , but there is actually plenty of clearance within the upper fuselage to house the plugs and wires. Like packing a tight suitcase.

I think taxi tests will occur in the very near future (days). I'd like to get a sense of how lively the bird is, prop wash effects and general response to rudder and elevators.
 

Attachments

  • Picture 52.jpg
    Picture 52.jpg
    37.1 KB · Views: 51
  • Picture 53.jpg
    Picture 53.jpg
    28 KB · Views: 52

liftline

Member
Sealed up the forward lower fuselage this morning after some last minute wire bundling and rerouting. Clearly lighter, less messy wiring is the next development hurdle.

Pic 1. Things look pretty clean if you don't look at the tangle of excess wire just under the cockpit cutout. The ESC didn't need a mount, all the wire keeps it secured. Bit of a weight savings.

Pic 2. Here is the lower side before I secured the lower center wing section. You can see the antenna wire and the leads going to the ESC.

Pic 3. A side view showing the internal bracing inside the center wing sections. Same system is used in the main wings. Hard to design (I let the computer handle that) but easy and quick to construct. Light weigh too.

Now that all the seams are connected the lower forward fuselage seems nice and strong - strong being a relative term in a 42 g paper plane.

Pic 4 is a shot of the aft end "bulkhead" which doubles as a plug for inserting the lower part of the aft tail section. Next step is to build that and attach the push rods. From there the build is completely routine, I've done it probably dozens of time in the past.
 

Attachments

  • Picture 56.jpg
    Picture 56.jpg
    24.7 KB · Views: 106
  • Picture 54.jpg
    Picture 54.jpg
    18.8 KB · Views: 49
  • Picture 58.jpg
    Picture 58.jpg
    23.8 KB · Views: 51
  • Picture 59.jpg
    Picture 59.jpg
    28.5 KB · Views: 110

liftline

Member
The model gets its horizontal stabilizer and elevators. Made to a higher standard of craftsmanship than those on the mock-up.

Mass is 29.5 g at this point (battery included. Funny, the model feels much lighter now that the long tail is on. Human perceptions about density are pretty bad, perceptions about moment of inertia even worse.:p Or maybe just mine.
 

Attachments

  • Picture 60.jpg
    Picture 60.jpg
    33 KB · Views: 47

liftline

Member
:car1:

The fuselage is completed except for the exhaust pipes and radiator. You might say the avionics are now wearing the fuselage.

Sealing the top of the forward fuselage was my "Crossing the Rubicon." No easy way to fix anything that goes wrong after. Passed one more test of the avionics.

Some views of the nearly complete fuselage. The Vickers gun, Aldis sight, headrest, fairing and valve covers add some authenticity.

You can just make out the elevator servo through the cockpit opening in the last pic.

The rest of the build is routine. Four wings to assemble, some struts, undercarriage and a Lewis gun. Looking good in white, but the next version will be much nicer when electronically painted.
 

Attachments

  • Picture 62.jpg
    Picture 62.jpg
    35.5 KB · Views: 99
  • Picture 61.jpg
    Picture 61.jpg
    33.9 KB · Views: 44
  • Picture 63.jpg
    Picture 63.jpg
    32 KB · Views: 47
  • Picture 64.jpg
    Picture 64.jpg
    21.6 KB · Views: 106
  • Picture 65.jpg
    Picture 65.jpg
    20.8 KB · Views: 49
  • Picture 68.jpg
    Picture 68.jpg
    25.7 KB · Views: 45

schorhr

Member
Wow I missed the post reply notification :curse:!

Neat! And yes, popsicle sticks can be very usefull, and it is a tasty procedure to source them. :thumb:

Looks like your bird is almost ready to jump out of the nest :)
I printed my quad frame to see how it turns out, but the ABS is a bit more brittle then the Nylon frame, so I need to make some parts stronger...
http://wap.cc/2011/02/02/286/

By the way, order one of the keychain spy cams when you order at Hobbyking the next time, or get one for ~$8 at ebay... The quality of your pictures is horrible, hehe :mrgreen: Plus the little cam can be stripped to 10, or 5g with ext. power, great for onboard flight videos :twisted: But probably a bit heavy for your little one... unless you use the 10g motor!
 

liftline

Member
Very nice work on those quad frames! You seem to be learning the art and science of 3D printing with amazing speed.

Nylon is pretty tough stuff but ABS has it's charm in terms of rapid programming.

Yes, my pics are really terrible. The white model has poor contrast, and I'm a completely inept photographer. It's genetic I fear. Kind of cash strapped lately, bills had to be paid, but a key chain camera is on the list. I would love to get an in flight view from the cockpit. I also wonder how much weight is needed for a GPS system these days. It would be great to be able to set way points for a model. Build my own drone.

Weight of the complete model fuselage and tail surfaces is now running to 31.5 grams. I started building the lower wings late in the day, but got distracted by a dinner invite. I'm quite proud of my wings, light, strong, precise plus very easy and quick to build. The full set of wings should add about another 7 grams. That gives me 3.5 g for struts and undercarriage.

The CG looks to be about right, likely just a little nose heavy.

My mother found popsicle "craft sticks" sticks at the dollar store and picked up a few hundred for me. One of the most useful tools in paper modeling. Toothpicks are great too.
 

schorhr

Member
Yeah, that would be neat :) GPS trackers are relativly light, but the price seems to stay over $30, compared them a few times; The one for $25 at DealExtreme seems to ship without memory most of the time.

The keychain cam does only hav 640x480 chip resolution but I find the quality rather good. Usualy I just film and extract the pictures out of the motion jpeg stream... :) More chances to get a non blurry shot. Looking at Chuck's website I see there are some arround with 1280x720 CHIP RESOLUTION now, not just interpolated! Nothing about the frame rate yet though... The #3 or similar with real 30 frames per second and 640x480 was allready nice.
Woah. $40 for the new ones. As the other cost under $10 (or $20 for the sun glasses) that's a cheaper solution :)


Wings done allready? Great!

CG: I bet it will work out :thumb: Did I mention the motor should be angled a bit? wall1 Don't recall what it is called in english (pic).
But worst case is that it will need some manual elevator correction or a programmed curve.

Yeah, 3D printing is fun. With KITs under $600 and prebuild devices under $1500 they reached a price tag that once was not unusual for a good laser printer ;-) Everyone should have one, and I bet one day they will. The pp3dp UP printer is as plug and play as it gets, it's amazing ^_^
 

liftline

Member
Yeah, that would be neat :) GPS trackers are relativly light, but the price seems to stay over $30, compared them a few times; The one for $25 at DealExtreme seems to ship without memory most of the time.

Hmmm - I must look into that

The keychain cam does only hav 640x480 chip resolution but I find the quality rather good. Usualy I just film and extract the pictures out of the motion jpeg stream... :) More chances to get a non blurry shot. Looking at Chuck's website I see there are some arround with 1280x720 CHIP RESOLUTION now, not just interpolated! Nothing about the frame rate yet though... The #3 or similar with real 30 frames per second and 640x480 was allready nice.
Woah. $40 for the new ones. As the other cost under $10 (or $20 for the sun glasses) that's a cheaper solution :)

I'm just snapping with a Logicam, maybe I should try motion capture like you. Even with a high end Nikon I have trouble getting a good shot of a white paper model.


Wings done allready? Great!

The wings were prototyped way back in August of last year. Just folding up new ones. Each wing is made from just three patterns, one for the top side, one for the bottom side and one for the twin internal spars. The ailerons are another 3 patterns, one for the skin, one for something I call a "sparser" (spar + spacer) and one for the hinge. It takes about 15 minutes to make each wing. I'm locking all but one of the ailerons on this prototype, the unlocked one may come in handy as a manual adjustment.

CG: I bet it will work out :thumb: Did I mention the motor should be angled a bit? wall1 Don't recall what it is called in english (pic).


But worst case is that it will need some manual elevator correction or a programmed curve.

Prop clearance was tight with the short shaft on the 2g motor, so I just kept the axis of the motor parallel to the battery case. The new FLYSKYs don't allow you to program the servo curves - or if they do the GUI interface doesn't support it. You can do permanent trimming. I've learned not to get too close to my old 2.4 GHz portable phone when using the Flysky!


Yeah, 3D printing is fun. With KITs under $600 and prebuild devices under $1500 they reached a price tag that once was not unusual for a good laser printer ;-) Everyone should have one, and I bet one day they will. The pp3dp UP printer is as plug and play as it gets, it's amazing ^_^

I could find a million uses for one. Custom servo mounts, motor mounts and control linkage horns come to mind immediately. I imagine the plastics will get better structural properties as the technology progresses.

Gluing up the lower right wing as I type (well, not exactly, that would get glue on the keyboard) and I should have the lower wings and the upper center wing section attached to the fuselage by the end of today. Traditionally, I attach the undercarriage next and the upper set of wings get hung on the bird last.
 

liftline

Member
The lower wing is attached to the fuselage and I'm printing the cabane struts and paper "lugs" to attach the center section of the upper wing.

The lower wing is easily strong enough to support the fuselage without additional help from the upper wings and struts. Rate it maybe 3 g +/-. My guess is the airplane could fly in it's current monoplane configuration, but I would prefer not to try! You can see the dihedral is generous in the attached AWFUL PIC (commence throwing rotten fruittrain97).
Current all-up weight is 35.5 g. CG should be darned near perfect!

:welcome1: Ecuatoriano! Happy to see a representative from the mainstream of card modeling is visiting my heretical little RC branch. The display examples I see in the Zealot aviation (and other) card modeling threads are simply stunning! My Se5a looks a lot better when it's "painted" - you can see examples way back 18 pages or so. Color printing is too expensive for prototyping!
 

Attachments

  • Picture 71.jpg
    Picture 71.jpg
    29.4 KB · Views: 38

ecuatoriano

New Member
Liftline

I am following with great interest this project.

Have you considered using airframe made of aluminum (soda cans)?

The average 8oz aluminum pop can weighs 14 grams.

dsc09618mg.jpg


dsc09615.jpg
 

liftline

Member
soda can airplanes!!!!!!

Not until now. Those Cubs are little gems! Can't quite make out the numbers, but maybe 10cm span? I'm working at something close to the practical limit of "off the shelf" RC with my 30 cm Se5a and I fear it would be too heavy.

The airframe in this thread is made almost completely of 75 g/m3 computer paper and it weighs in at 17.5 g. Quick calculation says that's .233 m3 worth of paper which works out to a bit less than 4 8.5 x 11" sheets. For the record, I'm about 25% efficient in my use of paper in a finished design. Not a lot of mass in my structure. But, for larger models, hmmm, very interesting idea.

How do you flatten the cans, and how do you paint them. I've never been able to get paint to stick to aluminum.
 

ecuatoriano

New Member
Not until now. Those Cubs are little gems! Can't quite make out the numbers, but maybe 10cm span?

About 18cm span

I'm working at something close to the practical limit of "off the shelf" RC with my 30 cm Se5a and I fear it would be too heavy.

I understand

The airframe in this thread is made almost completely of 75 g/m3 computer paper and it weighs in at 17.5 g.

Amazing

Quick calculation says that's .233 m3 worth of paper which works out to a bit less than 4 8.5 x 11" sheets. For the record, I'm about 25% efficient in my use of paper in a finished design. Not a lot of mass in my structure. But, for larger models, hmmm, very interesting idea.

I understand, maybe the next generation of rc motors (engines) could bring more power by less weigth. I think that fildder green style models made of aluminun (can soda) could fly and resist some crash landing :)

How do you flatten the cans, and how do you paint them. I've never been able to get paint to stick to aluminum.

I didnt paint it but I think it is posible. The soda can could be cut like paper with scissors.

Warning: This is dangerous not to try to do if not of legal age, if not sober or you do not have protective equipment and insurance up to date.

If finally you do this activity, the impact is not my responsibility.


dsc09729v.jpg


dsc09730.jpg


dsc09731m.jpg


dsc09732e.jpg


dsc09733v.jpg


dsc09734x.jpg


dsc09735u.jpg
 

liftline

Member
Just completed attaching the upper center wing section & its struts to the fuselage. A very tricky step...it's best to keep young children out of hearing range 'cause it gets "a little blue." wall1 Doing this well makes it a lot easier to true the upper and lower wings.

The cabane struts (I like the WWI era British term "half-struts") fit into 4 folded paper lugs on the upper center wing section and 4 matching lugs on the fuselage. The lugs are really artistic "glue traps" that get the alignment pretty close. You than have about 15 min. to get it even better by applying finger pressure until the glue sets.stooges8

The model is now officially a biplane. The next step is to hang the left and right upper wing sections from the four small tabs conveniently provided on the center section mounting lugs. The upper and lower wings are given a precision alignment when the main struts are attached. More paper lugs.
I'm off to do some paying work while the glue sets.
 

Attachments

  • Picture 74.jpg
    Picture 74.jpg
    14.5 KB · Views: 118
  • Picture 75.jpg
    Picture 75.jpg
    20.1 KB · Views: 109

liftline

Member
Pure genius! A great use for used aluminum cans.

I Love those Fiddlers Green models...easy to build and they look great. Some people get them to fly, back around 2003 it could be done using the guts of a Spinmaster capacitor fueled flying toy.

My E-buddy/mentor Schorhr is getting me interested in some of the sheet foams which are very popular in Europe. A bit heavier per sq m than my paper, but a lot more durable. Schorhr is the wisdom behind this thread - I provide the enthusiasm! China supplies the parts.

Everything RC is getting smaller, lighter, cheaper and more capable. Except me.
 

liftline

Member
I'm a bit behind schedule, but it's a "winter mix" of snow, sleet, freezing rain and rain today and a perfect time to build airplanes.

The upper wings are on the model. Upper wings are duplicates of the lower wings. I omitted the hinges from the ailerons on the prototype, but they can be bent a bit to trim any tendency to roll. That's the idea anyway.

A pair of folded paper lugs on each half wing serve as attachment points for the struts.

I first hang the upper wings from attachment feet on the upper wing center section. Looks like a bizarre flapping machine at this stage.

I then insert the main wing spars into the lugs and the upper wings are pretty close to aligned with just a little tweaking needed to get them nearly perfect. What you see in the last pic is a "dry fitting" of the just the rear struts. After I glue the struts into the lugs I seal the gaps in the wings with scrap paper fillits.

The struts are entirely of paper, pre-stressed and folded, not rolled. Think of them in cross section as two half pipes joined together They are a bit thicker than scale, my fingers being the limiting factor more than any desire for added strength. I "cure" my struts in the microwave for about 20 seconds, I think heating the white glue makes the bond a bit stronger. My struts almost never fail (even in crashes) so I figure they are good enough. Not so hot aerodynamically, but easy to make. I've never been entirely happy with my struts, but haven't found anything that works better yet.

On to the undercarriage.
 

Attachments

  • Picture 76.jpg
    Picture 76.jpg
    11.6 KB · Views: 53
  • Picture 77.jpg
    Picture 77.jpg
    12.5 KB · Views: 53
  • Picture 78.jpg
    Picture 78.jpg
    27.4 KB · Views: 52
  • Picture 79.jpg
    Picture 79.jpg
    31.7 KB · Views: 108
Top