My On3 layout

nkp174

Active Member
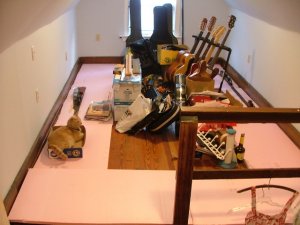
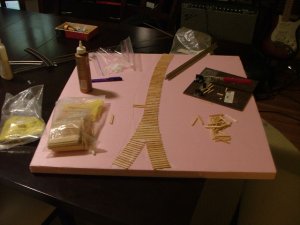
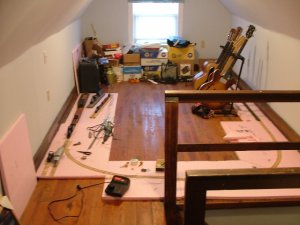
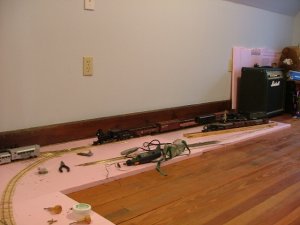
After laying around 11' of mainline over the past 10 months...I decided that it was to get serious about having a layout (rather than just the equipment. My track plan is a basic oval with a 28" minimum radius. I have one siding, a future wye, and a future passing siding.

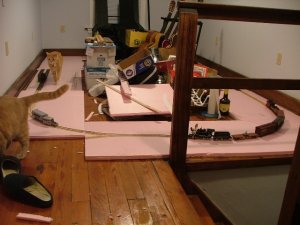
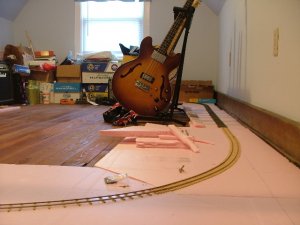
Half of the mainline is/will be on cork roadbed...half direct on the foam board. One of the curves will have tie plates. My intention is to build 24" tall benchwork with storage space underneath...and then cut out the right of way and add mountains, streams, etc...

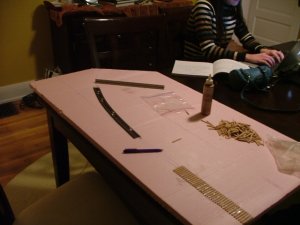
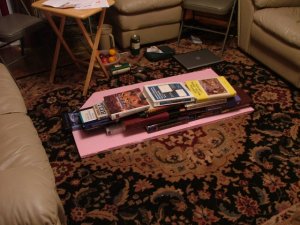
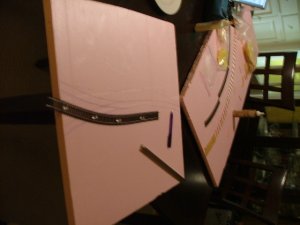
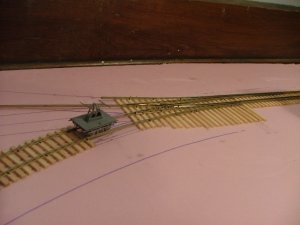
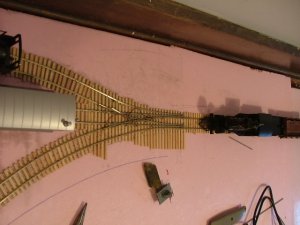
The track laying procedure is: Glue down ties...lay many books on top of them as they dry...then sand...then add rail. The previous method was to glue down the cork roadbed...pile on the books...then glue down the ties...pile on the books...sand the ties...paint the ties...paint the rail...spike the rail down.

I use both spiking tools and needle nose pliers. I have a rotary tool to speed up the turnout making process. I use HO flex track to assist me in laying out the ties.
 

Attachments

  • DSCF5497.JPG
    DSCF5497.JPG
    126.4 KB · Views: 57
  • DSCF5498.JPG
    DSCF5498.JPG
    110.4 KB · Views: 50
  • DSCF5500.JPG
    DSCF5500.JPG
    131.1 KB · Views: 52
  • DSCF5501.JPG
    DSCF5501.JPG
    118.5 KB · Views: 50
  • DSCF5503.JPG
    DSCF5503.JPG
    115.7 KB · Views: 45
  • DSCF5505.JPG
    DSCF5505.JPG
    116.9 KB · Views: 54
N

nachoman

A few questions and comments:

1) your cat looks like my cat

2) I see you are laying the ties directly on foam, and then are spiking the rail. Does the rail hold adequately with spiking into just the ties? I am asuming the foam is rigid enough that it has no "give" when you press a spike in. I am considering laying my own rail, but was told that homasote under the ties is a must. Unfortunately, I can't find homasote anywhere around here (or foam for that matter). My plan is to use standard plywood subroadbed, and then luann plywood roadbed.

3) be sure to not take up *all* the space in that room, cause it looks like you have other stuff that need storage!

Kevin
 

nkp174

Active Member
My trusty assistants Pumpkin(Mr. Pumpers) & Chester. I think they ate the track gang...since we can see their handcar (which is a working model) abandoned next the incomplete stub switch.

In the next picture...it is obvious that the grading crew came through. Then there is a nice picture contrasting the size of HOn3 and On3. That's my HOn3 mainline...all 3' of it...which isn't long enough to hold my entire HOn3 roster. Beyond that is my dad's old On3 mainline...24" long.

The corner closest to the stairs will be a trestle...but for now it is just widely spaced ties. And the final picture shows the nearly completed 3-way stub switch...with the temporarily soldered jumpers in place.


The roster includes:
1 - Balboa brass DSP&P Cooke Mogul
1 - Spectrum Mogul converted to On3 with a Bear Trap stack added
1 - Grandt Line porter
1 - Precision Craft Galloping Goose in the 1950's tourist configuration
1 - Mainline Models 30' boxcar lettered for the South Park after the 1885 renumbering
1 - Model Masterpieces C&S steel underframe flat car
1 - Grandt Line D&RGW 700 series drop bottom gondola
2 - Grandt Line C&S stock cars
1 - brass C&S caboose
1 - Hallmark brass C&S business car
1 - Bachmann baggage car with 36" gauge wheels

Near future additions:
1 - scratch built DSP&P boxcar...needs couplers
1 - scratch built DSP&P waycar (caboose)...needs couplers and some additional details
1 - nearly completed Grandt Line C&S caboose
1 - Bachmann flat car which is awaiting trucks and raising the couplers
1 - Bachmann boxcar in the same state as the flat car
1 - scratch built ex-Kansas Central/DL&G 27' boxcar which is 50% complete
1 - partially completed DSP&P paycar...the frame is ready to roll...it just needs couplers. The body is awaiting my building of the ends.

I have a DSP&P Gunnison depot kit and a C&S Forks Creek station kit for the structures category.

Power is currently provided by an MRC Tech 4 220...or an MRC Command 2000 with the power from the 220.
 

Attachments

  • DSCF5509.JPG
    DSCF5509.JPG
    134.3 KB · Views: 41
  • DSCF5511.JPG
    DSCF5511.JPG
    118.7 KB · Views: 44
  • DSCF5514.JPG
    DSCF5514.JPG
    124.3 KB · Views: 37
  • DSCF5516.JPG
    DSCF5516.JPG
    109.7 KB · Views: 42
  • DSCF5517.JPG
    DSCF5517.JPG
    121.8 KB · Views: 44
  • DSCF5518.JPG
    DSCF5518.JPG
    117.1 KB · Views: 39

nkp174

Active Member
A few questions and comments:

1) your cat looks like my cat

2) I see you are laying the ties directly on foam, and then are spiking the rail. Does the rail hold adequately with spiking into just the ties? I am asuming the foam is rigid enough that it has no "give" when you press a spike in. I am considering laying my own rail, but was told that homasote under the ties is a must. Unfortunately, I can't find homasote anywhere around here (or foam for that matter). My plan is to use standard plywood subroadbed, and then luann plywood roadbed.

3) be sure to not take up *all* the space in that room, cause it looks like you have other stuff that need storage!

Kevin

I'm actually using slightly less than half the space...you can't see the space behind me...the wifey said no at the present time to conquering the whole 30'x8' space :mrgreen:

The foam is an experiment...and I'm going to go back to cork roadbed in the future. It did give sometimes while spiking...but it didn't cause a problem except at the turnouts. I personally think that cork roadbed is ideal for driving spikes into...and I'd never again consider using plywood or particle board directly under the ties...made those terrible mistakes before...as well as laying my HOn3 into pine...all 3 required pre-drilling the holes. I really loved ties-on-cork-on foam.

Homasote is a lumber yard material...I get my foam from Lowes or Home Depot. I'm hoping for nice Lowes/Home Depot gift cards to buy material to elevate the layout and have storage for everything but my guitar rack and Marshal half stack under the layout.

Which cat is closer yours? Chester...the buff cat whom kills squirrels...attacks people whom don't let him outside for a week...and loves people to death for doing anything nice to him...or Pumpers...the tiger and mouse eater. Both prefer Loksound to no sound.
 

bigsteel

Call me Mr.Tinkertrain
great progress there man! that handlayed track is gonna look great :thumb:.im considering hand laying turnouts on my HO layout,on a level of 1-10 how hard do you think it is? i have to have 40+ switches and i REALLY dont want to have to buy'em all and have half of them not work :curse:.keep up the good work and pics :mrgreen:.--josh
 

nkp174

Active Member
bigsteel, it depends on your tools. Of course...you could save enough money to purchase...$300-$800 worth of tools dependent upon what turnouts you were going to purchase. I would highly recommend experimenting with it as it is definitely doable...and could save you enough to add a Precision Scale brass C&O L-1 hudson.

My 3-way stub switch was a nightmare...I'm going to use PC ties and solder the next time I do something like that. The wye turnout was also a pain since it has two curves. The older stub switch was no sweat and my previous turnout experiences were also easier. Stub switches are definitely easier than point switches...which is what you would need to build...but that's because the only part that requires any work is the frog. I've had success with both in the past. I also made it more difficult by not having cork under those two turnouts.

If you print out some templates...you should have no problem building 40 nice turnouts on the cheap.
 

sumpter250

multiscale modelbuilder
The foam is an experiment...and I'm going to go back to cork roadbed in the future. It did give sometimes while spiking...but it didn't cause a problem except at the turnouts. I personally think that cork roadbed is ideal for driving spikes into...and I'd never again consider using plywood or particle board directly under the ties...made those terrible mistakes before...as well as laying my HOn3 into pine...all 3 required pre-drilling the holes. I really loved ties-on-cork-on foam.
In another thread I referred to learning a skill by doing. This is an excellent example of what I was talking about! Trying different techniques, and finding the one that is best for you, and for the layout that will give you the greatest satisfaction!
Keep posting on this project, it will help others.
Pete
 

nkp174

Active Member
Waffles is a narrow gauger too. I'm sitting here on my dad's couch pouring through his narrow gauge books and I saw that F&CC equipment ended up on the Margma Arizona.

Learning from mistakes is definitely less fun than learning from the forum! But some mistakes just need to be made.
 
N

nachoman

Yes. They bought a few box cars, and converted a few of them to flats. There are a few photos of them in Chappel's "rails to cary copper". Crud, that reminds me I need to find that book at the library so I can scan the drawing of #4 in the back!!

Kevin
 

nkp174

Active Member
Yes. They bought a few box cars, and converted a few of them to flats. There are a few photos of them in Chappel's "rails to cary copper". Crud, that reminds me I need to find that book at the library so I can scan the drawing of #4 in the back!!

Kevin

If I recall, la belle makes those boxcars in HOn3. I know that Ye Olde Huff'n Puff makes them in On3. And several people make the D&RG short cabooses like the ones which went on to the F&CC...and then on to the MAAR.

Speaking of experimenting, Sumpter, I've asked for copies of Coronado's F&CC link & pins along with their DSP&P l&ps...to see how they mate. The DSP&P I intend to make my primary couplers...but with a slightly different method of coupling. I've also experimented with On3 Kadees, HO Kadees, and Precision scale knuckles for modern equipment...next up will then be one of San Juan's.
 

sumpter250

multiscale modelbuilder
I've also experimented with On3 Kadees, HO Kadees, and Precision scale knuckles for modern equipment...next up will then be one of San Juan's.

Because my introduction to On30 came via Bachmann, I chose to stay with the HO Kadees. I noticed that the pilot coupler on the Bachmann Mogul, was mounted at a more prototypical height, and have since mounted all my couplers at that height. It requires removing the coupler pad from all the Bachmann rolling stock, and raising the couplers on their locos.
 

nkp174

Active Member
The Bachmann mogul's tender actually sits too low...and raising it the proper height corrected the coupler height.
 

sumpter250

multiscale modelbuilder
The Bachmann mogul's tender actually sits too low...

2 foot gauge coupler height (rail head to horizontal centerline of coupler shank) is 16". 3 foot gauge is 24" the bachmann mogul's tender coupler is 18". By removing the "pad" for the tender coupler, and installing a kadee box, flush with the floor, the new coupler height is 24". I looked at 30" gauge as closer to 36", than 24", (yeah, there's 6" either way) so set the coupler height to match 36" gauge practice.
As to the mogul's tender sitting too low.... the tender deck, and the cab floor, should be the same height, as the fireman has to step from one to the other, in the process of firing the locomotive, and in the case of the mogul, would most likely be standing on the tender deck when actually scooping coal. (the firebox door is only one foot from the back of the cab which accounts for the 3' foredeck on the tender).
In retrospect, the 18" coupler height is probably the most correct for 30" gauge equipment, and no corrections need to be made.
I chose the 24" height for two reasons aesthetics, and the parent company is 3' gauge.
 

nkp174

Active Member
I raised mine with the addition of a pair of PSC trucks and maybe a thin washer or two. It couples nicely with my On3 equipment and the fireman can step forward to press the button that opens the butterfly doors. I love steam engines. So much fun!

Sumpter, do you have a thread with your layout somewhere?
 

sumpter250

multiscale modelbuilder
Sumpter, do you have a thread with your layout somewhere?

I have two "layouts", the first, the Lake County Model Rail Road Club, in Wauconda, Il. is linked in my signature. the Second, is the Lake County Society of Modular Engineers, modular layout, and Deano posted some excellent pictures of my modules here: http://forum.zealot.com/t153938/

With those three modules, and a new three module set under construction, there is no room left for any other "layout", even the Ntrak module gets moved around regularly.
 

nkp174

Active Member
I have seen those before...nice work!

I'm curious...where do you run your narrow gauge trains? I think I recall something about an HOn3 high line on your modules?

By the way...my On3 layout has been disassembled into sections as we have a guest staying up there now. I've stored all of my On3 equipment to prevent it from becoming toys for his dog.
 

sumpter250

multiscale modelbuilder
I'm curious...where do you run your narrow gauge trains? I think I recall something about an HOn3 high line on your modules?

The right of way that crosses the steel arch bridge, on the center module, is dual gauge. There is a set of "back tables" that carry the narrow gauge track around the back in a dog bone, with 18" radius curves. When the modules are home, in the basement, I will hook up the narrow gauge loop, and run it occasionally. LCMRRC had narrow gauge at one time, but the membership decided that, with only one member involved with it, the "real estate" would better serve standard gauge...narrow is gone now.
I am still considering opening the skyboard on the module with the "rock climber", and extending the scene on to the back table. The thought is to take the "river" back is a sweeping curve, just inside the curve of the track(to be hidden), and in the bend of the river, place a turntable, part in, and part on the bank of the river.
 

timbercreekrr

New Member
hello NKP174,

I just signed on and looking through the posts, discovered that on your roster that you have a Bachmann Mogul that you converted to On3. I have just purchased one for my On3 layout and was curious has how you converted your locomotive. I would be interested if you had purchased a new driver set to replace the On30 driver set or machined new axels for the drivers and requartered them. If you replaced them, can you supply me with a part number. Any information would be helpful and appreciated.

Thank you,
timbercreekrr
 

Bill Nelson

Well-Known Member
I just found this thread. and it in nice to see someone else handlaying track. No way am I brave enough to hand lay on foam, I don't even like foam under flex track.

That is a nice 3 way switch. Boy isn't that fun to wire. I built two 3 way stub switches in Ho standard, and it took me half a year to figure out how to


I'm mainly working in Ho and HON3, although I have a few on3 projects.


Thanks for sharing.
 
Top