

About a year ago, my wife and I tiled the backsplash in our kitchen --- little did I know that it would give me an idea for modelling brick or stone mortar quickly, easily and cheaply --- plus I think the end result looks quite good as well 
I've lost count of the number of methods for modelling mortar I've read about over the years. I have a Dave Frary video that showed how to use Modeler's Mortar (from a company in Texas whose name escapes me right now), so I gave that a try and it does work well. However, it costs $4.25 for a small jar (per colour) and tends to dry out over time (although that was probably my fault ). One day I saw the box of tile grout we had used for the kitchen and it dawned on me that it might work for modelling as well --- and it does :thumb:
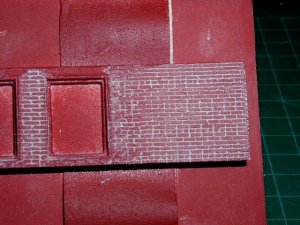
I mix up a couple of good sized tablespoons of the grout with enough water so that the consistency is probably about the same as Hydrocal just before you pour it in to a mould (+/-). The consistency is not that critical --- I just played around until it worked for me. You then add acrylic paint to get the approximate colour of mortar you want. I use small cubes of the same sponge I used for the kitchen (you can buy them at Home Depot, Rona Lansing, etc.) to apply the grout mixture over the entire surface of the wall. Using another dry piece of sponge, I immediately wipe off the excess until I'm happy with the look. Finally, because tile grout leaves a glaze or haze when it drys, I take a third piece of slightly damp sponge and gently go over the surface to remove this haze. You can use this last step to vary the look across the wall (lighter mortar lines in some areas, heavier in others, etc).
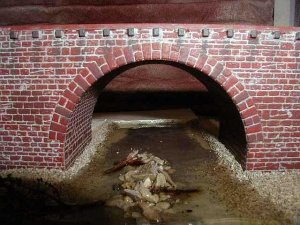
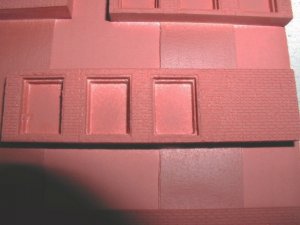
Here are two sets of before and after pictures to show the end result. The first is a Kibri kit, the second is from a structure kit I've just started which has very fine HO brick detail. The second one hasn't got highlighting and weathering yet, so I think the finished walls should look good when they are finished (the colour in the pictures is not very true).
Would appreciate getting your comments/suggestions
I've lost count of the number of methods for modelling mortar I've read about over the years. I have a Dave Frary video that showed how to use Modeler's Mortar (from a company in Texas whose name escapes me right now), so I gave that a try and it does work well. However, it costs $4.25 for a small jar (per colour) and tends to dry out over time (although that was probably my fault
). One day I saw the box of tile grout we had used for the kitchen and it dawned on me that it might work for modelling as well --- and it does :thumb: I mix up a couple of good sized tablespoons of the grout with enough water so that the consistency is probably about the same as Hydrocal just before you pour it in to a mould (+/-). The consistency is not that critical --- I just played around until it worked for me. You then add acrylic paint to get the approximate colour of mortar you want. I use small cubes of the same sponge I used for the kitchen (you can buy them at Home Depot, Rona Lansing, etc.) to apply the grout mixture over the entire surface of the wall. Using another dry piece of sponge, I immediately wipe off the excess until I'm happy with the look. Finally, because tile grout leaves a glaze or haze when it drys, I take a third piece of slightly damp sponge and gently go over the surface to remove this haze. You can use this last step to vary the look across the wall (lighter mortar lines in some areas, heavier in others, etc).
Here are two sets of before and after pictures to show the end result. The first is a Kibri kit, the second is from a structure kit I've just started which has very fine HO brick detail. The second one hasn't got highlighting and weathering yet, so I think the finished walls should look good when they are finished (the colour in the pictures is not very true).
Would appreciate getting your comments/suggestions

") I'll keep that one in mind.
I'll keep that one in mind.
 ops:
ops: