And so I shall!
Image 1 (far left) shows the pep file in its assembled stage. I used card stock for the printing (120gsm), after making sure that the size was the right fit in Pepakura Designer. HOWEVER (and please note) that even when the size was right, I could have gone slightly bigger to accommodate for the resin and fibreglass stages, just to be sure. (if requested I can share the file)
When the paper model was assembled, I used a straight mix of resin and hardener and coated the OUTSIDE of the helmet first, doing so in quarters so that the paper model would not be so weak from saturation that it would not hold its shape. Coating the outside this way, by painting only 1 quarter at a time, ensured that there would be no warping. It might take longer, but any costume or model worth doing is also worth taking time for.
Once the outside was cured and stiff, I cut up 1 by 1 inch squares of fibreglass matte (fibrous) and began to coat the INTERIOR of the helmet to give it support and an added layer of strength. It is HIGHLY advisable to do this, as the sanding and smoothing stage will require a good base to work on.
IMAGE TWO (center)
Here we begin the smoothing stages, using bondo, 80 grit sandpaper, time and patience. I use bondo to help further smooth the contours of the helmet and face. In this case, I did not want to use the facial features of the pep file, so I began sculpting my own design at thsi stage, using the pep file as a guide. By cutting patterns out of paper or painters tape, I was able to trace those patterns onto scraps of sintra plastic to begin my sculpting.
IMAGE THREE (right)
Here you can see how the sintra plastic, cut into patterns, integrate with the rest of the helmet, using bondo as a filler. Sandable primer paint helps to find imperfections, which can once more be filled using bondo or in the case of small pits, glazing putty and sanded smooth with 120 or 200 grit sandpaper.


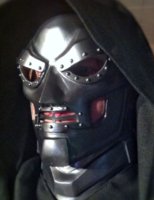
") Cheek areas will be filled in using circut boards from a broken cell phone and the mouth will be getting a grill.
Cheek areas will be filled in using circut boards from a broken cell phone and the mouth will be getting a grill.