making mountains

  • Thread starter Thread starter velmo
  • Start date Start date
V

velmo

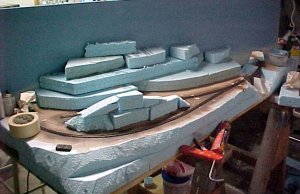
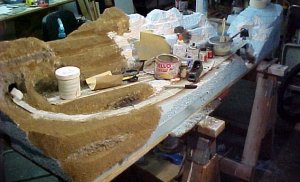
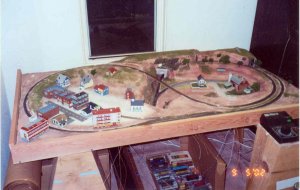
I am having a problem with getting a simple mountain done. I am using strrofoam base rfrom some old boxes and some screen stuff I found at a hardware store. I have tried nailing it to the styrofoam and then placing plaster of paris on it. Seems not to work well and clump up on me. Any good solutions out there? I am going to Gats Saturday and hopefully they will have a mountain making workshop. Velmo
 
Welcome to the gauge!

You might try dipping paper towels into the plaster, then draping those over your form. You may first want to smooth over and rough edges or cover them with news paper. Some earth tone laytex paint mixed into the plaster may make scenery easier later as you won't have a bright white base. Other folks here are more up on modern techniques than I, and you will likely learn something at the show. Have fun!
 
Velmo: Use something other than plaster of paris. It sets up far too quickly. Something that takes about a half hour to set is good. There are also tons of scenery specific mixtures available at a somewhat greater cost.
The other quality you want is that the plaster shouldn't shrink.
Someone at the show should be able to advise. Several someones will probably be glad to sell you something. :D
Check the rest of the gauge for threads on scenery -- look past the first page in some of the forums.
 
Hi Velmo,
Welcome to the Gauge. Check out www.bragdonent.com for mountain making supplies. They normally do the GATS shows but will be at a show in Mass. this weekend. Their mountains are made with two pieces of fiberglass window screen with their own mixture of expanding foam sandwiched in between. The foam is allowed to setup a little then you hot glue the sheet to your mountain framework in the contour you like. You can cut it and make any shape you like and cover the seems with caulking. If you don't like the shape, just pop the shell into the oven and it softens up. After you are happy with the shape and caulked the seems, paint artists gesso over the mountain. This is for smooth rolling hills. If you want rock faces, then you apply them before painting or caulking. They also sell cast satin(their recipe for casting resin) and rock molds that can be used at least 50 times. They make some great stuff and it's worth a look. By the way the foam and cast satin are 2 part mixes and temperature sensitive. So you can control your setup time! Steve
 
Hi Velmo!

I can show you a couple of pictures of what I've been doing recently... (a portable N scale layout)
I like to stack styrofoam into rough shapes that I carve down to what I want, with a small hand saw, & a wood rasp...
Here's what it starts out looking like...
 

Attachments

  • mtn1.jpg
    mtn1.jpg
    50.1 KB · Views: 546
After I've carved the foam, I use a product called Sculptamold, to smooth out some areas, & fill gaps...
I then paint the surface with earth-colored latex paint, & sprinkle on real dirt that I've sifted through a metal window screen...
(I cover the track with masking tape during this process)
 

Attachments

  • prog.110.jpg
    prog.110.jpg
    50.2 KB · Views: 545
Hi Velmo, Its all good advice on your plaster problem but like David said use something besides Plaster of Paris. Its not really a suitable medium for construction of mountains as has a very low adherence factor. Its ok for some "crafty" things that are not permanant. I've used Hyrodcal Plaster for years but its hard to find sometimes. I've had the best luck in finding it at wholesale ceramic supply places as its used to make ceramic molds....Molding plaster sold at building supply places will work nicely too but its not as strong.

Something else that a lot of folks use is plaster impregnated cloth. Its right "pricey" at the LHS but if you will contact a medical supply dealer (used for making casts for broken bones) and if they will agree to sell you some its very reasonable....the last time I bought some they sold me an "outdated" carton of it real cheap.

Another thing to remember when using plaster and to keep it from "clumping" is to always add the water to the plaster when mixing it rather than adding plaster to the water. Having the water at room temperature helps too.
 
I have found plaster cloth to be very easy to work with, if a bit pricey. You can buy plaster cloth in varying widths from medical supply centers for a reasonable price. Dip in water, lay over the base forms, smooth, paint. Real easy-like. Looks like this:
 

Attachments

  • train1.jpg
    train1.jpg
    77.9 KB · Views: 519
Rather than start a new thread I thought I'd revive this one as it asks many of the same questions that I have and has some very good ideas.
I'm starting to "build" my first mountain, scale model that is. I'm using foam, the expanded kind unfortunately, as this is readily available here in So. Cal. and also inexpensive( though extremely messy).
I've built up a corner of the layout, 9x6, with various foam blocks and was now thinking of incorporating some actual rocks that I've picked up that have shapes I like. Rather that casting these, is it feasible to just carve a place for them in the foam and then cement them in place? I'd then add some more foam pieces, cover the foam, not the rocks, with "Foam Coat" a product I've used on expanded polystyrene before to do trade show displays, and then carve out the rest. I'm starting with this
mountn01.jpg

George
 
Real rocks can look okay, other than the obvious disadvanatages that they're heavy, hard to modify, and generally continue to look like 1:1 rocks if not painted so much you might as well have made castings from them. One nice thing about making castings is that if you find a really neat rock with nice patterns you can use the same rock all over your layout by making different castings from it!

That being said, I did grab a few pieces of ballast from various stations on my last Amtrak trip across the country, and utilized them for a diorama I built. It's one of those things I didn't bother mentioning to anyone, but I know they're there...
 
jtbterri said:
...was now thinking of incorporating some actual rocks that I've picked up that have shapes I like....
I used nothing but real rocks in both of these tables...
http://www.the-gauge.com/showthread.php?t=11150
http://www.the-gauge.com/showthread.php?t=11089
The first one, I used decomposed granite. I've found that on the small layouts, it looks funny if you try to use more than one kind so I stick with the same one throughout. The decomposed granite looks good because you can crush it down to any size and replicate anything from gravel to boulders. If you put a talus slope underneath a boulder using the same material, it really helps the boulder "fit in."
The second table, I used something the landscape store called "Sedona Red." It was a lot harder to make it look a part of the scenery due to the color but again, I crushed a lot of it into gravel and sprinkled it throughout the layout.
I lean more towards using real rocks as I don't have that knack for making the plaster ones look real enough for my tastes.
If you want, let me know and I will take some specific photos of my real rocks used in my tables and how I worked them in.
 
Landscape bark (nuggets, not mulch) simulates certain types of rock very well. Dry a few pieces at room temp, attatch with wood glue, blend edges with gesso and paint. They're also very lightweight.
 
Thanks for the inputs and links to your pictures. I was beginning to think that there were problems incorporating real rocks into "model" mountains, other than weight, and those you've pointed out above.

One reason I wanted to try the real rock is I had these two(2) fragments that can be attached to foam, etc., in many positions, horizontal or vertical, and would, in my eye, simulate many of the rock outcroppings I see in my travels here in So. Cal. Here they are;
mountn02.jpg

I was thinking of using chunks of foam around these pieces to build up other rock outcroppings, but the idea of landscape bark is even easier and can give better realism.
George