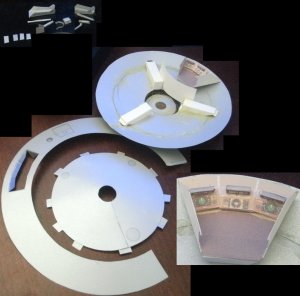
Resource lost in space jupiter 2 mods

This is really nice, I wanted to write "cute', but it's more than that. I like it. :)
 
  • Like
Reactions: spaceagent-9
thanks Zathros.
I had to replace the entire series of pages, due to a scaling error. but the fixes are up now.
 
  • Like
Reactions: zathros
I wish I could work in that scale. I"d love a 12" in diameter Jupiter 2. Anything around that size. This came out really nice. It's quite amazing how well your models look after they are built. ;)
 
GEDC2270.JPGStill working on it, have to glue the viewport to the control area,
and also the struts for the window panes.
Then figure out a viewport ledge piece for the bottom front,
of course all 3 legs. its about 5-6 inches wide.

[ On the bottom hull viewport, I cut a piece and folded it,
so it would appear to have a seam,
cut out the area on the hull and glued in the folded shutter. ]

Just going to have a simple yellow blinker in the dome and power core.
Thanks for being patient.
 
. I"d love a 12" in diameter Jupiter 2. Anything around that size.

I think Ron C is making one that size. he has some great stuff in the works he showed me.
 
the hardest part is going to be connecting the roof to the upper hull. I think I can manage the viewport bottom sill piece.
 
Spaceagent,

Hmmm... I'm thinking that maybe you should have joined the top to the sides and then attached to the bottom. Of course that's not going to work now without scrapping the model.

Ok try this - Glue internal tabs at about 1 inch intervals around the internal periphery of the side walls along the top.

Bend the tabs so that they are slightly bent down with the top side walls, but elevated enough to make a contact with the top. Also, maybe reinforce the tabs with wire twist ties like the ones that are used for bread make it harder for the tabs to deform when applying the top.

Apply glue on top of the tabs (the portion that is facing up towards the top of the model).

Then apply the top of the ship on top of the glue tabs.

When dry, cut the periphery of the top so that it is flush with the side walls.

That's all I've got for now.

Sky Seeker
:tank:
 
that's exactly what I did in a fashion! what I am having trouble with this model is , that the hull ovates in the aft section. and the ceiling isn't just a round peg fitting into a round hole. I might have to make and ''underlip'' and just hope that the gaps aren't too much. snipping it to fit. I don't know why I get this ovation in the back of the hulls. I might have to print out my own and cut them to figure out whats happening.
 
  • Like
Reactions: Sky Seeker
I have never much been a fan of the show but your build is truly impressive. It even makes me want to catch an episode to compare your excellent work, and that's a compliment!

:eek:

Your design and build skill has increased so much during the time you've been with us and this detailed inside/outside kit is impressive beyond!

GREAT WORK!
 
well thank you. for the last 7 years I have found paper modeling to be the greatest hobby an artist could ever have. i would urge every one looking for something to do to learn how to build, refine and design paper models that appeal to them. I am still looking for some kind of plastic sheet to replace card stock with, or maybe very thick rice paper, also something that could be heat press molded for compound curves. tissue and glue can take care of that tho. a simple form made from squish epoxy or air dry feemo clay can be used to make a curved piece. preaching to the choir sorry=lol.

j2.jpg

here is what I am going for. and a link to the video of great sfx

 
. I"d love a 12" in diameter Jupiter 2. Anything around that size.

I think Ron C is making one that size. he has some great stuff in the works he showed me.

I like ANY model of the J2, yours is looking GREAT!!! If I can ever get back on track and find some free time, I'll try to finish up what I've started. I'm not sure of the finished size, could be around 12" D, but I want to use a gumball container for the upper dome; it will be close enough for government work. Also going to use a gumball container for the astrogator, although I have to scale itt just a bit larger to accommodate that. Have to build the floor in quarters, not happy about that, but it's the only way to use a readily available thing for the dome and astrogator. Sorry to hijack, back to Spaceagent's EXCELLENT design and build!

Best Regards,
 
  • Like
Reactions: Sky Seeker
thanks!
but its not my design, I just modified the existing model. here is the link to the Zealot resource.

http://www.zealot.com/resources/jupiter-2.492/

I think we all are waiting for a really good Jupiter 2 with interior. those foam sheet guys do some excellent work. a 3 foot diameter foam Jupiter 2 would just be too awesome!!
I am still having a real problem with the roof hull plate. I guess I just need to pop the connecting seam on it and lay it in and trim to fit. sounds easy, but im sure it wont be and I hope I don't ruin the job I've done so far.
also trying to figure out the steps on the landing gear. gluing in plates is really a hassle. folding typing paper and gluing in the folded plates with the spaces between them glued to the inside of the landing gear leg might be the answer.
 
  • Like
Reactions: Sky Seeker