

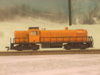
Here is a dummy loco I got for free and I want to paint it. How do I go about removing the old piant. It was origionally PRR black and my friend painted it orange and I want it Maroon:mrgreen:
Loco repaint Q's
- Thread starter Kevinkrey
- Start date
You are using an out of date browser. It may not display this or other websites correctly.
You should upgrade or use an alternative browser.
You should upgrade or use an alternative browser.
I've used Four different solutions for striping paint: Brake fuild, Pine-sol, Easy Off oven cleaner and 99% Isopropanol Alcohol. They all work, depending of the paint but the first three all smell bad and can damage the plastic. I recently switched to the alcohol and it works great, no nasty smell and it strips the paint with no damage to the plastic underneath.
I use a rubbermaid container with a lid (since the alcohol will evaporate) and just dip the shell in. I take it out every half houir or so to scrub with a toothbrush and rinse with warm water untill all the paint is gone.
I use a rubbermaid container with a lid (since the alcohol will evaporate) and just dip the shell in. I take it out every half houir or so to scrub with a toothbrush and rinse with warm water untill all the paint is gone.
From what I can see, your friend seems to have heavily brushed on the paint. I don't know if this is a good idea, but I think you could just airbrush maroon on it, abit several times to get the orange to stop showing up. I myself only have one engine to show my level of repainting, RRR 1116, and I pretty much did what I just described (although with a more careful touch)
The orange paint i on VERY HEAVY and covers some details. So i do think I will try to strip it. I will need help with airbrushing tips wen the time comes. I want it to be in a Missabe scheme, even though they never had one. The model is a very odd kit. I have no clue of the make. The coupler boxes are the darndest things.
It looks like the AHM model if it has truck mounted couplers.
I strip every model that I am going to repaint. As you said the orange paint is heavy enough to cover details them it's also heavy enough to crate brush lines that airbrushing over won't cover.
I strip every model that I am going to repaint. As you said the orange paint is heavy enough to cover details them it's also heavy enough to crate brush lines that airbrushing over won't cover.
You're definitely better off if you remove the paint before repainting: otherwise more paint will only hide more detail. I'd go with the alcohol. Your loco looks like an RS-3, and if it's the Atlas version, do not use brake fluid as a paint remover, as it will destroy the bodyshell very quickly.
The plastic is most likely black, so a grey primer might be a good idea if you're planning on a maroon repaint. I use Floquil Grey Primer, but any flat, light grey paint would likely work. Allow the primer to dry for at least 24 hours before applying subsequent coats.
When you spray, thin the paint according to the manufacturer's suggestions and use the recommended air pressure. Test your spraying technique on a piece of cardboard beforehand, and if need be, practise further before attempting to paint the loco. Get the paint flowing through the airbrush before the spray hits the loco: in other words, start spraying either to the left or right of the loco, then smoothly move along the side without releasing the trigger, until you have sprayed beyond the opposite end of the loco. Don't move too fast, or the coverage will be too thin. Too slow, and the coverage will be too heavy and may also cause sags or runs in the paint. Try to maintain a constant distance from the loco, and never stop with the spray on the loco. Several light coats are much better than one or two heavy ones. I spray in a back-and-forth motion, and work from top to bottom, without stopping the paint flow. By the time the ends and other side have been sprayed, you should be able to apply a second coat to the first side, working continuously until the first colour has been done completely on the entire loco.
If you can disassemble the loco before painting, do so, as it makes the job much easier. If you can't remove the cab, you'll find that it may be difficult to paint the inside corners where the cab ends meet the sides of the hood. A useful tip to aid with this task is to drop the air pressure, up to half what is recommended, then paint the problem area first. Return the pressure to normal to complete the job.
If you need to mask for additional colours, make sure that the paint is fully cured before applying tape. Many people use the green or blue masking tape, but I prefer the regular stuff, which seems to cling better with the lacquer-based paints that I prefer. To apply tape, place a strip of it face-down on a sheet of glass - use a straightedge to ensure that it's straight on the glass, then use the straightedge and a new blade in your X-Acto to trim away both factory edges, as they often have irregularities that will affect the sharpness of the colour division. Also, the adhesive on the edges, particularily on older tape, is sometimes slightly dried out, resulting in a poor seal when applied to the model. I use dividers to plot out the tape widths required, based on the model, photos of the prototype, and also the decals that will be used. Use them to mark the tape, then cut to fit while still on the glass, using a sharp blade. Accurate cutting usually means that you can use details cast onto the body shell as reference points for placing the tape, ensuring that it's straight and in the proper position. Use your fingernail or a suitable tool to work the tape over protruding details, and ensure that the edges are tight. After you've applied the second colour, remove that tape as soon as the paint is dry to the touch. This should give you just enough time to thoroughly clean your airbrush first. Use the tip of the knife to lift one end of the tape, if necessary, then slowly peel the tape back over itself at an angle as acute as possible - this lessens the chance of the tape lifting the paint over which it's been applied. Don't worry if there are small areas where this occurs or areas where the second colour has bled under the tape: after the paint has fully cured, these areas can be touched-up using a fine brush. Have fun.") :-D
:-D
Wayne
The plastic is most likely black, so a grey primer might be a good idea if you're planning on a maroon repaint. I use Floquil Grey Primer, but any flat, light grey paint would likely work. Allow the primer to dry for at least 24 hours before applying subsequent coats.
When you spray, thin the paint according to the manufacturer's suggestions and use the recommended air pressure. Test your spraying technique on a piece of cardboard beforehand, and if need be, practise further before attempting to paint the loco. Get the paint flowing through the airbrush before the spray hits the loco: in other words, start spraying either to the left or right of the loco, then smoothly move along the side without releasing the trigger, until you have sprayed beyond the opposite end of the loco. Don't move too fast, or the coverage will be too thin. Too slow, and the coverage will be too heavy and may also cause sags or runs in the paint. Try to maintain a constant distance from the loco, and never stop with the spray on the loco. Several light coats are much better than one or two heavy ones. I spray in a back-and-forth motion, and work from top to bottom, without stopping the paint flow. By the time the ends and other side have been sprayed, you should be able to apply a second coat to the first side, working continuously until the first colour has been done completely on the entire loco.
If you can disassemble the loco before painting, do so, as it makes the job much easier. If you can't remove the cab, you'll find that it may be difficult to paint the inside corners where the cab ends meet the sides of the hood. A useful tip to aid with this task is to drop the air pressure, up to half what is recommended, then paint the problem area first. Return the pressure to normal to complete the job.
If you need to mask for additional colours, make sure that the paint is fully cured before applying tape. Many people use the green or blue masking tape, but I prefer the regular stuff, which seems to cling better with the lacquer-based paints that I prefer. To apply tape, place a strip of it face-down on a sheet of glass - use a straightedge to ensure that it's straight on the glass, then use the straightedge and a new blade in your X-Acto to trim away both factory edges, as they often have irregularities that will affect the sharpness of the colour division. Also, the adhesive on the edges, particularily on older tape, is sometimes slightly dried out, resulting in a poor seal when applied to the model. I use dividers to plot out the tape widths required, based on the model, photos of the prototype, and also the decals that will be used. Use them to mark the tape, then cut to fit while still on the glass, using a sharp blade. Accurate cutting usually means that you can use details cast onto the body shell as reference points for placing the tape, ensuring that it's straight and in the proper position. Use your fingernail or a suitable tool to work the tape over protruding details, and ensure that the edges are tight. After you've applied the second colour, remove that tape as soon as the paint is dry to the touch. This should give you just enough time to thoroughly clean your airbrush first. Use the tip of the knife to lift one end of the tape, if necessary, then slowly peel the tape back over itself at an angle as acute as possible - this lessens the chance of the tape lifting the paint over which it's been applied. Don't worry if there are small areas where this occurs or areas where the second colour has bled under the tape: after the paint has fully cured, these areas can be touched-up using a fine brush. Have fun.
:-DWayne
Wayne, thanks for the tip regarding cutting the tape because of factory made irregularities and adhesive issues. Great stuff I wouldn't have thought of but that can make a huge difference in the results. Good luck with the paining project Kevin. I've always liked the look of RS units and hope you can salvage that one!
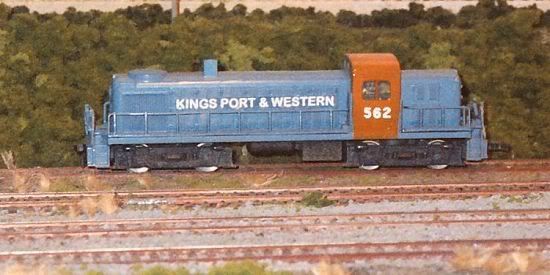
May I suggest a possible paint scheme?")
Seriously, Have fun putting this unit back into service!
Ralph
May I suggest a possible paint scheme?
Seriously, Have fun putting this unit back into service!
Ralph
I've used Tamiya masking tape for my projects. It's a bit more expensive but I've never had a bleed under problem as long as the tape is properly burnished down.
Wayne, thanks for the tip regarding cutting the tape because of factory made irregularities and adhesive issues. Great stuff I wouldn't have thought of but that can make a huge difference in the results. Good luck with the paining project Kevin. I've always liked the look of RS units and hope you can salvage that one!
May I suggest a possible paint scheme?
Seriously, Have fun putting this unit back into service!
Ralph
Ralph, what brand is that, I know all good models will look the same but it appears to be the same in some forms. only markings I can see are that it says made in Yugoslovia on the bottom.
Hi Kevin,
Mine has the same marking. Its made by AHM. They produced model trains kind of along the lines of Tyco and Life Like back in the 60s and 70s I believe.
My loco was a flea market purchase for a couple of bucks and actually was powered. It had rubber traction tires. It was originally painted in Penn Central livery but not very accurately. It ran poorly so I gutted it to make a dummy. When I started playing around with the idea of creating a freelanced road I used this loco as one of my early test subjects for the blue and orange scheme. Its just spray painted.
Ralph

 :mrgreen: :lol:
Well I have some 91% isopropel alcohol, and I let it soak for maybe 30-45 minnutes, took a tooth brush to it and a little paint came off, so I let it soak more, and the roof paint began comming off, and eventually one side of the cab (the loco is on its side, one side at a time) but none of the locos long hood is comming off, and there a alot of molded in doors and grills, but that should still come off it it soaks right? I let is soak overnight and still no more progress than from last night. Should I use something other than a toothbrush?
Hmmm. That's a tough paint job. I wouldn't use anything more than the toothbrush, anything harsher could damage the plastic underneath. I've never had a paint that wouldn't come off like this. My only suggestion is to just keep working at it. If the paint on the cab came off and it was the same paint as the long hood I would figure that it would eventually peel off as well.
How about the purple stuff?
You could try Castrol Super Clean(purple stuff). Some folks swear by it; I haven't seen anyone swearing at it yet. :mrgreen: From what I've read, it won't harm the plastic. Takes 6 - 9 hours to work. Do some googling first.
Well I have some 91% isopropel alcohol, and I let it soak for maybe 30-45 minnutes, took a tooth brush to it and a little paint came off, so I let it soak more, and the roof paint began comming off, and eventually one side of the cab (the loco is on its side, one side at a time) but none of the locos long hood is comming off, and there a alot of molded in doors and grills, but that should still come off it it soaks right? I let is soak overnight and still no more progress than from last night. Should I use something other than a toothbrush?
You could try Castrol Super Clean(purple stuff). Some folks swear by it; I haven't seen anyone swearing at it yet. :mrgreen: From what I've read, it won't harm the plastic. Takes 6 - 9 hours to work. Do some googling first.
Chameleon paint stripper works pretty well too... a bit pricey, but non toxic. Other than that, I'd try Pine Sol or Isopropyl alcohol.
That unit is an AHM/Model Power RS-2.
What'd your friend paint that with? A Q-tip?
I have no idea what he painted it with, but I hope he has since found something that works better.:mrgreen: