

In laying out my new track plan I originally had a line run on either side of the station but then decided that it wouldn't look right. Seeing how you made it work is giving me second thoughts. Very nice! :thumb: :thumb:
Layout Progess
- Thread starter Herc Driver
- Start date
You are using an out of date browser. It may not display this or other websites correctly.
You should upgrade or use an alternative browser.
You should upgrade or use an alternative browser.

Thank you all again for the kind words. Sorta gives one the needed push to make more improvements.
The Davidson repair station (my son's name is David - get it?) is a kit bought from Walthers but I don't remember who the actual manufacturer was. It went together very well. The detail is great and it wasn't too expensive. I wanted a "new" look for some of the buildings so that the layout would look current. The kits themselves allow for modification of doors and windows, but to cut them out took some work, and a lot of filing and finishing to cover up the color change to the plastic.
I'm working on getting that aerial view for a "total" picture. I need a sunny day and extra lighting. The wall/ceiling over the layout angles back towards me so getting the right angle and correctly even lighting has been a challange.
I am very interested in how you all make grass look more realistic. I an locked into one elevation of grass - and the earth isn't made that way. Has fake fur worked well?
Has anyone used dry wall for rock facing? It cracks well and looks realistic. I'm thinking of using it for the sides around the turns in the upper middle of the layout by the water. I imagine, using a dry brush chalk technique, it should darken up real well and look pretty realistic. If it works, I'll post some pictures here.
I also need water help. There is only a small area of water near the upper middle edge of the layout, my kids wanted some, and I'm a bit at a loss to know what to do with it and open to ideas. There is a berm that keeps the water back from the track that one day will be more strongly reinforced with concrete or brick, but for now, I don't know what to do with the little water there is. Any ideas will help.
Again, I sincerely appreciate the kind words...but look forward to the good ideas. I've seen pictures of layouts on this website and they're great and full of terrific ideas...keep 'em coming!
Herc Driver said:Thank you all again for the kind words. Sorta gives one the needed push to make more improvements.
The Davidson repair station (my son's name is David - get it?) is a kit bought from Walthers but I don't remember who the actual manufacturer was. It went together very well. The detail is great and it wasn't too expensive. I wanted a "new" look for some of the buildings so that the layout would look current. The kits themselves allow for modification of doors and windows, but to cut them out took some work, and a lot of filing and finishing to cover up the color change to the plastic.
I'm working on getting that aerial view for a "total" picture. I need a sunny day and extra lighting. The wall/ceiling over the layout angles back towards me so getting the right angle and correctly even lighting has been a challange.
I am very interested in how you all make grass look more realistic. I an locked into one elevation of grass - and the earth isn't made that way. Has fake fur worked well?
Has anyone used dry wall for rock facing? It cracks well and looks realistic. I'm thinking of using it for the sides around the turns in the upper middle of the layout by the water. I imagine, using a dry brush chalk technique, it should darken up real well and look pretty realistic. If it works, I'll post some pictures here.
I also need water help. There is only a small area of water near the upper middle edge of the layout, my kids wanted some, and I'm a bit at a loss to know what to do with it and open to ideas. There is a berm that keeps the water back from the track that one day will be more strongly reinforced with concrete or brick, but for now, I don't know what to do with the little water there is. Any ideas will help.
Again, I sincerely appreciate the kind words...but look forward to the good ideas. I've seen pictures of layouts on this website and they're great and full of terrific ideas...keep 'em coming!
Do you mean like a rock face hillside ? Spackling works well to cause its not so wet and runny ! Easy to shape
Yes, a rock face was what I was looking for. I had to do some dry wall work and have some left over and noticed that, when broken, it looks a lot like natural rock face. I thought that if I played with a dry brush technique, I might get a pretty good looking rock face. I'm going to give it a try and post the results here.
Herc Driver said:Yes, a rock face was what I was looking for. I had to do some dry wall work and have some left over and noticed that, when broken, it looks a lot like natural rock face. I thought that if I played with a dry brush technique, I might get a pretty good looking rock face. I'm going to give it a try and post the results here.
That sounds like a good idea , never thought of that
Herc, I've often thought over the years about using sheetrock/drywall for rock faces... I'm hoping to incorporate a small area on my layout for rock facing......so I may try using Drywall as well ")
It's very easy to cast some rock faces with Hydrocal and aluminum foil. Just make a small trough mold with pre-crumpled foil, pour in the Hydrocal, wait maybe 20-30 minutes and peel off the foil. Worked for me. :thumb: Then it's just a matter of painting it. You can chip little chunks out with an X-acto knife for added detail.
As for drywall, are you talking about using small pieces of sheet (then ends exposed) or the finishing 'mud' that comes in a bucket? I haven't used sheet for anything but I did make my roads out of drywall mud...easy to sand, easy to spread, no mixing and it's cheap. I have it on my N-trak module and it's proven to be very stable, though in thicker areas I did reinforce it between coats with drywal screen.
As for drywall, are you talking about using small pieces of sheet (then ends exposed) or the finishing 'mud' that comes in a bucket? I haven't used sheet for anything but I did make my roads out of drywall mud...easy to sand, easy to spread, no mixing and it's cheap.
I have it on my N-trak module and it's proven to be very stable, though in thicker areas I did reinforce it between coats with drywal screen.Latest Pics
I'm still trying to figure out how to take good pictures of a layout. Lighting seems to be key, and I haven't figured it out yet. I've got to check on this website for some tips to take more effective pictures.
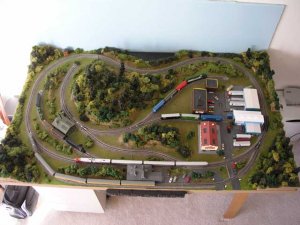
Here's a total layout shot, sorry for the lack of detail, but it was as much as I could load. This is my first attempt at a layout and I now know that I made several basic mistakes on track layout. I should have completed more research on track design and such before the glue went on the tracks. I needed an operation that would fit my kids abilities (and give dad lots of detail work to do) and this is what I came up with on my own.
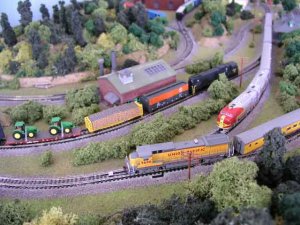
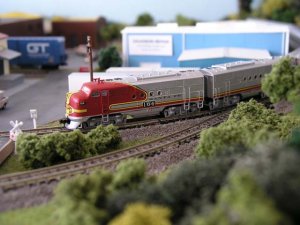
I included a few pics of the Santa Fe FT A/B unit...recently restored and pulling a smooth side passenger consist on a holiday excursion. It met a UP Dash-8 also pulling it's smooth siders on a vacation express.
I'm still trying to figure out how to take good pictures of a layout. Lighting seems to be key, and I haven't figured it out yet. I've got to check on this website for some tips to take more effective pictures.
Here's a total layout shot, sorry for the lack of detail, but it was as much as I could load. This is my first attempt at a layout and I now know that I made several basic mistakes on track layout. I should have completed more research on track design and such before the glue went on the tracks. I needed an operation that would fit my kids abilities (and give dad lots of detail work to do) and this is what I came up with on my own.
I included a few pics of the Santa Fe FT A/B unit...recently restored and pulling a smooth side passenger consist on a holiday excursion. It met a UP Dash-8 also pulling it's smooth siders on a vacation express.
Attachments

Getting back to the dry wall idea...
Yes, I was planning on using the "exposed edge" of broken drywall - so the actual chalk side would be showing. I figured, cut at the correct angle and by that I mean not exactly horizontal, it just might look pretty real. I've been noticing that depending on how the earth moved in a particular area to form up a mountain, the rock isn't ever exactly horizontal...it's always just a bit off (sometimes a lot off depending on where you are in the country). Again, the day I do it, I'll take pic's and post them here.
Using drywall compound for road is an excellent idea...mine need some help and I think I'm going to try using the mud (also called joint compound) and see how it goes. Is it hard to get it thin enough? Has anyone had a problem with it cracking due to humidity changes inside your house? Of course, minor cracks would only improve the way it looks I suppose - more like real concrete.
Herc Driver said:Getting back to the dry wall idea...
Yes, I was planning on using the "exposed edge" of broken drywall - so the actual chalk side would be showing. I figured, cut at the correct angle and by that I mean not exactly horizontal, it just might look pretty real. I've been noticing that depending on how the earth moved in a particular area to form up a mountain, the rock isn't ever exactly horizontal...it's always just a bit off (sometimes a lot off depending on where you are in the country). Again, the day I do it, I'll take pic's and post them here.
Using drywall compound for road is an excellent idea...mine need some help and I think I'm going to try using the mud (also called joint compound) and see how it goes. Is it hard to get it thin enough? Has anyone had a problem with it cracking due to humidity changes inside your house? Of course, minor cracks would only improve the way it looks I suppose - more like real concrete.
Well I think the shirt box cardboard for raods is much easier and a lot less messy . Cracks are simply made by using a razor lightly scratching the surface . The lines can be painted on very easy before you put the road down . The drywall rock face sounds good though. think I might try that myself.
The pics looks great though. I hope mine turns out as good .
I'm going to try the shirt box idea too and see what looks best with my layout. The more I see the prices of kits...the more I want to scratch build something.
Great looking layout, Herc!
While I like the arial shots for giving a great overview of the layout, there's nothing quite like those track-level shots for making our 1:160 models look more like the 1:1 kind!
:thumb: :thumb:
As for the lighting, it looks like you've got a pretty good handle on it...I'm not going to profess to being an expert on lighting for digital photos, but what I've found works best for me is to have a good light source directly over the subject, & another at the same level, & distance as the camera, pointed at the subject at about 45 degrees to either the left, or right of the camera...
While I like the arial shots for giving a great overview of the layout, there's nothing quite like those track-level shots for making our 1:160 models look more like the 1:1 kind!
:thumb:
:thumb: As for the lighting, it looks like you've got a pretty good handle on it...I'm not going to profess to being an expert on lighting for digital photos, but what I've found works best for me is to have a good light source directly over the subject, & another at the same level, & distance as the camera, pointed at the subject at about 45 degrees to either the left, or right of the camera...
tonyevans said:This is Mk 1
I would advise that you don't use sandpaper to clean track. The very small scratches that sandpaper puts in the railhead actually captures dirt, and the track gets dirty much much quicker. The smoother you can get the railhead, the longer it will stay clean.
---jps
I was thinking of doing something similiar, I have some 600 Grit Wet/Dry Sand paper that I was planning on using, and this stuff is almost as smooth as a piece of Card Stock.
My question is what would be the difference between using a "Brite-Boy" track cleaner, and using something like 600 or Higher Grit wet/Dry sand paper. If I am not mistaken the last Brite-Boy Track cleaner that I saw was a lot mor coarse than the 600 Grit sand paper.
Jacob
My question is what would be the difference between using a "Brite-Boy" track cleaner, and using something like 600 or Higher Grit wet/Dry sand paper. If I am not mistaken the last Brite-Boy Track cleaner that I saw was a lot mor coarse than the 600 Grit sand paper.
Jacob
Thanks Herc, looks great,
I hope mine turns out just as good. Just starting it, still reading through the forums getting ideas and know how.
Something that I thought as a simple click together track systems seems to be total opposite, what a newbie right.
Thanks for the encouragement showing what a newbie has done.
I hope mine turns out just as good. Just starting it, still reading through the forums getting ideas and know how.
Something that I thought as a simple click together track systems seems to be total opposite, what a newbie right.
Thanks for the encouragement showing what a newbie has done.