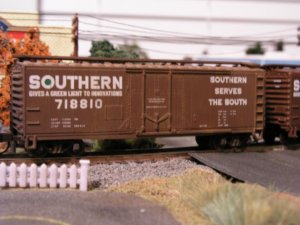
For weathering, I usually use a variety of techniques. The first boxcar, below, was first given a wash of dirty black PollyS (no longer made). This is usually a Dixie cup of water and one or two brushloads of paint from the bottle, plus a couple drops of liquid dish detergent. I flow tjhe paint on, then stand the car on its wheels, letting the wash run down the sides. As it collects along the bottom edge, I use a paper towel to wick up the excess: you have to stay on top of this step, because if it starts to dry around the edges of the "blob", it'll leave an unprotoypical ring. Usually small amounts will collect, and dry, along the seam and rivet lines, becoming heavier farther down the carside. On some cars, prior to the wash, I'll take a fine brush and some of the unthinned paint, and run a very thin line down each of the panel seams, then follow immediately with the wash. Other cars may get a brown wash, either alone or in conjunction with the black. I use PollyScale paint nowadays for washes. All cars also get airbrush weathering after the washes: I prefer Floquil for airbrushing, and usually mix it using between 70% and 90% thinner.

I've also done many reefers using the techniques outlined above. However, this car was done completely with an airbrush. The first step is to make a "mask", using cereal boxboard. I use a piece higher than the height of the car, and cut inverted "vees", extending from the bottom edge all the way up to the eaves, and on the same spacing as the rivet lines and/or body panels. This also includes the door edges. The bottom of the vees, for HO, needn't be wider than 1/4". I place the car in the spray booth, then line up the vees with the rivet lines, keeping the mask away from touching the car. A couple of quick passes horizontally, or, if you want the weathering a little more distinct, vertically, at each vee, then remove the mask and do a quick pass along the bottom edge of the car, including the trucks, using the same colour. This helps to blur any sharp edges. The closer the mask is held to the body, the sharper the line of weathering will be, so it's best to keep the mask from touching the carside. I use a similar mask on the car ends to duplicate the effects of wheel spray from adjacent cars. I have about two dozen carside masks, to suit different manufacturer's various cars, each on labelled as to its use. The balance of the weathering is various shades of dust, grime, and dirt, whatever happens to be on the shelf. When doing the lower part of the sides, it helps to roll the car as you spray: this keeps the dirt effect similar all around the circumference of the wheels.

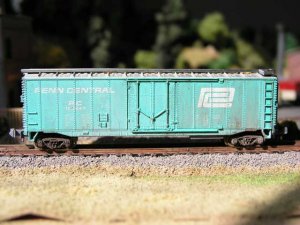
This car was done similar to the reefer, above, except the first step was to spray the entire carbody with a very heavily thinned boxcar colour. It doesn't have to be the exact same colour as the car, just in a similar shade. This helps to soften the starkness of the lettering, and, in the case of a fairly new car, could be followed with a little road grime and dust, then left at that. This car, however, did get the full treatment, same as the reefer.
By the way, most of my cars are lettered with dry transfers, which have a somewhat waxy residue around them: not very compatable with a water-based wash, so all are Dulcoted before weathering. Same goes for those lettered with decals, to kill the shine. Most factory paint jobs also get Dulcoted before weathering, as it seems to help the washes adhere better. I never Dulcote after weathering, as I feel it makes the surface textures too uniform. The cars don't get handled too much, and when they are, clean hands are a must.
Wayne


") Nice!!!!
Nice!!!! To be completely fair, though, the shortcomings of my computer monitor have been mentioned several times, so perhaps I'm not qualified to even comment: I know what colour the car should be, but I'm seeing grey. Grey!!? Time to go shopping.


") . i WAS into N scale for a couple years, to darn small for me, though YOU and others do quite well with it:thumb: . **as far as the weathering goes, Hmm, i think for N scale maybe you might want to try NOT using the gray, see what that looks like. heres some things you might want to try. get a cheap car, tape the sides in half, and tape off the top, now you can try 5 different ways to weather, on the same car!:thumb: try dry brushing dirt & rust, if you use water based paint you can take it back off
. i WAS into N scale for a couple years, to darn small for me, though YOU and others do quite well with it:thumb: . **as far as the weathering goes, Hmm, i think for N scale maybe you might want to try NOT using the gray, see what that looks like. heres some things you might want to try. get a cheap car, tape the sides in half, and tape off the top, now you can try 5 different ways to weather, on the same car!:thumb: try dry brushing dirt & rust, if you use water based paint you can take it back off
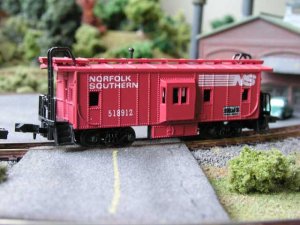
 , but i think YOU have done REAL GOOD with them:thumb: . the caboose DOES NOT look over weathered:thumb: . i REALLY like the steps and trucks!:thumb: