

Z
Klishêshima
- Thread starter carlos filipe
- Start date
You are using an out of date browser. It may not display this or other websites correctly.
You should upgrade or use an alternative browser.
You should upgrade or use an alternative browser.
Thank you for sharing. I have had varied results from carving and painting foam. In some locations I have been very satisfied with the results, and in others I have been very dissatisfied, I'll have to try clay, as carving takes a lot of time, and sometimes looks bad, I don't mind the time spent, if the results are satisfaoctory, but sometimes they are not.
Bill Nelson
Bill Nelson
Hi Bill Nelson:
This clay I had used previously to carve retaining walls. I prefered spackling compound in powder as it is much cheaper and great to work with. But very fragile to handling. There's noting worst than attending an exhibition with odd pure white cracks in a layout. Well... there is. A broken anonymous electric wire...
Carving foam with a hot wire is great as it isn't messy.
I'll post soon some photos showing my method. Nothing much, but very pratical.
best regards
Carlos
Cá estou eu ")
Por sinal, encontrei Das Pronto 500g a 3.30€ ao pé do Antunes, numa loja de indianos que também vende material escolar (rua à saída do metro da Mouraria (lado de quem vai para o Castelo), logo no início, do lado direito.
Por sinal, encontrei Das Pronto 500g a 3.30€ ao pé do Antunes, numa loja de indianos que também vende material escolar (rua à saída do metro da Mouraria (lado de quem vai para o Castelo), logo no início, do lado direito.
Z
Zathros
I wanted to "Bump" this thread back up for our Train Enthusiasts, and for Carlos Felipe. I have embedded the Videos for easier viewing. It's amazing what you can do in a small space.

thanks for the small inspiration.
This is interesting. Right now I'm planning on making a small Hon3 layout, a Minni, not a micro. my standard gauge railroad is point to point, and my narrow gauge is point to loop. I'm hoping to add a second loop, but some continuous running on a small layout could be a lot of fun with my Hon3 Blackstone C-19 with DCC and sound. I have a small NCE system that will allow me to get full value out of the sound , and having contiuous running, on a platform small and light enough (I'm using foam) to transport, will be fun.
I am also considering a rebuild of much of my Railroad to reduce my grades, so my rod locomotives can have a longer run. I have to keep fighting my tendency to make things more complicated, and to use every available inch.
In any case, thanks for sharing, I'm not getting much done thinking big right now, so inspiration from something small is particularly useful.
Bill Nelson
Once again I want to thank you for sharing. the foam and clay scenery is a particular inspiration, and has helped me get started on my small Hon3 portable.
http://www.zealot.com/forum/showthread.php?p=947966#post947966
thanks again for sharing
Bill Nelson
http://www.zealot.com/forum/showthread.php?p=947966#post947966
thanks again for sharing
Bill Nelson
This project lost momentum. Well I lost for some obscure reason interest in finishing it....
I grabbed it last November and it is practically finished.
After dirtying the tracks with glue when applying foliage, I'll have to remove the catenary poles and give a good polish in order to "resume traffic". Then I also have to build a definitive wiring conneting to the throttle. For the moment the wires are just held in place with tape...
If I'm a "good boy", I'll make the first public presentation next June in Oeiras, Lisbon.
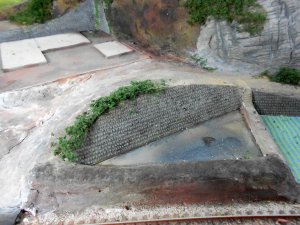
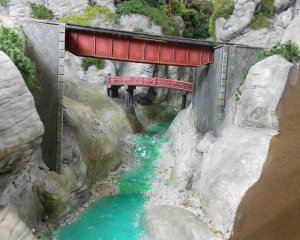
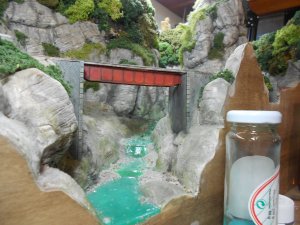
I restarted by laying the "water". I used an acrylic product from Faller. Add some drops of Vallejo transparent emerald colour. Don't know why, but in most photos of rivers in Japan the water has this emerald colour, not the brownish we're used to see in Europe and States.
It cures in 24 or 48 hours.
After that I checked the work and noticed that accidentally removed some rocks, leaving white gaps. So I made a map of " things to do".
.jpg")
It cures in 24 or 48 hours.
After that I checked the work and noticed that accidentally removed some rocks, leaving white gaps. So I made a map of " things to do".
Attachments
-
 klisheshima-update-2015.03.21 (2).jpg201 KB · Views: 11
 -
 klisheshima-update-2015.03.21 (3).jpg401.5 KB · Views: 64
 -
 klisheshima-update-2015.03.21 (4).jpg289.1 KB · Views: 10
 -
 klisheshima-update-2015.03.21 (4).jpg289.1 KB · Views: 10
 -
 klisheshima-update-2015.03.21 (5).jpg159.9 KB · Views: 11
 -
 klisheshima-update-2015.03.21 (6).jpg267.9 KB · Views: 9
 -
 klisheshima-update-2015.03.21 (7).jpg269.7 KB · Views: 12
Slowly I found my rhythm and things started to happen in a matter of weeks.
The rice paddies are made with a product from Tomytec. It is quite weird and hardly believable, but sure easies the way. Had to cover the gaps in the corners of the rocks and apply foliage. The rice paddies wer palced just for the photo, they weren't glued yet.
.JPG")
The rice paddies are made with a product from Tomytec. It is quite weird and hardly believable, but sure easies the way. Had to cover the gaps in the corners of the rocks and apply foliage. The rice paddies wer palced just for the photo, they weren't glued yet.
Attachments
-
 klisheshima-update-2015.03.21 (9).JPG429.3 KB · Views: 15
 -
 klisheshima-update-2015.03.21 (10).JPG3.8 MB · Views: 10
 -
 klisheshima-update-2015.03.21 (11).JPG2.4 MB · Views: 12
 -
 klisheshima-update-2015.03.21 (12).JPG1.8 MB · Views: 11
 -
 klisheshima-update-2015.03.21 (13).JPG2 MB · Views: 14
 -
 klisheshima-update-2015.03.21 (14).JPG4 MB · Views: 15
 -
 klisheshima-update-2015.03.21 (15).JPG156.6 KB · Views: 12
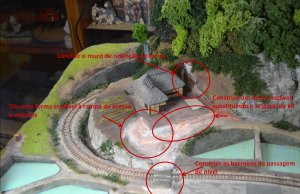
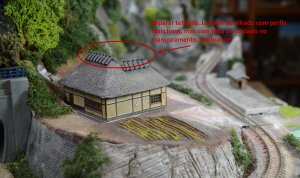
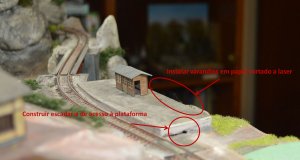
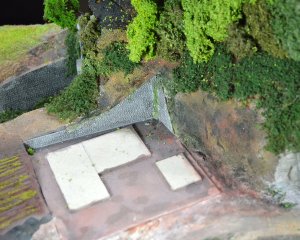
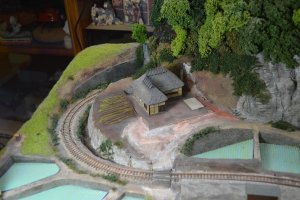
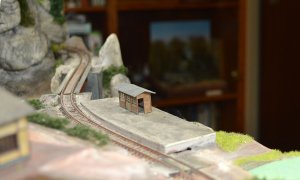
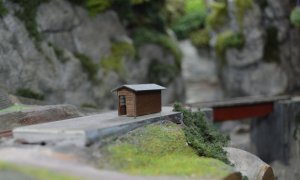
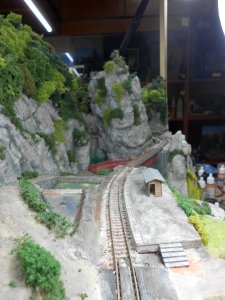
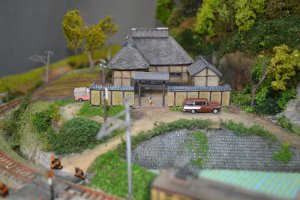
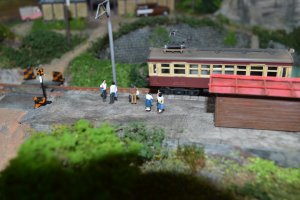
Then turned to the small halt. The tiny building is a laser cut cardboard kit.
.JPG")
Attachments

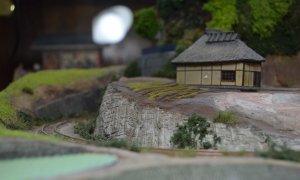
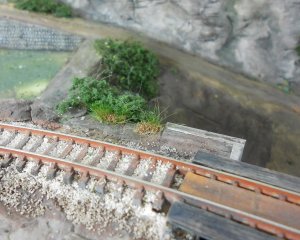
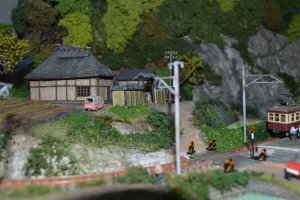
Restored some broken parts I added previously to the thatched roof of the house and started to prepare a more believable setting for the farm house courtyard.
.jpg")
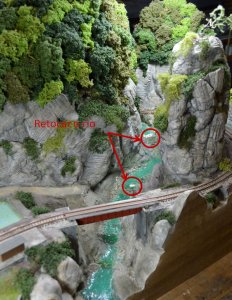
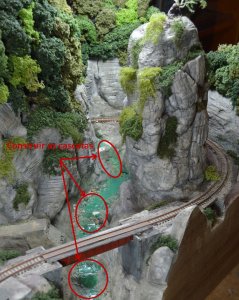
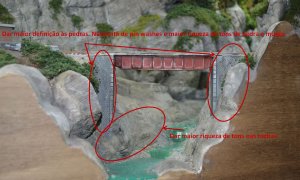
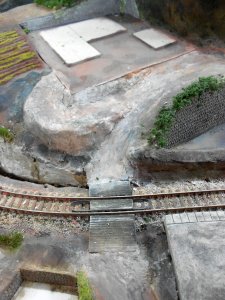
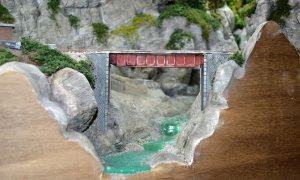
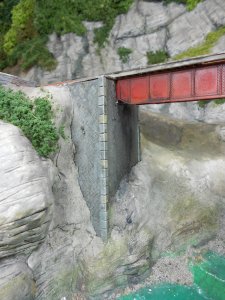
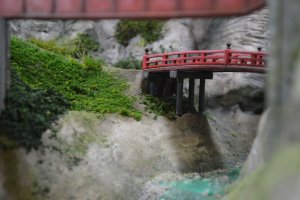
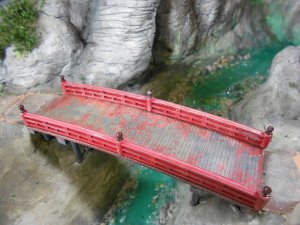
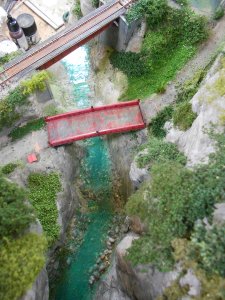
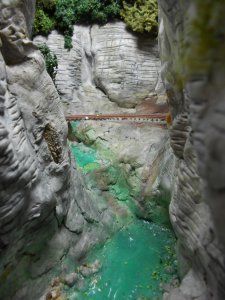
Paid attention to the bridges and river.
After several attempts I'm still not convinced with the painting of the stone work. It is so dull!
Paid attention to the bridges and river.
After several attempts I'm still not convinced with the painting of the stone work. It is so dull!
Attachments
-
 klisheshima-update-2015.03.21 (23).JPG279.9 KB · Views: 14
 -
 klisheshima-update-2015.03.21 (24).jpg442.6 KB · Views: 11
 -
 klisheshima-update-2015.03.21 (25).jpg342.7 KB · Views: 11
 -
 klisheshima-update-2015.03.21 (26).jpg2.4 MB · Views: 17
 -
 klisheshima-update-2015.03.21 (27).jpg1.7 MB · Views: 12
 -
 klisheshima-update-2015.03.21 (28).jpg3 MB · Views: 14
 -
 klisheshima-update-2015.03.21 (29).jpg780.4 KB · Views: 12
 -
 klisheshima-update-2015.03.21 (30).jpg757.7 KB · Views: 13
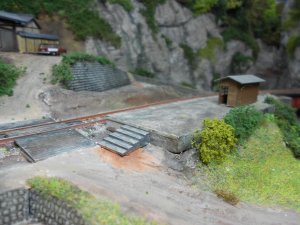
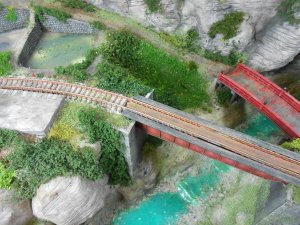
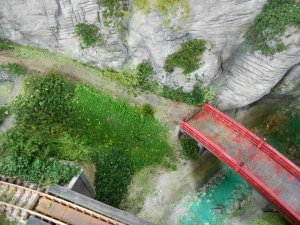
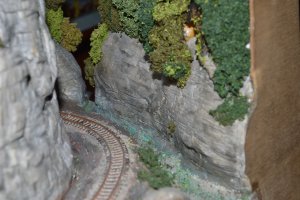
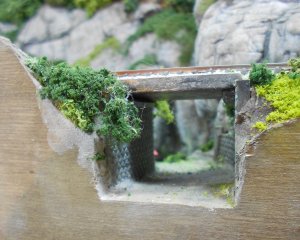
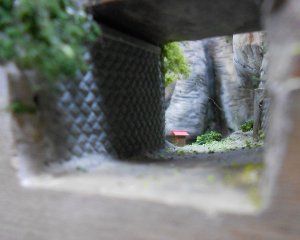
Went on with the bridges area of the layout. they are central in the stage setting. The layout is so tiny (1.04m, some 3' 2") I had to explore scenery breakdown with different levels and the rock outcrop that partially hides the track.
Attachments
-
 klisheshima-update-2015.03.21 (31).jpg1.8 MB · Views: 12
 -
 klisheshima-update-2015.03.21 (32).jpg1.9 MB · Views: 10
 -
 klisheshima-update-2015.03.21 (33).jpg2.7 MB · Views: 12
 -
 klisheshima-update-2015.03.21 (34).jpg2.5 MB · Views: 15
 -
 klisheshima-update-2015.03.21 (35).jpg733.7 KB · Views: 11
 -
 klisheshima-update-2015.03.21 (36).jpg2.5 MB · Views: 15
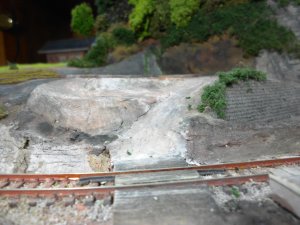
Then I had to tackle with the "holes in the water. I must have pulled to strong when cleaning foliage that was falling over the river that I removed pebbles incrusted in the acrylic varnish.
Started by painting with a close match colour and than add small portions of "water". Luckily I prepared a jar with more than needed so I had the mix still available to pour over.
Another product - an acrylic medium gel high gloss - helped to give the ripples of the stream. They have to be applied in thin layers to get a total transparent volume after cure.
The final details were done with acrylic titanium white paint in tubes.
I'll have to take better photos showing clearly the white foam of the river stream.
.JPG")
Started by painting with a close match colour and than add small portions of "water". Luckily I prepared a jar with more than needed so I had the mix still available to pour over.
Another product - an acrylic medium gel high gloss - helped to give the ripples of the stream. They have to be applied in thin layers to get a total transparent volume after cure.
The final details were done with acrylic titanium white paint in tubes.
I'll have to take better photos showing clearly the white foam of the river stream.
Attachments

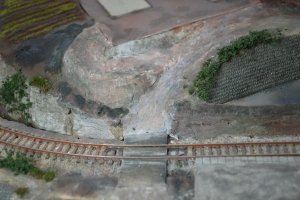
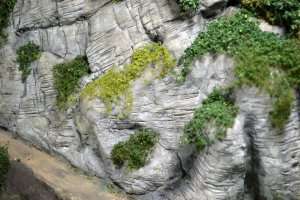
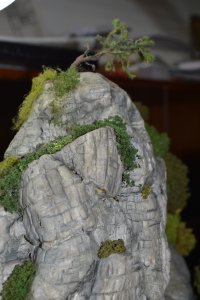
I still have some areas of the mountain to cover with foliage, the black paint under is visible in some areas.
Attachments


Glad you got rolling again, and are back to sharing. I'm in the middle of a massive rebuild of my large Ho layout, and have too many other irons in the fire, so progress is painfully slow. I love your green water, we get some of that in the mountains of TN, not sure why, but I love the look. I usually paint my water with acrylic paints and use acrylic gloss medium. that would not work on my big river, cause the riverboat, which I like to move around would stick to the gloss medium. I used polyurethane floor finis here, doesn't look as good, but is more durable, can put drinks on the river without coasters.

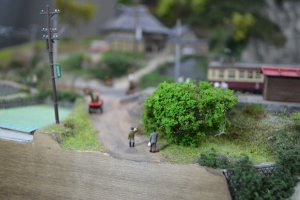
Eager to feel life in the layout, I added in this stage some tiny people.
Attachments
-
 klisheshima-update-2015.03.21 (45).JPG3.5 MB · Views: 12
 -
 klisheshima-update-2015.03.21 (46).JPG3.7 MB · Views: 10
 -
 klisheshima-update-2015.03.21 (47).JPG3.9 MB · Views: 17
 -
 klisheshima-update-2015.03.21 (48).JPG3.9 MB · Views: 12
 -
 klisheshima-update-2015.03.21 (49).JPG254.7 KB · Views: 13
 -
 klisheshima-update-2015.03.21 (51).JPG3.3 MB · Views: 16
 -
 klisheshima-update-2015.03.21 (52).JPG3.4 MB · Views: 10
 -
 klisheshima-update-2015.03.21 (53).JPG3.5 MB · Views: 11
 -
 klisheshima-update-2015.03.21 (54).jpg377.8 KB · Views: 34
 -
 klisheshima-update-2015.03.21 (55).jpg262.8 KB · Views: 12
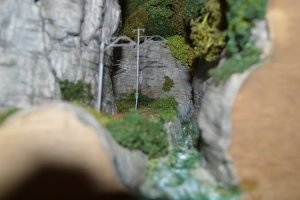
Now I have to turn my attention to the box enclosing the layout and providing the lighting. I made it too light, the weight of the two circular fluorescent lamps has warped in a very nasty way the top.
I'm hoping that a wood beam attached form above might force it to get straight again.
This is the last layout with fluorescent lighting. I'll try using LEDs next time.
I'm hoping that a wood beam attached form above might force it to get straight again.
This is the last layout with fluorescent lighting. I'll try using LEDs next time.
You are doing a SPECTACULAR JOB on this layout!
KEEP UP THE GREAT WORK!
KEEP UP THE GREAT WORK!