H.G. Wells "The Time Machine" Large Paper Model - Animated

mtrappett

Well-Known Member
Screen Shot 01-01-20 at 06.52 PM.JPG
H.G. Wells
"The Time Machine" Large Paper Model - Animated

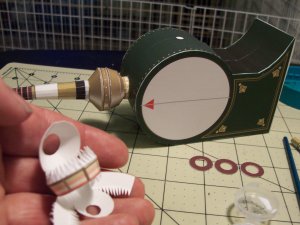
I built this model at a larger scale of approximately 1/12th. I have always been a fan of the original version of, "The Time Machine". I decided to add animation and lights. The model is quite large as can be seen from the photos and video.

I created a separate key that must be inserted to switch the machine on (just like the original). The disk rotates forward or back in time faster or slower the more the lever is moved. The lights all work the same as in the film. It is controlled by two basic stamps. One controls all the lights, the other the disk. The Basic Stamps both talk to one another through a serial communications link.

I will add the build thread below these.


100_4917.jpg100_4918.jpg100_4919.jpg100_4920.jpg100_4921.jpg100_4922.jpg100_4924.jpg100_4925.jpg100_4926.jpg100_4927.jpg100_4928.jpg100_4929.jpg100_4930.jpg100_4931.jpg100_4932.jpg100_4933.jpg100_4934.jpg100_4935.jpg100_4936.jpg100_4917.jpg100_4918.jpg100_4919.jpg100_4920.jpg100_4921.jpg100_4922.jpg100_4924.jpg100_4925.jpg100_4926.jpg100_4927.jpg100_4928.jpg100_4929.jpg100_4930.jpg100_4931.jpg100_4932.jpg100_4933.jpg100_4934.jpg100_4935.jpg100_4936.jpg
 
Last edited:

zathros

*****SENIOR ADMINISTRATOR*****
Staff member
Administrator
Moderator
That looks to be the size of the demonstrator model from the movie. Well done!! I used to program 4,5 and 8 axis CNC machines in BASIC, I can't remember a line of code now. ;)
 

thegreek270

Active Member
Hi mtrappett,

this is a very nice and clean build of UHU's Model. Thank you so much for re-uploading this one, i was hoping you do so.
I had no chance to download your pictures before the tapa...... Desaster. I will save them now.

This one is on my List and i had the same idea to build it with moving Dish. I thought also about using the lever as a switch, but i was not sure if it could work.
Seeing your work just proves once more that it is possible to do. I will try it. I just don't know if i go that big though. (no Space !!!:().
I still have other models to do before i get to this one.

I have two Questions.

First.
It is very shiny. What did you use to coat it with ?

Second.
If i remember correctly you also built UHU's Gen11 ChittyChittyBangBang Car in a bigger scale. Could you re-upload that one too please ?

Thank you so much.
 

mtrappett

Well-Known Member
That looks to be the size of the demonstrator model from the movie. Well done!! I used to program 4,5 and 8 axis CNC machines in BASIC, I can't remember a line of code now. ;)
Hi Zathros! That's interesting what you mentioned about programming CNC machines. That was a well paid job. Thanks for the reply too!
 

mtrappett

Well-Known Member
Hi mtrappett,

this is a very nice and clean build of UHU's Model. Thank you so much for re-uploading this one, i was hoping you do so.
I had no chance to download your pictures before the tapa...... Desaster. I will save them now.

This one is on my List and i had the same idea to build it with moving Dish. I thought also about using the lever as a switch, but i was not sure if it could work.
Seeing your work just proves once more that it is possible to do. I will try it. I just don't know if i go that big though. (no Space !!!:().
I still have other models to do before i get to this one.

I have two Questions.

First.
It is very shiny. What did you use to coat it with ?

Second.
If i remember correctly you also built UHU's Gen11 ChittyChittyBangBang Car in a bigger scale. Could you re-upload that one too please ?

Thank you so much.

Thank you for the comments, and I'm glad you like the model.

I experimented with various methods for getting a nice shine on the model. I finished up using Dresden Spray Varnish. It goes on really thick and is the equivalent of three coats at once.

Thank you, and yes, I will upload Chitty. It can be difficult with the larger scale working with it and strengthening it where needed.

Much appreciated!
 

mtrappett

Well-Known Member
Start of the Time Machine Build Thread

The model is based upon the paper model created by UHU02 but has significant changes. The model has been up-scaled to approximately 1/12th scale. The construction of the model had to be reinforced in many places to support the extra size and to prevent floppiness of the paper. The model has also been equipped with electronics including lights, and micro-controller (PIC) programmer. The finish of the model has also been made more durable so that it can be "played" with. :yesyes:

The disk at the back of the Time Machine model is a disposable paper plate from Walmart. It was just the right size to give some strength.
100_4698.jpg

This is the backside of the plate/disk.
100_4699.jpg


Building up the disk in sections fixing an issues with colored pencils.
100_4703.jpg


This is the center-boss of the disk. It was reinforced with some balsa wood.
100_4722.jpg


This is the piece that I think they used an old barbecue for in the original movie.
100_4706.jpg


Building up the details.
100_4718.jpg


100_4724.jpg


The servo motor and LED lights will be installed into this part.
100_4725.jpg
 

Attachments

  • 100_4713.jpg
    100_4713.jpg
    651 KB · Views: 1
Last edited:

Rhaven Blaack

!!!THE MAN BEHIND THE CURTAIN!!!
Staff member
Administrator
Moderator
This looks FANTASTIC! You did an AMAZING job on this project! I like the fact that you added electronics to make it "work"!
 

Revell-Fan

Co-Administrator
Staff member
Administrator
Moderator
Absolutely stunning! Increasing the scale and adding ights make the detail really pop. Excellent! :)
 

micahrogers

Moderator "Where am I, and how did I get here?"
Staff member
Moderator
I've always loved the design of this time machine, it looks like something from the era the book was written. Very nice build of the model, and a nice improvement of UHUo2's design.
 

mtrappett

Well-Known Member
Absolutely stunning! Increasing the scale and adding ights make the detail really pop. Excellent! :)

The movie was so inspiring to me, as many others too of course. It's that scene where Mr. Wells places the model of the Time Machine on the table, and starts it up only for it disappear, which of course the whole idea. It seemed such a waste to me that it should be lost forever.

Thank you for your comments! thumbsup
 

mtrappett

Well-Known Member
I've always loved the design of this time machine, it looks like something from the era the book was written. Very nice build of the model, and a nice improvement of UHUo2's design.

Thank you Mica! My eyesight is getting kinda blurry these days and I have to rely more and more on magnifying devices LOL. I wish I could just go back in time to those younger days.
 

Revell-Fan

Co-Administrator
Staff member
Administrator
Moderator
Nothing beats a classic. "The Time Machine" and "Journey to the Center of the Earth" starring Pat Boone are all-time classics. Tomorrow I'll be recording "Journey" in HD from free TV (it was restored to its original length and looks absolutely gorgeous, so I'm looking forward to it; I recorded it on DVD last year but it will look so much better on BD ;) ). "Time Machine" is one of the few movies that's missing from my collection and I'm still waiting for it to be shown again. There was a time when the stations would broadcast it every year on new year's eve. I do have an old recording from analog TV but it is time for an upgrade now. ;)
 

mtrappett

Well-Known Member
This was one of my favorite models to build I can remember. Building it bigger enabled me to add greater detail in some areas that would have been very difficult if not impossible with the original scale. I had to do a lot of paint touch ups to cover/hide the dotted fold lines. Also , painting the edges of the parts in the appropriate color. I had always wanted a model of this way back when I was a kid.

100_4728.jpg


I decided early on that I didn't want the model to be flat colored. Some models it works okay, but this I think would look better glossy.
100_4729.jpg


This was the old barber's chair on the real Time Machine.
100_4730.jpg


100_4731.jpg


100_4732.jpg


100_4733.jpg


100_4734.jpg


100_4735.jpg


100_4736.jpg


100_4737.jpg


The railings also where most of the wires would be hidden. It worked out well as the tube is wider diameter due to scale-up.
100_4738.jpg


I laminated the base using thick card to give more rigidity.
100_4739.jpg
 

Rhaven Blaack

!!!THE MAN BEHIND THE CURTAIN!!!
Staff member
Administrator
Moderator
Even though I do not build in such a scale, I still think that once I get a few more projects cleared from my queue, this build has inspired me that I should try my hand at this model!
 

mtrappett

Well-Known Member
Even though I do not build in such a scale, I still think that once I get a few more projects cleared from my queue, this build has inspired me that I should try my hand at this model!
I'm really pleased to hear that it has inspired you! That is music to my ears! thumbsup I loved building this model, and it would look nice on your bookshelf.
 

mtrappett

Well-Known Member
Okay.... "onwards, and upwards", as my old boss used to say.

Here you can see more details of the strengthening I added. I added a piece of spruce wood at the back (the large square. That is to provide stability for the rotating disk. There are also a bunch of additional strips glued around the edges.

100_4740.jpg


Now that is much better! More solid. There's no way just the regular paper would stand up to the rigors on its own.
100_4741.jpg


100_4742.jpg


I drilled out the 4 bolts that are 2D and added real nuts and bolts to give a better effect.
100_4743.jpg


The feet also had to be reinforced with card and wood.
100_4744.jpg


100_4745.jpg


Here are details of the LED installation for the sides.
100_4746.jpg


Starting to take shape now.
100_4747.jpg


More LEDs for the control console. There are 2 LED's of different colors here. A single common wire to reduce wiring complexity.
100_4748.jpg


This is a blurry picture of the control key setup. Its a plastic tube that provides a sleeve for the key to be pushed in to.
100_4749.jpg


I fitted a feather micro switch to signal that the key has been pushed all the way down. This was tricky to get right. I used a piece of balsa wood to hold it all together. This is one of the input signals to the microprocessor circuit.
100_4750.jpg


Here's one of my favorite parts to build, the control console. I think its neat that you can select a date of your own. UHU02 provided a full list of months and days. I used a hot glue gun to fix the LEDs to the paper. The light shines through perfectly.
100_4751.jpg


100_4752.jpg
 

Rhaven Blaack

!!!THE MAN BEHIND THE CURTAIN!!!
Staff member
Administrator
Moderator
I'm really pleased to hear that it has inspired you! That is music to my ears! thumbsup I loved building this model, and it would look nice on your bookshelf.
I have quite a few other projects in the queue, so it will be awhile before I can get to it. However, with that being said, I will post a build thread, once I do start. thumbsup
 

zathros

*****SENIOR ADMINISTRATOR*****
Staff member
Administrator
Moderator
SO many build picks, it's hard to comment, but I will say one thing, I have told people here thatt the gauge wire they use is far too thick. To see such fine wiring shows me you understand electricity, and electronics, and can wire up something the way it shuld be. It looks so orderly, like a High End working model that one would buy from Hammacher schlemmer.com. No Shit!!! :)
 

mtrappett

Well-Known Member
SO many build picks, it's hard to comment, but I will say one thing, I have told people here thatt the gauge wire they use is far too thick. To see such fine wiring shows me you understand electricity, and electronics, and can wire up something the way it shuld be. It looks so orderly, like a High End working model that one would buy from Hammacher schlemmer.com. No Shit!!! :)
Thank you Zathros for the nice comments! Much appreciated!
 
Top