

S
Soaring
I know, I know, the last one was supposedly the guide, but I thought I'd better just call that the "Pre" Guide.
Anyways, Welcome to the Guide to building Hazel Gundam papercraft!
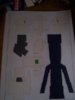
Let's check out some details of this model.
The creator, mechani8or, has done a beatiful job in creating SOME of the templates, although, there are some "Pros" and "con's" of this model which are listed below. *This paragraph will be centered around....you know, maybe like a critic's corner.
Pro's
The model itself, well, the parts I've built so far are very cool, the "cool" things I would like to note is, how easy it SEEMS. Plus, the finished part is amazing ;P
You can also get the no lines version, but I think lines version is better for the first time.
The model is described to be at least 30 cm, but is said to be 31.
Con's
You must be thinking, Con's already? Well, I didn't have much pro's to note")
The templates, which I downloaded, are kind of.....what's the word, messed up? I downloaded these templates first off of pepakura. Then, from the creator's site. Both were the same, evidentely... Anywho, examine the templates carefully.
Pepakura template-
Some of the parts are infused with another
Some tabs are infused in parts
Some tabs aren't even on the sides where they're supposed to be. *This may seem not much of a big deal to you, but to me, I think it's crucial.
Windows I think JPG, where you can edit the templates colors.
Here, the parts aren't as badly messed up compared to the pepakura file.
Some tabs are again infused in parts, but not enough that you can't build it, you can imagine the rest of the tab and draw it by pen.
When you print it, the parts seem faded, well, at least when I print them. It doesn't come out so clear. This may not seem like a big problem to you with all the fancy and new printers, but our Lenmarx printer was broken a year ago, now we only have a Canon :/.
Alright, now we're done with the critisism. Do not get discouraged by the Con's of this model, that's why I'm here to "Guide" you through this mess. So, let's get started!
Guide to Hazel Gundam papercraft
- Tools
Pen
Nail filer
Tweezers
Super Gel Glue
X-acto Knife
Toothpick
One cartridge of black ink and colored.
Cardstock(I use 67 grams)
Scissors
Rug/ Carpet/ cutting mat
Those are all the parts you need to build Hazel, however, you can use different tools, I can only use these :/
*Other things you will see in this guide
-Scoring, cutting, pre-shaping, oh my! Which means To score the parts of this page first, then cut out the pieces, next, pre- shape it, without using any adhesive product.
-LOOK! Pay attention to this portion especially if you're having trouble.
- Pre-shaped and cut! Which means, on most of the pieces, I'll show you different views of a piece I thought was difficult XD
Step 1
Gather up the tools either listed above or the tools you regularly use.
Then, add those color and black cartridges! Print out the Hazel Gundam parts, or just one part if you want.
Tomorrow, I'll post the first parts. For now, I'd better get some rest, print out the feet! We'll be doing that tomorrow! Happy New year!
Anyways, Welcome to the Guide to building Hazel Gundam papercraft!
Let's check out some details of this model.
The creator, mechani8or, has done a beatiful job in creating SOME of the templates, although, there are some "Pros" and "con's" of this model which are listed below. *This paragraph will be centered around....you know, maybe like a critic's corner.
Pro's
The model itself, well, the parts I've built so far are very cool, the "cool" things I would like to note is, how easy it SEEMS. Plus, the finished part is amazing ;P
You can also get the no lines version, but I think lines version is better for the first time.
The model is described to be at least 30 cm, but is said to be 31.
Con's
You must be thinking, Con's already? Well, I didn't have much pro's to note
The templates, which I downloaded, are kind of.....what's the word, messed up? I downloaded these templates first off of pepakura. Then, from the creator's site. Both were the same, evidentely... Anywho, examine the templates carefully.
Pepakura template-
Some of the parts are infused with another
Some tabs are infused in parts
Some tabs aren't even on the sides where they're supposed to be. *This may seem not much of a big deal to you, but to me, I think it's crucial.
Windows I think JPG, where you can edit the templates colors.
Here, the parts aren't as badly messed up compared to the pepakura file.
Some tabs are again infused in parts, but not enough that you can't build it, you can imagine the rest of the tab and draw it by pen.
When you print it, the parts seem faded, well, at least when I print them. It doesn't come out so clear. This may not seem like a big problem to you with all the fancy and new printers, but our Lenmarx printer was broken a year ago, now we only have a Canon :/.
Alright, now we're done with the critisism. Do not get discouraged by the Con's of this model, that's why I'm here to "Guide" you through this mess. So, let's get started!
Guide to Hazel Gundam papercraft
- Tools
Pen
Nail filer
Tweezers
Super Gel Glue
X-acto Knife
Toothpick
One cartridge of black ink and colored.
Cardstock(I use 67 grams)
Scissors
Rug/ Carpet/ cutting mat
Those are all the parts you need to build Hazel, however, you can use different tools, I can only use these :/
*Other things you will see in this guide
-Scoring, cutting, pre-shaping, oh my! Which means To score the parts of this page first, then cut out the pieces, next, pre- shape it, without using any adhesive product.
-LOOK! Pay attention to this portion especially if you're having trouble.
- Pre-shaped and cut! Which means, on most of the pieces, I'll show you different views of a piece I thought was difficult XD
Step 1
Gather up the tools either listed above or the tools you regularly use.
Then, add those color and black cartridges! Print out the Hazel Gundam parts, or just one part if you want.
Tomorrow, I'll post the first parts. For now, I'd better get some rest, print out the feet! We'll be doing that tomorrow! Happy New year!
 Modelmaking is for the enjoyment of oneself isn't it? So take your time~~
 , Red is too difficult xD