

DISPLAY
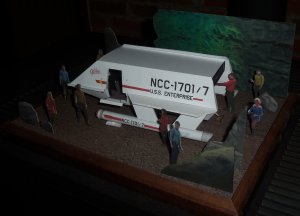
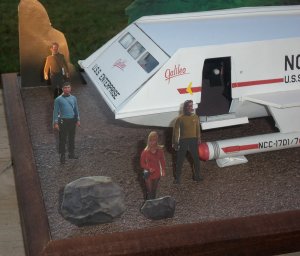
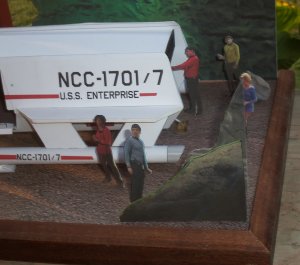
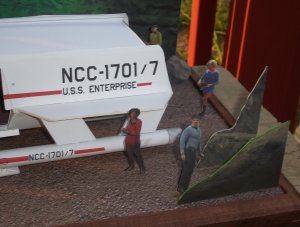
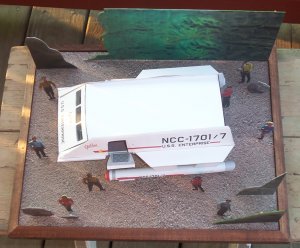
The final step for me on this trek (see what I did there?) was to create a display base that looked like the scene from “The Galileo Seven” when the Galileo is first seen on Tarsus II. The actual base is an old picture frame with the glass removed. The frame sits face down so the back is the “ground.” I cut a piece of foam core to size for the ground. I found a picture of dirt that looked like the dirt on the original soundstage, printed it on card and glued it to the foam core. Using screen caps from the episode and Photoshop I made files to recreate the soundstage rocks. I printed these on card and glued them to 2mm chipboard. I Super Glued bamboo skewers to the back of the rocks and pushed them into the foam core where I wanted them. The rocks aren’t exactly in the same as they were in the episode due to the size of the display.
The final touch was to add the crew. Again, I used screen caps from various episodes for the crew. I scaled them to size, printed them on card and glued them to 2mm chipboard. After a lot of slow, tedious trimming, I edge colored them, glued bamboo skewers on and pushed them into place. And, yes, I know I have more than seven crew and it’s unlikely the entire senior staff would go on a landing party…but I don’t care. It looks cool! I wanted the display to have that ’70s cardboard pop-up-toy-feel like old playsets of the day. If I’d had this when I was a kid I’d have played the crap out of it!
And with that, I’m calling it a wrap for the Galileo. I still need to tweak the door, but all in all, I’m pretty pleased with the model. As usual in hindsight I see lots of things that could be improved on: better centerline molding, better pylons, better pylon bracing, better door hinging, actual retracting landing gear with recesses in the engines and hull, more detailed rear landing gear, removable roof, lights….ARGH! But to be fair, this is a great model as is. All it really needed was a more accurate repaint and a better interior, which I think I gave it. My thanks to Joerg Stammen for creating a really fun model to build. If any of you have this model I encourage you to build and improve on it.
")
The final step for me on this trek (see what I did there?) was to create a display base that looked like the scene from “The Galileo Seven” when the Galileo is first seen on Tarsus II. The actual base is an old picture frame with the glass removed. The frame sits face down so the back is the “ground.” I cut a piece of foam core to size for the ground. I found a picture of dirt that looked like the dirt on the original soundstage, printed it on card and glued it to the foam core. Using screen caps from the episode and Photoshop I made files to recreate the soundstage rocks. I printed these on card and glued them to 2mm chipboard. I Super Glued bamboo skewers to the back of the rocks and pushed them into the foam core where I wanted them. The rocks aren’t exactly in the same as they were in the episode due to the size of the display.
The final touch was to add the crew. Again, I used screen caps from various episodes for the crew. I scaled them to size, printed them on card and glued them to 2mm chipboard. After a lot of slow, tedious trimming, I edge colored them, glued bamboo skewers on and pushed them into place. And, yes, I know I have more than seven crew and it’s unlikely the entire senior staff would go on a landing party…but I don’t care. It looks cool! I wanted the display to have that ’70s cardboard pop-up-toy-feel like old playsets of the day. If I’d had this when I was a kid I’d have played the crap out of it!
And with that, I’m calling it a wrap for the Galileo. I still need to tweak the door, but all in all, I’m pretty pleased with the model. As usual in hindsight I see lots of things that could be improved on: better centerline molding, better pylons, better pylon bracing, better door hinging, actual retracting landing gear with recesses in the engines and hull, more detailed rear landing gear, removable roof, lights….ARGH!
But to be fair, this is a great model as is. All it really needed was a more accurate repaint and a better interior, which I think I gave it. My thanks to Joerg Stammen for creating a really fun model to build. If any of you have this model I encourage you to build and improve on it.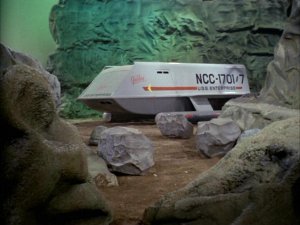


")

