Forested Hills & Fall Foliage

Drew1125

Active Member
Jan 28, 2001
2,975
0
36
Someone asked earlier how I made trees for my N scale layout, so I thought I'd post this.
(bear with me here, there are about 11 photos that go with this)

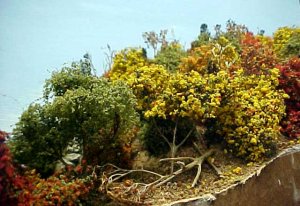
My current layout is set in the Appalachian Mtns, so I will never have too many trees!:rolleyes: :D

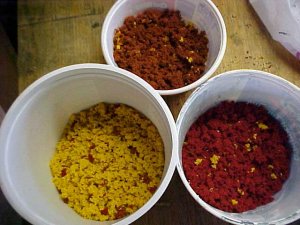
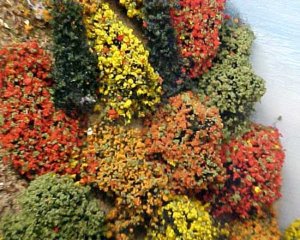
I started with some of that Wooland scenics clump foliage in fall colors
 

Attachments

  • trees1.jpg
    trees1.jpg
    52.3 KB · Views: 312
These were a little too intense for me, so I cut each color with some burnt green by mixing them in a blender...I ended up with the four WS fall colors, in assition to the burnt green, & some dark green for representing evergreens. I put each of the six colors in a plastic grocery bag...
 

Attachments

  • trees2.jpg
    trees2.jpg
    49 KB · Views: 300
Next, I take a bag of WS Poly-Fiber, & pull a small tuft between my index finger & thumb...
 

Attachments

  • trees3.jpg
    trees3.jpg
    18.2 KB · Views: 301
Next, I pull the tuft out into a random shape, roughly the size of a golf ball..then I spray it with some cheap flat black spray paint...
 

Attachments

  • trees4.jpg
    trees4.jpg
    15.1 KB · Views: 297
While the paint is still good & wet, I roll the tuft in one of the bags of the foliage...
 

Attachments

  • trees5.jpg
    trees5.jpg
    16.5 KB · Views: 293
As I finish each tree, I toss them onto a piece of wax paper to dry...
 

Attachments

  • trees6.jpg
    trees6.jpg
    44.2 KB · Views: 294
To 'plant' these on steep hillsides, I stick sectios of toothpicks, about 1/4" long into the hill, to act as "cleats" to hold the trees in place...
 

Attachments

  • trees7.jpg
    trees7.jpg
    60.2 KB · Views: 289
Then, using full-strength white glue, & working from the bottom up, I attach the trees to the hill...
This looked OK, but I really thought it needed something more... the "forest" just wasn't "branchy" enough...
 

Attachments

  • trees8.jpg
    trees8.jpg
    64.8 KB · Views: 288
The solution came in the form of this stuff I found at Wal-Mart in the dried flower section...I think it's called "candy tuft", or something like that...(?)
 

Attachments

  • trees9.jpg
    trees9.jpg
    20.9 KB · Views: 280
I cut tiny sprigs of this stuff, & put as dab of glue on them, & just stick them here & there in among the PF trees...
 

Attachments

  • trees10.jpg
    trees10.jpg
    63.6 KB · Views: 280
Thanks for sharing

your techniques on tree making. I like how you come up with the different colors for fall. I tried using the WS fall colors at first and didn't like them either. But never thought of what you are doing. I have used the blender to chop up dried moss to make great ground cover.

Great idea!
 
Thanks Judy!
I've used my blender for things like that too...I've used it to chop up dead leaves for griound cover.
NOTE: do not use the household/kitchen blender for scenery!
I went to the thrift store & bought myself one for $3.00 that is strictly for scenery. It's been a great little tool to have!
 
Originally posted by Charlie
Thanks Judy!
I've used my blender for things like that too...I've used it to chop up dead leaves for griound cover.
NOTE: do not use the household/kitchen blender for scenery!
I went to the thrift store & bought myself one for $3.00 that is strictly for scenery. It's been a great little tool to have!

Know what you mean, Margaritas are never the same after using the kitchen blender:D :eek:
 
Charlie & Judy,
I'm impressed by your use of Fall colors which I think look really great. On my last layout the bushes and trees were a half-dozen shades of green. I think the Fall colors look so much better that I might do it myself. The only problem is that I would have to re-do my backdrop colors. Have to think about that as I'm not a painting "artist" type. hmmm.... Jim