Fireball XL5

subnuke

Banned
xl5026.JPG

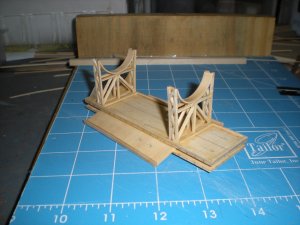
I completed this scratchbuilt wood Fireball XL5 several years ago. Now that we have a wood forum and I have plenty of build pics, I thought I would make a build thread to show one of the ways I scratchbuild. I have refined my methods over the past few years, mainly under the influence of pics on the site for the Osaka Solid Model Club in Japan.

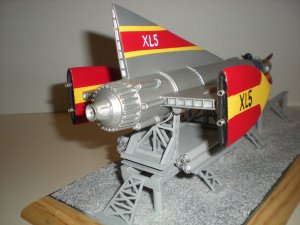
On to the build. Here are pics of the completed project. The model is sitting on the launch cradle, which is glued to the rails. I like to build very sturdy wood models and encourage youngsters to handle them, which always comes as a surprise to them (they always hear Don't Touch!).
 

subnuke

Banned
The fuselage comes from a wood curtain rod bought at the local hardware store. The fins are poplar, which can be hard to carve but is also tough wherever there is thin detail. I used the card model, studio drawings, and lots of stills from the TV show. I also used Martin Bower's web site for guidance, though his does not exactly match the TV stills. Don't know if it is still there, but I got a lot of stills from a Fireball XL5 yahoo group.

xl5001.JPG
 

subnuke

Banned
From the drawings you can see that most of the rear fuselage is a constant diameter. There are a couple of step-downs in diameter and a conical nose. I marked these on the plans and scaled them up for the model, marking on the rod. If I had a normal lathe, this would have been a breeze. I only have a Proxxon hobby lathe so I had to carve this thing by hand.

xl5002.JPG
 

subnuke

Banned
Each of the new diameters were cut down and the transitions are carved in. Various sanders get everything looking right. With calipers they may not be perfect, but I don't care as long as it looks right to the eye. Since this thing is silver, you have to be careful to get a nice, smooth surface. The carving knife set you see is Two Cherries brand. Good quality steel is a must for carving. You can use an Xacto knife if you are a glutton for punishment, but good steel takes a good edge and retains it longer. Good knives do not have to be real expensive, but high quality does cost high dollars.

xl5003.JPG
 

subnuke

Banned
You have to be careful when doing cylinders to keep your circles. You can accidently carve and sand such that a cross-section that is supposed to be cylindrical is sloppy. For this reason I taped around the back of the cockpit before reducing it to a conical section for the nose.

xl5004.JPG
 

subnuke

Banned
The rocket section at the tail has several step-downs and a nozzle. I cut it the depth mark of the cross-section then created the reduced section.

xl5006.JPG

xl5007.JPG
 

spaceagent-9

Right Hand Man and Confidant
Moderator
i loved this show when i was 5. its was my absolute favorite. i remember getting up at 6am or something ridiculas just to watch it. couldnt tell you anything about the show now though...........lol.
 

subnuke

Banned
I was able to use my hobby lathe on the rest of the rocket section which speeded things up. I have no formal machining training so I do the best I can.

xl5009.JPG

xl5010.JPG
 

subnuke

Banned
Cut out all the fin blanks from poplar. Everything has pins. These help greatly in gluing up and getting the alignment right. They also increase durability. I use metal pins after learning the hard way that wooden pins have their limitations.

xl5012.JPG

xl5013.JPG

You can see on the plan all the notes on diameters.
 

subnuke

Banned
Shaped up the fins and dug-in the rear channels. Make sure everything is smooth and aligned before gluing anything. The pins again come in handy during this phase of building. Don't glue it until all is done and looking right. Glue it to paint it.

xl5015.JPG

Also notice there is now a rocket cone with another nozzle inside.
 

subnuke

Banned
Here she is with her lumps and bumps installed. All the fins are made and pinned. They can be removed when needed for handling and installed to check progress. Looks a lot like a land speed record car, in particular the Spirit of America by Craig Breedlove. She's sitting on my bench hook, a very useful tool for carving and cutting card model pieces.

xl5016.JPG
 

zathros

*****SENIOR ADMINISTRATOR*****
Staff member
Administrator
Moderator
That's pretty awesome. There's an awesome Papermodel of the XL-5 too. Of course, it could not withstand the forces yours can!! :)
 

subnuke

Banned
Sorry I haven't finished this build report but my crummy health does like to get in the way. On with the build. The rocket is done but we need the launch rail system. I found a lot of pics on the web to help with this. I just estimated it's basic size against the rocket and built a section.

On the base you essentially have straight ladder supports and narrowing ladder supports. I drew out a template on card and built up my sections just like making a rubber powered airplane fuselage.


xl5019.JPG

After that I just cut them out, sanded, finished, and they were ready.

xl5020.JPG

The angled ladders were built the same way with a different template.

xl5022.JPG
 

subnuke

Banned
xl5023.JPG

I used a piece of red oak I got from Lowe's for the base. A nice, heavy base can support this model well. The layout was marked out on the board and holes were drilled for the posts. The posts were slotted to accept the strips of wood for the rails. The rails were then built on the posts and the ladders against the rails. The is actually a very easy base to build and when all these structures are glued together it is extremely strong.

As you can see in the background, I use clear plastic shoe boxes to keep the models dust free during construction delays.
 

subnuke

Banned
The launch cradle looks complex but is also simple to break down. Again, when all these structures are glued together it is extremely strong and does not flex. The cradle is glued to the rails but the model just sits in the cradle. This allows the rocket to be removed from the base for handling, fondling, and waving around the room making noises associated with childhood. You want to blow somebody's mind, especially a kid, tell them to feel free to pick the model up and look it over. I like to build them strong with durable finishes.

xl5024.JPG

The bands for the launch cradle were easy to make. I took some of the wood rod used for the fuselage to use as a mold. Strips were soaked in water and bent around the rod. They were taped down tightly and left to dry. After drying overnight I took them off, bent them in further to get the proper shape, and they were ready for the cradle.

xl5025.JPG

Look at the launch cradle as sections and subassemblies and you can see it is also easy to build. I did not get detailed plans, just templates for the structures. The booster rockets are rolled paper and lay on the wing-like pieces.

The base pieces were glued together and painted gray. I put some gravel from the craft store on the ground and it was ready to hold the rocket for display.
 

Attachments

  • xl5025.JPG
    xl5025.JPG
    547.2 KB · Views: 26

subnuke

Banned
Well, here she is. I could have gotten more detailed in painting by simulating the panels but I liked the way it looked so this is as far as I got with it. Everything is painted, no decals. The numbers were painted by hand. They are not perfectly formed, but I like the hand-painted look. The aluminum finish is Krylon aluminum paint. I covered it with Krylon clear, thinking that using the same paint brands would be a good idea. The stupid thing took on a shade of pink!. I sprayed it again with aluminum and it was fine. The markings are regular craft paints. I got the surface of the wood way to smooth and some of the aluminum chipped off when I removed the tape. I touched up the paint and it still looks good. You have to examine it closely to see it. I know better now and rough up the surface after I get it perfectly smooth.

xl5026.JPG xl5027.JPG xl5028.JPG xl5031.JPG
 

Attachments

  • xl5034.JPG
    xl5034.JPG
    504.3 KB · Views: 19
  • xl5034.JPG
    xl5034.JPG
    504.3 KB · Views: 64

subnuke

Banned
xl5034.JPG xl5035.JPG

I'm sorry about the large pic sizes but you can see the model clearly and see how it is built. The original is not overly detailed and makes a relatively simple subject for scratch building. Hope you all enjoy this and maybe you will give a scratch built wood model a try. In my opinion, they make better models than plastic and really benefit from details in card, paper, and metal. Materials and paint are cheap and they are so strong you are not in constant fear of their demise.

Ciao
 

mcusanelli

Well-Known Member
My God, that looks like Derick Meddings himself made it ! Absolutely BEAUTIFUL!! Congrats on a fantastic model:)
 

zathros

*****SENIOR ADMINISTRATOR*****
Staff member
Administrator
Moderator
This is a professional build. It will be "Model of Merit" after the "Prince of Wales" in 2 weeks.

This was my favorite of all the rockets of that era, which is the era I grew up in. Superb, fantastic, and worth a fortune!! :)
 
Top