I too am looking forward to seeing how you are going to fix this.
I think that it will be very helpful for those who may run into this same issue.
I think that it will be very helpful for those who may run into this same issue.
![FB-54.a[1].jpg](https://www.zealot.com/data/attachments/132/132188-fb8b1d58cdd73d5ca17ab7c7c791b6e1.jpg?hash=-4sdWM3XPV "FB-54.a[1].jpg")
![FB-55.a[1].jpg](https://www.zealot.com/data/attachments/132/132191-bbcc42194e31cc6591db4900977ca429.jpg?hash=u8xCGU4xzG "FB-55.a[1].jpg")
![FB-56.a[1].jpg](https://www.zealot.com/data/attachments/132/132192-be810227c4145a5a671fd6980ad0d864.jpg?hash=voECJ8QUWl "FB-56.a[1].jpg")
 )
)![FB-57[1].jpg](https://www.zealot.com/data/attachments/132/132193-7053e007aa307cad69d85746fe3bebed.jpg?hash=cFPgB6owfK "FB-57[1].jpg")
![FB-58[1].jpg](https://www.zealot.com/data/attachments/132/132194-5672e0751826c42f0b611d773148b73d.jpg?hash=VnLgdRgmxC "FB-58[1].jpg")
![FB-59[1].jpg](https://www.zealot.com/data/attachments/132/132195-98554bed13400cadcdcf8aee6977b779.jpg?hash=mFVL7RNADK "FB-59[1].jpg")
![FB-60[1].jpg](https://www.zealot.com/data/attachments/132/132196-078855750a9df10ad1ab339a3c5ab2a6.jpg?hash=B4hVdQqd8Q "FB-60[1].jpg")
![FB-61[1].jpg](https://www.zealot.com/data/attachments/132/132197-d3563db58f339bc8fce7458ad4616f15.jpg?hash=01Y9tY8zm8 "FB-61[1].jpg")
![FB-62[1].jpg](https://www.zealot.com/data/attachments/132/132198-19e509c504539c51ff911813e61ee369.jpg?hash=GeUJxQRTnF "FB-62[1].jpg")


I found out this website and became a member yesterday, and it's absolutely amazing to discover this thread because I just printed out Faro Basso 2 days ago and am ready to assemble it. I have done Uhu's Endurance and turned out to be really cool. I really love Uhu's work he's just simply a genius!! I hope I get to share my progress with you too. Keep up the good work!!
")
Now, "looking back over my shoulders" in threads #41, 52, 57, 58, I think that I found a clue about my mistake with the tabs: a printed line to guide me gluing that I didn't see before . . .
Please, note the correct way at right side:
View attachment 152838 View attachment 152839
Now, the wrong way at left side:
View attachment 152840 View attachment 152841
I hope that it will be helpfull to someone. But, if I wrong in this conclusion, could someone correct me, please?
Thank you for following.
")
This thread has to be one of the best examples of a build thread I have seen in years. Your interactive nature, ability to process suggestions, your kindness, are all the qualities of a truly fantastic person. I truly wish I could meet you. You have this model right on the money now, and the finished product will be fantastic.
Around 20 years ago, a guy came to me with a real on of these and the side cover was rusted through, Just under the sear, on the right hand side. What he though was a 5 inch whole was really a 20 inch rust spot. No one would touch it. That part being fairly flat, I took a sand bag and eyeballed a piece of sheet metal, matched the gauge of the metal, and with a plastic hammer, pounded out the shape (after I cut out the rust). I used my pneumatic edging tool and crimped the perimeter and mig welded the piece on. I sanded, welded, sanded again till it was almost, not quite, but functionally perfect. I sprayed the inside with weld through Zinc Primer. This guy drove this thing around for years. He moved out of town, thanking me before he left. I did not charge him, as I was just learning how to weld, and he gave me a great opportunity. After it was all sanded and painted, standing back 5 feet, you could see no distortion. You would have to look hard to see it was repaired.
Seeing your model build thread and the problems you have run into and corrected has me believing this is one of the best build threads I have seen in years!! Thanks for the memories.
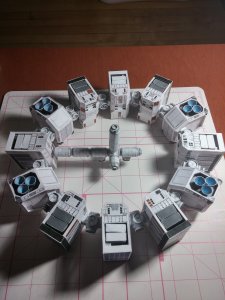
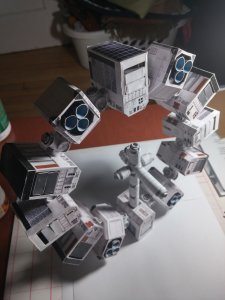
Hi Enterpriser10, here are a couple of photos of the Uhu's Endurance I built, it took me a little over two months to build it. However, it doesn't look like this anymore because it got torn in two pieces when I was moving to my current place, I should have packed it better. I haven't figured out how to fix it yet, but I'll leave it for now, still heart broken that it got broken ..

![FB-74.a[1].jpg](https://www.zealot.com/data/attachments/132/132605-e67e04278e5369ff6ce4d40dbbb82311.jpg?hash=5n4EJ45Taf "FB-74.a[1].jpg")
![FB-75[1].jpg](https://www.zealot.com/data/attachments/132/132606-d3128333a222d373d77bccc0ca328be1.jpg?hash=0xKDM6Ii03 "FB-75[1].jpg")
![FB-76[1].jpg](https://www.zealot.com/data/attachments/132/132607-a4581fcb953d0a27530d120dc4b52792.jpg?hash=pFgfy5U9Ci "FB-76[1].jpg")
![FB-77[1].jpg](https://www.zealot.com/data/attachments/132/132608-457e843b4bacd145804d20eae887a2b1.jpg?hash=RX6EO0us0U "FB-77[1].jpg") :
:![FB-77.a[1].jpg](https://www.zealot.com/data/attachments/132/132609-132765dbadb300423024029ec1a8d617.jpg?hash=Eydl262zAE "FB-77.a[1].jpg")
![FB-78.a[1].jpg](https://www.zealot.com/data/attachments/132/132610-4385c61019d0bc4e0e9c609e4a0bcf2a.jpg?hash=Q4XGEBnQvE "FB-78.a[1].jpg")
![FB-79[1].jpg](https://www.zealot.com/data/attachments/132/132611-38ce7092d931b6698c68ebf432f10a5a.jpg?hash=OM5wktkxtm "FB-79[1].jpg")
![FB-80[1].jpg](https://www.zealot.com/data/attachments/132/132612-f7b294d6e15805217ebe52e751733335.jpg?hash=97KU1uFYBS "FB-80[1].jpg")
![FB-81.a[1].jpg](https://www.zealot.com/data/attachments/132/132613-7f2f2647ee69bd49fc4909483b87a134.jpg?hash=fy8mR-5pvU "FB-81.a[1].jpg")

![FB-82[1].jpg](https://www.zealot.com/data/attachments/132/132614-0a5399c85194c97b0d2beb611a1be3ff.jpg?hash=ClOZyFGUyX "FB-82[1].jpg")
![FB-82.a[1].jpg](https://www.zealot.com/data/attachments/132/132615-35af98d3c591f3e2ba84d36a9bb91b86.jpg?hash=Na-Y08WR8- "FB-82.a[1].jpg")
![FB-83[1].jpg](https://www.zealot.com/data/attachments/132/132616-cea492aa79eefe257c76d28f7adfd786.jpg?hash=zqSSqnnu_i "FB-83[1].jpg")
![FB-84[1].jpg](https://www.zealot.com/data/attachments/132/132617-d5a08d8f1d330246bdeefc91b9afa4c6.jpg?hash=1aCNjx0zAk "FB-84[1].jpg")
![FB-84.a[1].jpg](https://www.zealot.com/data/attachments/132/132618-29575c7e0e4dc19509edc6d0b012c965.jpg?hash=KVdcfg5NwZ "FB-84.a[1].jpg")
![FB-85[1].jpg](https://www.zealot.com/data/attachments/132/132619-50a3324aca9cb87d1fc31cf2f67e330d.jpg?hash=UKMySsqcuH "FB-85[1].jpg")
![FB-85.a[1].jpg](https://www.zealot.com/data/attachments/132/132620-9a4533c1ae67ec410f4e6c04d9bac43d.jpg?hash=mkUzwa5n7E "FB-85.a[1].jpg")
![FB-86[1].jpg](https://www.zealot.com/data/attachments/132/132621-e29b53dd8776ab843b24899815299046.jpg?hash=4ptT3Yd2q4 "FB-86[1].jpg")