Adding Details to Your Engines
OK FOLKS, i am going to try and do this in two posts:thumb: , so PLEASE wait till the second post comes up before commenting
")
. THANKS!

announce1 OK, FIRST, before i do ANYTHING to an engine, I DO THE HOMEWORK! what i mean by this is i try and look for prototype pics of the engine i want to add the details to. a GREAT place to start is "Railpictures.net":thumb: , they have a HUGE assortment of engine pics in just about ANY road you could imagine. books are ANOTHER great place to look for pics of engines. SINCE I AM INTO UP
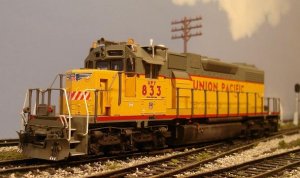
, i am going to use UP for the examples in these posts. lets say i am looking for UP SD38-2 #833, if i cant find the exact proto pics for #833, i would try and get AS MANY UP SD38-2 pics as i could so i have some examples of how UP sets these engines up, it gives me a starting point:thumb: . AFTER i have some pics of some UP SD38-2's, i start looking for similarities in how the are "set up".
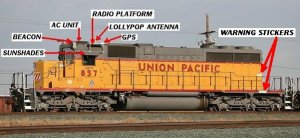
View attachment 29824 THINGS I LOOK FOR: antennas, plows, MU sockets, MU hose holders, AC units, grab irons, warning stickers, sunshades, all weather windows, radio platforms, GPS, horn placement, hoses, do the steps have safety stripes on them?, do the leading railings have a safety color on them? announce1 THOSE are MOST of the things i look for
.
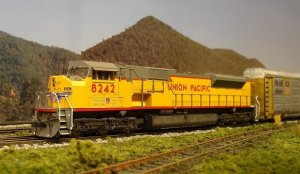
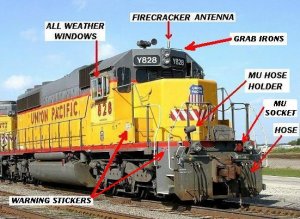
View attachment 29825 NOW i have a good idea of what items i need to get to make the engine more prototypical:thumb: . more often then not, i use Walther's to get my detailing parts. Walther's is GREAT because they have TONS of the parts you will need. ALSO, if you are not sure what the name of the "antenna"(as an example)type, you could scroll through all there antennas and check the pics out of them, till you find the one you need:thumb: . MOST roads, stick with certain types of equipment, UP for example, uses 4 different antenna types: firecracker, lollipop, and on newer units; dome type and Sinclair. the same goes for plows, and MANY other items, so if you model a certain road, most of the things on one engine will be the same on others
. UNFORTUNATELY for me

ops: , i collect UP past AND present, so i have a MULTITUDE of parts(some pictured below). if you stick with a one time period, it will cost much less to detail your enginestooth1 .
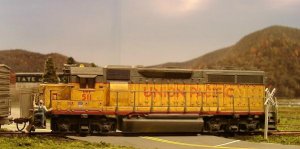
View attachment 29821 DETAILING an engine requires MORE then just the add on parts to do it
. look at the prototype pic of the engine you want to detail, do you have the decals it takes to replicate the prototype? i have a LARGE assortment of decals in HO and N scale to do this. HOLD IT!, STOP THE TRAIN! "Deano, did you say N scale decals?" YOU BET!:thumb: , and heres why, many of the warning stickers on the prototype are small, and not many of the HO decal sheets have decals small enough to simulate these stickers, THIS is why i buy some N scale decals, to "simulate" some of the stickers on the prototypes
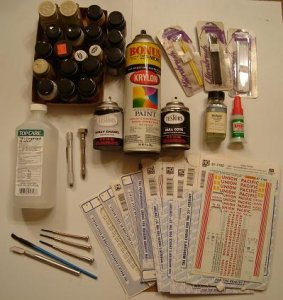
. some of you have asked me in my threads how i have got all the warning stickers to do this, now i have let you in on my secret:thumb: . i get my decals from the LHS, and Walther's. i "set" my decals with SOLVASET. i put one coat on, let it COMPLETELY DRY, then put one more coat on them. announce1 OTHER items you will need: an assortment of paint to match the road/s you model, Dull Cote, an assortment of small brushes, one medium brush, 70% isopropol rubbing alcohol, small screwdrivers, exacto knife, tweezers, pin vice & drills, and your choice of fast setting glue.
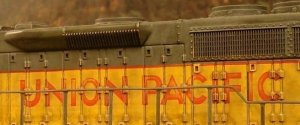
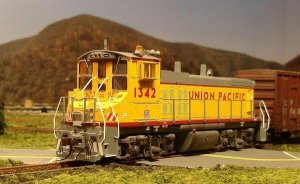
View attachment 29822 NOW that you have EVERYTHING you need, you can start detailing the engine. THE NEXT COUPLE PICS, will give you some ideas of what you can do:thumb: . the first pic is of my UP MP15DC, heres what i have done: moved the horn to the "UP correct" place on the roof, put all weather windows on it, added 9 decals to it, placed a firecracker antenna and a beacon on the roof, detailed the hoses, air brushed over the zebra stripes, and put new ones where they are supposed to be, and weathered the trucks, air and fuel tank:thumb: .
View attachment 29823 CONTINUED....


") , and the kind words regarding the layout:thumb: . -
, and the kind words regarding the layout:thumb: . -
 . ALSO, i am going to push it back a little as i have not only been getting asked about the "how to's" on engine detailing on this thread, but have gotten some PM's and E-mails asking about it. announce1 SO, i am working on the "detailing engines post" NOW, and HOPE to have it done by tomorrow night
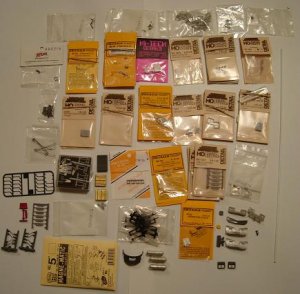
 , but i HATE to do it. one thing i do to give the engine the appearance that it is "used", is to weather the LOWER HALF of it, that is enough to satisfy metooth1 . i only have 3 engines i have weathered "all over", if you choose to do this(and no doubt it would turn out better then mine