Dry Brushing

Woodie

Active Member
Gary mentioned in his Graffiti thread that he used "dry brushing" to get the weathering on the bridge. I've seen this technique mentioned a few times. Ummmm.... what is it?? :confused:
 

pcentral

Member
Hey Woodie,
Dry brushing is using your paint brush with very little paint on it. Such as when you are painting something and are just about out of paint on the brush. Thats how much you want for dry brushing. Then you just lightly brush the area you want to weather. I have only done it a few times, so if someone can describe it better......
I now use a weathering system from www.bragdonent.com for all my needs. I find it easier to use than dry brushing, chalks or any other weathering methods.
 

Gary Pfeil

Active Member
Woodie, the above is pretty much accurate. Practice on some scrap for a few minutes and you will get the feel for it. After dipping your brush into the paint, wipe it on a paper towel, removing almost all the paint. Start by brushing gently, see how much paint is transferred. From there you will see whether you should brush harder. When you get to the point where you have to scrub to transfer more paint, it's time to reload. It may seem to be a terribly slow process, particularly if you are impatient. Take your time!

Gary
 

rockislandmike

Active Member
I particularly like the effect for bridges and hoppers..........

I've painted a couple bridges so far 'atsf silver' to simulate the steel used, then tone it down by drybrushing grey and tan overtop. Then the serious weathering begins, with rust and india ink.

Now if you'll excuse me, I'm gonna go check that weathering link from pcentral.
 

sumpter250

multiscale modelbuilder
Woodie,
I get the brush TO the point where you have to scrub the paint, this way I don't get too much paint on the weathered surface, and only the edges, and high spots get painted.
Pete
 

Vic

Active Member
Dry Brushing Examples

Hi Woodie, Here's a pic of some dry brush weathering on tin roofs. I used various rust colored paints.
 

Attachments

  • examples1.jpg
    examples1.jpg
    64.8 KB · Views: 163

Woodie

Active Member
Supplementary question

Hi guys,
Thanks for that so far. Another question on this. A lot of my structures are printed card stock. Can dry brushing for weathering be used on these as well? Chalks would be a bit difficult due to the abscence of texture/raised profiles/detail on the printed card. Any suggestions here. I have not yet tried to weather anything. I'm not game enough yet! In case I ruin it!:(
 

60103

Pooh Bah
Dry Brush Figure Painting

One of our club members has written articles and given workshops on his figure painting technique.
He sprays the entire figure black and then dry brushes the highlights on. Most of the figure then seems to have shadows. This (he claims) gives better results than painting colours and putting shadows on top.
I've also seen him apply it to buildings. (but not the extension he added to his house).
This was dismissed by one person as "the way those military modellers do it".


Woodie: I'd like to know if it works for card models too, as that's what most of mine are. I think you need a bit of texture for it to work.
 

Gary Pfeil

Active Member
I laughed when I read the line "the way those military modelers do it". For the most part, those military modelers kick railroad modelers butt when it comes to painting.

Gary
 

billk

Active Member
Gary - Agree re: military modelers, but there's a good reason - they can concentrate more on the painting because they don't need to care about trackwork, running abililities, electrical and control systems, etc. etc. Model RRing has a lot more, and more diverse, facets, more than any other hobby I can think of.
 

Cactus

New Member
Woodie,

Dry brushing might work on card structures with no problem, since there's so little paint involved. But I recently discovered that the acrylic paint that I used to touch up a couple of spots on a card structure can cause one.

I had printed up a brick pattern on photo paper using my ink jet printer, and made a building from the paper. When I went to touch up the corner joints with brick-colored paint, I discovered that water-based paint caused the ink-jet pattern to run.

My solution to the problem was to spray the model with Testor's Dull Coat before the touchup. This put a protective layer over the photo paper, preventing the moisture in the paint from doing damage to it. The Dull Coat had the added advantage of removing the shiny character of the printed surface.
 

Vic

Active Member
Chalk

Hi Woodie, A very light coat of Dullcote or similar flat finish sprayed over the cardstock before using the chalks will add enough "tooth" for the chalk to adhere to the cardstock. Just "test" it on something first to make sure that it is compatible with the printing on the card stock.

TIP: Hold the can 10-12 inches away from the surface to be coated. Just make 2-3 light passes with the spray. You do not want the surface to be "wet". The ideal situation is that the spray dries just as it hits the surface of the cardstock.

After you have applied your chalks make 1-2 passes with the spray, as described above, again to "fix" the chalk so it does not rub off.

ANOTHER TIP: This works well too to restore old decals that have dried out and crack all to pieces when you try to use them
 

Woodie

Active Member
Decals

old decals that have dried out and crack all to pieces

I see I'm not the only one that has happened too!:mad: THanks for the tip.:)
 

Vic

Active Member
Hey Woodie, Just thought I would pass on something else....If you elect to use the Testor's Dullcote brand of flat finish please be aware that they have two different grades of it.

There's the regular Testor's...in a blue and white can I think and Testor's ModelMaster.(In a black and sliver can I think)

Use the ModelMaster...the difference is that the ModelMaster can has a much finer spray nozzle and just does a much neater job.

I have also used Krylon Crystal Klear and it works fine too.
 

Woodie

Active Member
Dullcoate

Vic,

I have the dullocate in a bottle (brush on) and spraycan (black & silver label). I haven't seen the other grade of it on the shelves here. I brushed the cardstock, and it came up OK (to take ths shine off the card). I spray the rollingstock though. Gotta be careful with the spray (not to spray the windows).
 

Vic

Active Member
Hey Woodie, Glad its working out. The brush will be ok. Post us a pic or two when you get some chalk weathering on something.:)
 

Woodie

Active Member
First go

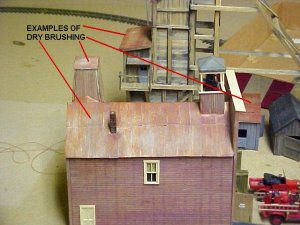
Had my first go at drybrushing tonight. Went well, actually. I was quite pleased with myself!:cool: :D I did 4 wagons, and also loaded them up with coal. No piccies yet, but I will put some up when I can.

Here is what I did:
Try to open bottle of Floquil Grimy Black. :mad: 20 mins. Pliers, wrench, door jamb, hammer, vice..... nup...... stuck fast that lid was. An easy way of opening stuck Floquil bottle lids would be FAB! :cool: :eek:
Got the smallest brush I could find. 2mm (1/16 "), dipped in the paint (Grimy Black), then squeezed/press between absorbent paper. Did a test squiggle on a separate sheet each brush refill, to make sure there was minimal paint.

Then brushed lightly along the joins/rivets etc. Also pressed quite hard to spread the brush bristles right out as well.

Should I use a bigger brush, or is the brush size dependant on the detail/spread of the weathering you want? Should I only use light strokes, or is pressing the brush quite hard to spread the bristles OK?

Rivets and rasied textures on the cars where OK, but the crevices proved a problem, getting the weathering down them.

What can I do about crevices?

Anyway, I was quite proud of myself!!! I was sure I was gunna wreck the paint job on the trucks, and have to repaint the whole thing, after I'd spent hours putting the decals on!
 
Top