

Thank you, Revell-Fan! Just the final fixing of the sphere, the neck, the back end and the antenna. Feels really weird that it's done! Nearly two years (counting the time out to train the pup!)WOOOW!!! This is such a beauty - very well done so far !!! :Congrats: :Bravo:Claphands
Discovering UHU02's 2001 Discovery One
- Thread starter Jacopo1969
- Start date
You are using an out of date browser. It may not display this or other websites correctly.
You should upgrade or use an alternative browser.
You should upgrade or use an alternative browser.
Agree with the others, this is a beaut. Nice construction, changes mede in order to make it better, and a nice looking representation of the original.

- Apr 5, 2013
- 13,876
- 10,216
- 228
There's something that really cries outof this model. More than it's superb nature. It is a fantastic nuild. You are in the 1% class. Also, this build thread is an example to all!! ")
Thanks Zathros - just another 99% to go!There's something that really cries outof this model. More than it's superb nature. It is a fantastic nuild. You are in the 1% class. Also, this build thread is an example to all!!
") I hope I've managed to add something here for future modellers taking this one on!
I hope I've managed to add something here for future modellers taking this one on!I've got to say a big thank you to @DanBKing for his build thread - and @lyter1958 later on in the process. Apart from anything else it was pictures of those builds that put me on to attempting this. Mine is far from perfect but the overall effect is presentable as long as you don't zoom in too close! Very pleased with it and still can't believe it's done!
Thank you to all of you Zealots for all your encouragement and kind words. thumbsup
Thank you to all of you Zealots for all your encouragement and kind words. thumbsup
Attachments


Last edited:
I have no idea what MOM criteria are, but I like this one...You have done a FANTASTIC JOB on this project!!!
- Apr 5, 2013
- 13,876
- 10,216
- 228
This is MOM level. A beautifully built model and an excellent build thread. You have added another excellent build thread on this model, and on of a model that requires this much dedication, there can never bee too many resources.
Officially submitted for MOM!
Officially submitted for MOM!
Wow, that's amazing, thank you soooo much!This is MOM level. A beautifully built model and an excellent build thread. You have added another excellent build thread on this model, and on of a model that requires this much dedication, there can never bee too many resources.
Officially submitted for MOM!
- Apr 5, 2013
- 13,876
- 10,216
- 228
Wow, that's amazing, thank you soooo much!
You deserve it. Your build thread was so excellent. You ionteracted with other members, it is a shining example of what a build thread should be. Now people can look and see the construction steps of the model,, and learn how to interact with other members. You brought all of us closer together. You deserve it.
I really am humbled! Thank you all!
Given the honourable status this model has unexpectedly achieved, I feel obliged to 'fess up' on some of the later stages of construction:
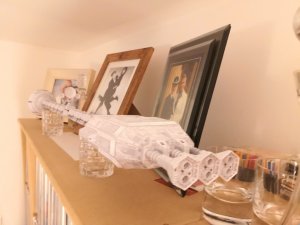
1. Spine rod. I left a small length of dowel visible at the front with a longer length at the tail. Turns out would've been better to paper right up to the front of the rod and leave a longer tail end. This wasn't an issue as I was able to wrap a length of paper as a 'tail pipe' to ensure a good solid connection inside the propulsion section.
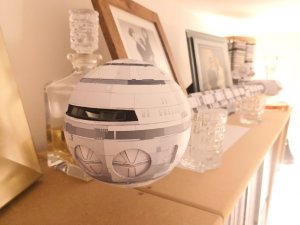
2. Joining the hemispheres. I was in two minds as to the best way to do this. I had originally left a 'tab' around the bottom edge of the top hemisphere (should be visible on photos) but I ended up removing it and making a clean edge. This was after looking carefully at other build threads! I plumped for it being safer to apply an inner rim to the bottom hemisphere, so that it ended up flush with the edge. Note I applied it with plenty of glue so that there was no need to pinch tight and risk the tabs from the pod bay doors becoming visible on the outer hull - that way disaster lies! Having done that, I then applied a replacement tab to the inside edge of the top hemisphere, which made a really good connection with that hidden inner rim when the two halves came together. This also helped preserve the recessed darker band round the 'equator'. I was really happy with the outcome.
3. That neck join. My heart was in my mouth when I placed the sphere on the neck. It was mis-shapen and too baggy! That first photo I posted of the sphere on the neck in front of the fireplace - you'll see that the bottom left of the sphere shrinks back from the neck join - and that's after I applied the fix! I was gutted! Despite careful cutting and alignment of panels, it came up short! I attempted a fix by creating an additional 'collar' to slide over the end of the neck. I made it in exactly the same way as the neck end, attaching two equal strips top and bottom so that they could slide snugly over the end of the neck. The new collar was then glued on to the tabs inside the hole in the sphere, and the result was remarkably effective by way of fixing what could have been a very messy situation. I think fitting the collar helped fill out the shape of the sphere correctly, reducing the size of the gap as a result.
Here endeth the confession!
Given the honourable status this model has unexpectedly achieved, I feel obliged to 'fess up' on some of the later stages of construction:
1. Spine rod. I left a small length of dowel visible at the front with a longer length at the tail. Turns out would've been better to paper right up to the front of the rod and leave a longer tail end. This wasn't an issue as I was able to wrap a length of paper as a 'tail pipe' to ensure a good solid connection inside the propulsion section.
2. Joining the hemispheres. I was in two minds as to the best way to do this. I had originally left a 'tab' around the bottom edge of the top hemisphere (should be visible on photos) but I ended up removing it and making a clean edge. This was after looking carefully at other build threads! I plumped for it being safer to apply an inner rim to the bottom hemisphere, so that it ended up flush with the edge. Note I applied it with plenty of glue so that there was no need to pinch tight and risk the tabs from the pod bay doors becoming visible on the outer hull - that way disaster lies! Having done that, I then applied a replacement tab to the inside edge of the top hemisphere, which made a really good connection with that hidden inner rim when the two halves came together. This also helped preserve the recessed darker band round the 'equator'. I was really happy with the outcome.
3. That neck join. My heart was in my mouth when I placed the sphere on the neck. It was mis-shapen and too baggy! That first photo I posted of the sphere on the neck in front of the fireplace - you'll see that the bottom left of the sphere shrinks back from the neck join - and that's after I applied the fix! I was gutted! Despite careful cutting and alignment of panels, it came up short! I attempted a fix by creating an additional 'collar' to slide over the end of the neck. I made it in exactly the same way as the neck end, attaching two equal strips top and bottom so that they could slide snugly over the end of the neck. The new collar was then glued on to the tabs inside the hole in the sphere, and the result was remarkably effective by way of fixing what could have been a very messy situation. I think fitting the collar helped fill out the shape of the sphere correctly, reducing the size of the gap as a result.
Here endeth the confession!
Last edited:
:Congrats::Bravo: to the MOM status, you deserve it.
Very well done Jacopo1969 and as Z already wrote, an excellent building tread with a lot of information to the build.
Thank you so much for all your little details you shared with us, this will definitely help others (me ! ) when building their Discovery.
Very well done Jacopo1969 and as Z already wrote, an excellent building tread with a lot of information to the build.
Thank you so much for all your little details you shared with us, this will definitely help others (me !
) when building their Discovery.If you want to follow me down the cockpit build route, I'm happy to share the sheets I pulled together for that - they include the window frame. Let me know if you are interested - you'll probably be able to improve on them:Congrats::Bravo: to the MOM status, you deserve it.
Very well done Jacopo1969 and as Z already wrote, an excellent building tread with a lot of information to the build.
Thank you so much for all your little details you shared with us, this will definitely help others (me !
You have indeed done a FANTASTIC JOB on this model! I fully understand the difficulty of this model and some of the challenges that it poses when building. Your build has indeed set the bar for others to follow! KEEP UP THE GREAT WORK!!!
Great work. i bow to you sir. now the best part is showing it to your friends and telling them its made out of paper!!!!
plus finding the "right spot" for her.
plus finding the "right spot" for her.
Thank you - it stands on the shoulders of the giants that went before it! Thanks again for sharing your build.Great work. i bow to you sir. now the best part is showing it to your friends and telling them its made out of paper!!!!
plus finding the "right spot" for her.
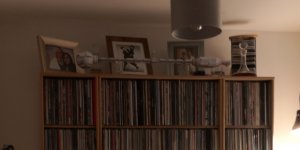
Already been showing it off and enjoying the disbelieving looks!
Second one needs some thought
Last edited:
- Apr 5, 2013
- 13,876
- 10,216
- 228
Nobody looks at what's inside, that's what it took to get you to the outside!! That's imagination and fabrication at it's best. No confession needed, nothing out of the ordinary done.