Dimorphodon, by @Strick67

micahrogers

Moderator "Where am I, and how did I get here?"
Staff member
Moderator
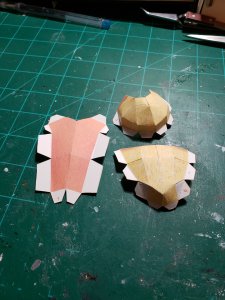
As promised, here is my build of the Dimorphodon by @Strick67

As is usual the process starts by printing the model. This one is formatted for A4 paper, but since I am in the US it has been downsized to 95% of original to fit onto Letter size 8 1/2 by 11 67# stock.

The 3 parts pages printed first.
20200628_113936_resized.jpg
 

Strick67

AKA Dinoreplicas
Watching this with interest.
Incidentally I'm using Vallejo Model Color to paint the 3D printed sculpted model which the card version was based on.
 

micahrogers

Moderator "Where am I, and how did I get here?"
Staff member
Moderator
Watching this with interest.
Incidentally I'm using Vallejo Model Color to paint the 3D printed sculpted model which the card version was based on.
I use both Vallejo, and The Army Painter (TAP) Vallejo for models mostly, and TAP for figures and miniatures. The rack with the smaller (10 ml?) bottles are TAP Dungeons & Dragons Nolzur's Marvelous Pigments.
 

micahrogers

Moderator "Where am I, and how did I get here?"
Staff member
Moderator
Update on the Dimorphodon build.
Neck pieces 3 and 4 cut out, preformd,
20200628_183024_resized.jpg20200628_183333_resized.jpg
glued, and attached to the head.
20200628_183814_resized.jpg
Head is filled with tissue to add support, neck will be stuffed once glue dries.
 

Attachments

  • 20200628_183333_resized.jpg
    20200628_183333_resized.jpg
    530.1 KB · Views: 0
  • 20200628_183814_resized.jpg
    20200628_183814_resized.jpg
    545.6 KB · Views: 0

Strick67

AKA Dinoreplicas
I use both Vallejo, and The Army Painter (TAP) Vallejo for models mostly, and TAP for figures and miniatures. The rack with the smaller (10 ml?) bottles are TAP Dungeons & Dragons Nolzur's Marvelous Pigments.

I'm not really a model maker but I've had to start painting up my sculpts for product photography. Originally I was using cheap artists acrylic which was fine for the skulls but I decided I needed something with better opacity for the Dimo 3D print. I have to say the Vallejo paints rose to the occasion.
 

micahrogers

Moderator "Where am I, and how did I get here?"
Staff member
Moderator
I'm not really a model maker but I've had to start painting up my sculpts for product photography. Originally I was using cheap artists acrylic which was fine for the skulls but I decided I needed something with better opacity for the Dimo 3D print. I have to say the Vallejo paints rose to the occasion.
If your main concern is opacity, the The Army Painter have a higher pigment count. but you won't find "Generic" colors from TAP. Vallejo Model Color have the traditional painters colors, Umber, sienna, Prussian Blue, and the like. Just Keep in mind that all of the lighter colors, orange, yellow, white, and some blues take multiple coats to show true color, unless your base color is the same color as the paint.
 

Strick67

AKA Dinoreplicas
The Vallejo paints were fine for my needs. At a push I could have managed with artists' acrylic but I fancied going 'posh' for a change :biggrin:
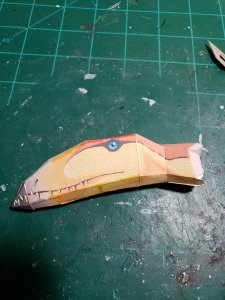
. In the pre-digital days I used to illustrate using acrylics and sometimes oils so I developed a few techniques for getting opaque and transparent colours to play nice together. Incidentally I gave the 3D print the same colour scheme as the card model.
 
Last edited:

micahrogers

Moderator "Where am I, and how did I get here?"
Staff member
Moderator
I went 'posh' with my $64.95 "Master series" brush set by The Army Painter. 11 brushes, from 1/2 inch wide, all the way down to one called "The Pyscho" which is smaller than a 20/0 detail, and the set includes a real Red Sable Kolinski Master Class detail brush. I'll spend good money on fancy things for my wife, and my hobby :cool:
 

micahrogers

Moderator "Where am I, and how did I get here?"
Staff member
Moderator
And back to the build.

Update on the Dimorphodon build.
The next step is the tail, pieces 8 - 12. Pieces scored, cut out and preformed.
20200629_172717_resized.jpg
Then the individual segments assembled,
20200629_173333_resized.jpg
then the completed tail boom. As suggested in the instructions, I inserted rolled up paper to reinforce the segment joins. The final segment to the tail "sail" just has a trimmed toothpick.
20200629_174940_resized.jpg

As a side note, this model could have easily had a 'round' tail instead of 4 sides, just don't pre score and fold the segments, instead just roll them up...
 

micahrogers

Moderator "Where am I, and how did I get here?"
Staff member
Moderator
I forgot to take step by pictures, so I'll do that with the left side.
Here is the right side dorsal surface of the wing.
20200629_200338_resized.jpg
I've already thought of another change an advanced builder can make, No Tabs, the wing would look much better with but joints.
 

micahrogers

Moderator "Where am I, and how did I get here?"
Staff member
Moderator
Left wing dorsal surface cut out, scored, and preformed.
20200630_165156_resized.jpg
Left wing dorsal assembled.
20200630_165859_resized.jpg
Left wing ventral scored, cut out, and preformed,
20200630_181303_resized.jpg
And assembled
20200630_181557_resized.jpg
and the same for the right ventral surface.
20200630_182853_resized.jpg20200630_183050_resized.jpg

Next will be the body, then assembly.
 

micahrogers

Moderator "Where am I, and how did I get here?"
Staff member
Moderator
Progressing nicely, had to make a trip into town or this would be a finishing update.
I got the body chest and abdomen, pieces 5 & 6 and the back, piece 7 cut out and preshaped.
20200701_090624_resized - Copy.jpg
Internal cuts glued to form the curved shape.
20200701_090624_resized.jpg

and the chest glued to the abdomen
.20200701_132835_resized.jpg
Head and right wing dorsal attached to the back.
20200701_135308_resized.jpg
and left dorsal
20200701_135555_resized.jpg
The tail added, this is the top side of the pterosaur. She is a fairly large paper model.
20200701_142423_resized.jpg
Ventral wings attached to the chest and abdomen.
20200701_150021_resized.jpg
and leg membrane attached and tweezers holding it till the glue dries.20200701_150848_resized.jpg
 

Attachments

  • 20200701_091904_resized.jpg
    20200701_091904_resized.jpg
    560.8 KB · Views: 1

micahrogers

Moderator "Where am I, and how did I get here?"
Staff member
Moderator
All I have managed to do today is to finish getting the main body glued together, a combination of errands that couldn't be put off, and a very painful day, slowed me down.
20200702_095358_resized.jpg
I will work on the legs and arms later if I can stay awake.

I hate having to take my pain meds so early.
 

micahrogers

Moderator "Where am I, and how did I get here?"
Staff member
Moderator
Rear legs and feet attached.
20200703_104819_resized.jpg
The instructions aren't real clear on which way the feet go on, but the cover picture shows them toes open up, so that's the way I put them.
20200703_104830_resized.jpg
Right arm pieces scored, cut, and preformed.
20200703_105707_resized.jpg
Mock up, to see best way to install.
20200703_105834_resized.jpg
Right arm installed
20200703_112509_resized.jpg
Left arm scored, cut and preshaped.
20200703_114029_resized.jpg
Left arm installed
20200703_114742_resized.jpg
And finished
20200703_114755_resized.jpg
 

micahrogers

Moderator "Where am I, and how did I get here?"
Staff member
Moderator
Better pics taken outside in natural light.
20200703_114850_resized.jpg20200703_115006_resized.jpg20200703_115033_resized.jpg20200703_115039_resized.jpg
And the beauty shot.
20200703_115014_resized.jpgI
In summation, I really enjoyed this build, and it will take a place of honor, hanging from the ceiling of my grandsons room.
Again my thanks to Strick67 for designing this model, and making it available for free.
 
Last edited by a moderator:
Top