

Building UHU's Endurance- My First Build Thread
- Thread starter Cforrest900
- Start date
You are using an out of date browser. It may not display this or other websites correctly.
You should upgrade or use an alternative browser.
You should upgrade or use an alternative browser.
Interstellar earned a spectacular 5 academy award nominations this morning! I personally thought it deserved a nom for best picture as well, but I'm completely perplexed as to how it didn't get nominated for best cinematography, seeing as how it was considered by many a frontrunner to win that one.
Anyways, I've finally completed the final docking port! The finished ring measures a whopping 13.5 inches across (not quite as big as expected, but certainly big enough)
Up next, I plan to start working on the central docking hub. I have an idea for a stand for the model. It will have 4 posts of different heights, each of which will have an angled "hand" piece for one of the modules of the ship to sit on. This will hopefully display it at a nice angle AND in a way that I can rotate it to also show the backside, as there is a lot of detail work there.
Without further ado, here are the build pics:
View attachment 139753 View attachment 139754 View attachment 139755 View attachment 139756 View attachment 139757 View attachment 139758 View attachment 139760 View attachment 139761
View attachment 139759
I hate to be raining on your parade
 but I just noticed that you might have glued "luggage compartments" of the habitat modules wrongly (it's upside-down)
Reference: http://uhu02.way-nifty.com/.shared/image.html?/photos/uncategorized/2014/12/03/31.jpg
I realized that after doing two, but decided to do the other two the same way, as nobody is really likely to notice unless they have eyes as clean as yoursI hate to be raining on your parade
Reference: http://uhu02.way-nifty.com/.shared/image.html?/photos/uncategorized/2014/12/03/31.jpg

Next bit of progress: work begins on the central docking hub:


Central docking hub completed. Up next, I need to attach it to the rest of the ship and complete the other Lander and Ranger.


Work begins on the final stages of the model: the Lander and the Ranger. As these were the trickiest bits of the model for me, I'm gonna go SUPER detailed on my build pics/ descriptions so that others who choose to build this model in the future may use them as a ref.
To begin with, all parts are cut out and folded:


I then layer the areas where the magnets will go with two extra layers of paper:


For the ranger, I cut out tabs from the 3rd layer to ensure that they will not be visible in the finished product.
Next, I glue the magnets to the approximate area:


As can be seen above, I use a few other magnets to then line up the glued one correctly:


Next: lots and lots of waiting. But in the meantime, I'll begin work on the "wing" for the Ranger
To begin with, all parts are cut out and folded:
I then layer the areas where the magnets will go with two extra layers of paper:
For the ranger, I cut out tabs from the 3rd layer to ensure that they will not be visible in the finished product.
Next, I glue the magnets to the approximate area:
As can be seen above, I use a few other magnets to then line up the glued one correctly:
Next: lots and lots of waiting. But in the meantime, I'll begin work on the "wing" for the Ranger
It is really coming together beautifully!
I am glad to see that you took into consideration that the magnets would put extra strain on the paper and have compensated for it.
I am glad to see that you took into consideration that the magnets would put extra strain on the paper and have compensated for it.
Building the Ranger's wing:
To begin with, I double up some of the areas of the wing. This is to prevent it from warping when glued to the main hull of the ship. I then cut out the shape with the tabs on the bottom layer, which will create something like a butt-joint.


Next, I cut out 1 set of the other 2 pieces to finish the wings. I cut tabs here, as these will become the bottom layer:

The y are then glued into the wing:


I then cut out another set of the "U: shaped pieces with NO tabs sand glue them over the others:


I then take an extra copy of the Ranger hull and cut out the grey triangles for the wing placement from the front half of the hull. I make sure to cut them WITH tabs:

They are then glued into the wings. Note that the front does not line up completely with the front of the wing:

Finally, the top edges are glued, completing the wing:

Up next (tomorrow): completing the Ranger!
To begin with, I double up some of the areas of the wing. This is to prevent it from warping when glued to the main hull of the ship. I then cut out the shape with the tabs on the bottom layer, which will create something like a butt-joint.
Next, I cut out 1 set of the other 2 pieces to finish the wings. I cut tabs here, as these will become the bottom layer:
The y are then glued into the wing:
I then cut out another set of the "U: shaped pieces with NO tabs sand glue them over the others:
I then take an extra copy of the Ranger hull and cut out the grey triangles for the wing placement from the front half of the hull. I make sure to cut them WITH tabs:
They are then glued into the wings. Note that the front does not line up completely with the front of the wing:
Finally, the top edges are glued, completing the wing:
Up next (tomorrow): completing the Ranger!
I know that UHU02's models can be (and sometimes are) quite challenging (which is one of the many reasons why I am so drawn to his work in the first place). So seeing what you are doing, I have to commend you on the meticulous care and effort that you are putting into building this model. Such efforts are (INDEED) paying off.
- Apr 5, 2013
- 13,876
- 10,215
- 228
I am so impressed by how perfect you made this model. These huge pictures would show any defects, and the bigger the pic, the better the model looks! I see a Model of the Month, I guarantee, when finished, a "Model of the Month", to be soon renamed something a bit shorter! (well, not "Something a bit sorter", a shorter title......HehHehHeh) ")
:jawdrop::jawdrop::jawdrop::jawdrop::jawdrop::jawdrop::jawdrop::jawdrop::jawdrop::jawdrop:I am so impressed by how perfect you made this model. These huge pictures would show any defects, and the bigger the pic, the better the model looks! I see a Model of the Month, I guarantee, when finished, a "Model of the Month", to be soon renamed something a bit shorter! (well, not "Something a bit sorter", a shorter title......HehHehHeh)
The second Ranger is finished:
To begin with, I attach the tabs to the bottom of the hull and cut out the top pieces. Nothing special is done here:


Next, I cut out tabs from a scrap piece of paper to place in the rear half of the hull:


I then attach the upper halves of the hull to the bottom, but do not yet seal the two halves together:

Next, glue is applied to the tabs on the rear half of the wing and it is glued onto the Ranger:


Finally, I seal the two halves together, completing the Ranger:


Up next, I'll start work on the second Lander!
Thanks to all for watching and for the kind words.
To begin with, I attach the tabs to the bottom of the hull and cut out the top pieces. Nothing special is done here:
Next, I cut out tabs from a scrap piece of paper to place in the rear half of the hull:
I then attach the upper halves of the hull to the bottom, but do not yet seal the two halves together:
Next, glue is applied to the tabs on the rear half of the wing and it is glued onto the Ranger:
Finally, I seal the two halves together, completing the Ranger:
Up next, I'll start work on the second Lander!
Thanks to all for watching and for the kind words.
Attachments
Work continues with the assembly of the second lander's main hull.
To begin, I seal the front of the hull. I would strongly advise scoring these areas, as the folds here are rather complex:

Next, I cut out and install the divider/ support piece between the two sections of the hull. I would not recommend sealing the front of the hull yet, as that makes attaching the central piece of the bottom much trickier.


I then attach the bottom of the central hull and connect it to the front:


Next, I cut out and install the bottom of the cockpit:


Lastly (for this post, at least), I cut out and install tabs at the rear of the hull:

Up next: finishing the hull's rear and finished pictures of the lander's main hull
To begin, I seal the front of the hull. I would strongly advise scoring these areas, as the folds here are rather complex:
Next, I cut out and install the divider/ support piece between the two sections of the hull. I would not recommend sealing the front of the hull yet, as that makes attaching the central piece of the bottom much trickier.
I then attach the bottom of the central hull and connect it to the front:
Next, I cut out and install the bottom of the cockpit:
Lastly (for this post, at least), I cut out and install tabs at the rear of the hull:
Up next: finishing the hull's rear and finished pictures of the lander's main hull
Next, I cut out the final piece of the ship's main hull:

I begin by attaching it to the rear of the central piece of the bottom:

Next, I attached it to the top piece:

Finally, the sides were closed:

Aaaaaand done:


I begin by attaching it to the rear of the central piece of the bottom:
Next, I attached it to the top piece:
Finally, the sides were closed:
Aaaaaand done:
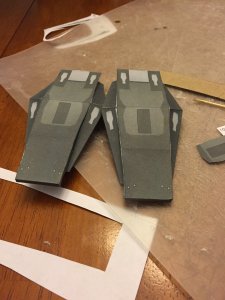
More progress: The front pods (possibly secondary engines?) are done.
I begin by cutting out the part with a LOT of tabs:


Next, I fold on all of the lines except for some of the thin grey ones:

The part is then assembled:

Next, you'll need:
A dragon's right big toenail, the blood of a virgin (fresh or store-bought), 1/19th of a unicorn's horn, the 43rd page of an overly-long, convoluted fantasy novel (preferably one with a pretentious name), and a goat hoof. Combine all of these ingredients and then drop the first engine pod in. When the smoke clears, you'll have two:

Finally, the pods are attached to the front of the ship:


I begin by cutting out the part with a LOT of tabs:
Next, I fold on all of the lines except for some of the thin grey ones:
The part is then assembled:
Next, you'll need:
A dragon's right big toenail, the blood of a virgin (fresh or store-bought), 1/19th of a unicorn's horn, the 43rd page of an overly-long, convoluted fantasy novel (preferably one with a pretentious name), and a goat hoof. Combine all of these ingredients and then drop the first engine pod in. When the smoke clears, you'll have two:
Finally, the pods are attached to the front of the ship:
Second to last bit of work on the ENTIRE PROJECT!
First, the parts are cut out and folded:


Next, I glue them together, then, by repeating the process from step three of the above post, I duplicate the already made engine:


The engines are then attached to the ship:


Up next: building the thrusters
First, the parts are cut out and folded:
Next, I glue them together, then, by repeating the process from step three of the above post, I duplicate the already made engine:
The engines are then attached to the ship:
Up next: building the thrusters