building my own millenium falcon

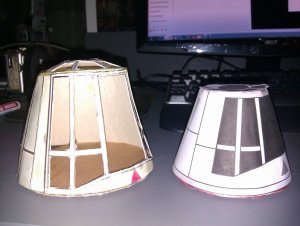
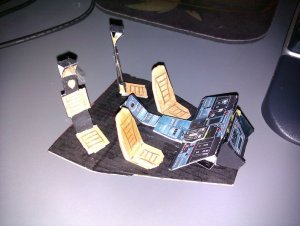
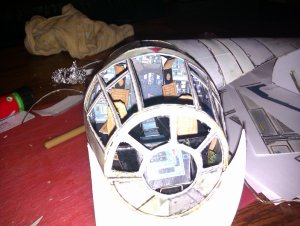
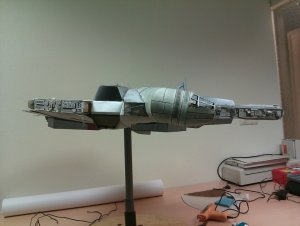
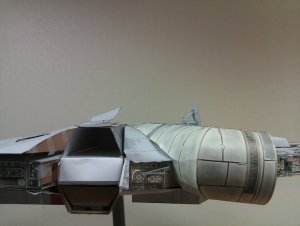
Damn...then is the size of my cockpit also to small
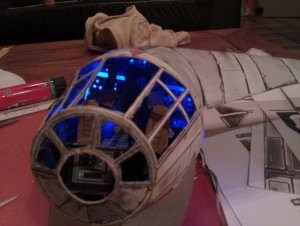
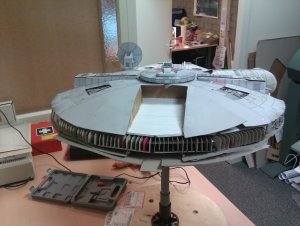
And i have to rework everything.
incl that inside cockpit

Tomorrow i will look how far i have to recontruct the cockpit
damn.:-)
 
As an aside the general diameter of the 'tube' (and thus the cockpit) is the same as the narrow end of the docking ring. In theory there is a straight hall (all the 'halls' have the same diameter) leading to that ring, sealed by the ramp; the hexagonal structures on the surface are the doors.

I have some awesome pics of the filming cockpit blueprints (top and side). Send me a PM and I'll get them to you. The filming cockpit does not match 100% with the model however (none of the interior matches nicely with the filming model), but its close enough, where it counts.

Tirick
 
My new cockpit tube..
and it's a LOT bigger
But looks better...and only problem now is the cockpit with the inside stuff..
And i think that i have to stick the orginal armour plating on it, because the hull is from another Falcon kit.
 

Attachments

  • new tube2.jpg
    new tube2.jpg
    128.3 KB · Views: 14
  • new tube 1.jpg
    new tube 1.jpg
    125 KB · Views: 12
Wow, I would have never torn that up! :eek: 
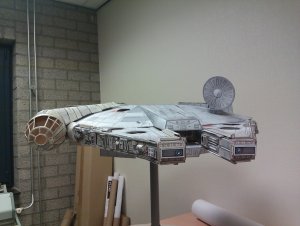
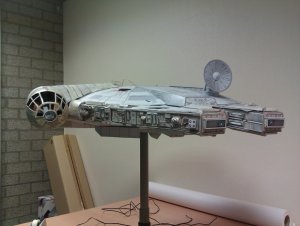
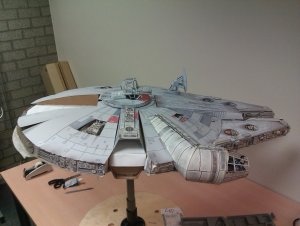
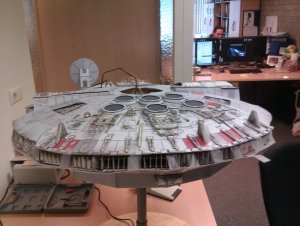
For all the inconsistencies in Star Wars, who would care.:yinyang1: I thought it looked ready to take off. :drag1: You are much braver than I am !!:inw:
 
Or i'm just stupid :-)

But i think this works better...i only hope that it is not TO big...
Look at te new size (left) , old (right)
 

Attachments

  • IMAG0299.jpg
    IMAG0299.jpg
    136.8 KB · Views: 15
Yes this looks great..
The size looks better the tube is also straight..
I'm now trying to create a new inner cockpit.
they are a bigger then the cockpit so i have to find the correct scale.
 

Attachments

  • TESTFIT2.jpg
    TESTFIT2.jpg
    184.6 KB · Views: 16
  • TESTFIT3.jpg
    TESTFIT3.jpg
    153.2 KB · Views: 14
Yes. i used some tape to fix it a little..just for testing it. i like that :-)
At the moment i'm printing the dashboard and hope that i have enough time tonight for building the inside.
Then i can install the cockpit at the correct angle to the cockpit tube.
 
Today i've installed the inside of the cockpit including the lights..
And i i think it looks nice.
 

Attachments

  • IMAG0306.jpg
    IMAG0306.jpg
    178.6 KB · Views: 13
  • IMAG0307.jpg
    IMAG0307.jpg
    155 KB · Views: 12
Today the cockpit installed to the main hull.
Also insert the engine incl nice blue lights..

the cockpit looks better than the orginal..
but it is a little bent downwards on the tip.
so tomorrow i will glue it at the back so it stays up :-)
 

Attachments

  • engine installed.jpg
    engine installed.jpg
    138.2 KB · Views: 12
  • frontview.jpg
    frontview.jpg
    140.5 KB · Views: 16
  • side view.jpg
    side view.jpg
    119.4 KB · Views: 13
I thought at first the 2nd cockpit looked too big but now I think it is really coming together just right. You just have to finish it at this point. The interior of the cockpit is excellent. This would be a fine edition to any home. :)
 
Today worked on the backside..
everything goes fine but the bottem part doens't look good.
i think i have to recontruct it a little

today i found a led bulb which i can use for the lighting of the top gun-cockpit but it gets very hot in a few minutes...so i have to build in a heatsink
 

Attachments

  • backview.jpg
    backview.jpg
    160.1 KB · Views: 12
  • sideview.jpg
    sideview.jpg
    156.2 KB · Views: 8
today the backside top part installed..
But u have to cut some parts so that i can bent it
and (i hope) fixed the under backside at the engine.
 

Attachments

  • backside ready1.jpg
    backside ready1.jpg
    169.2 KB · Views: 8
  • backside ready3.jpg
    backside ready3.jpg
    165.5 KB · Views: 16
It took me a while to realize that you were using tape to hold the ends together. At first I thought maybe you idled the engines too long! I look forward to some "after tape" pictures, she's looking great! :)
 
:-) Yes i needed the tape to force the hull to go down..
Because of the way the flat surface is bent it wants to go up.
Now i used some very strong glue and had to fix everything..

And now i hope it will stay down and not tear everyting.