BNSF Track Plan

Hoss

Member
Nov 10, 2003
189
0
16
47
TEXAS
Visit site
I don't know if it's against any rules or not, but I thought I'd post my proposed track plan over here in the N scale forum as well as the track planning forum to see if I could pick up a few more reviews.

The track plan shown below is modeling modern day BNSF. The only thing shown here is the mainline, passing sidings and hidden staging. It was getting late last night and I was too sleepy to take the time to put industry spurs and such in.

Take a look and let me know what you think.

A couple of notes:

- The hidden staging will likely be hidden behind scenery and not a backdrop like is shown on the drawing.
- The numbers located around the track indicate the radius of the curves.
- Grid lines are spaced at 12 inches.

You can see the image below or you can go HERE for the full size version.

aaj.sized.jpg


Okay...what do my fellow N scalers think?

Also, while I do plan to have a grain elevator and lumber yard on here, I'm open to suggestions on industry (although I do want to maintain a rural look and not big city). I'd like to maybe get some coal in here somewhere. Feel free to make suggestions or draw in where you think the industry spurs should go. :)
 
Well...it doesn't BEGIN to compare to that BEAST of a layout you've got, but unfortunately my wife wouldn't surrender any more space than the "formal" living room. I just can't understand why she doesn't want to have trains running through every room of the house. :rolleyes:
 
Hoss:
I've been watching this plan develop. This looks like a fun version. You will be able to hide the staging behind a steep ridge line, but still keep it accessible. You may even want the yard turnouts exposed, but the tracks disappearing behind the ridge with trees or under an overpass. Leqaving the turnouts visible will make them easier to maintain. It can look like two different yards, but the trains will be hidden from view.

If you want coal, you can probably put in a siding along the center track with the 30" curves. You can locate a flood loader on the siding, fed by a "mine and processing plant" just over the hill that hides your staging.

The plan looks great. I like the way that you have not crowded the space with too much track.

Eric
 
Originally posted by pomperaugrr
Hoss:
I've been watching this plan develop. This looks like a fun version. You will be able to hide the staging behind a steep ridge line, but still keep it accessible. You may even want the yard turnouts exposed, but the tracks disappearing behind the ridge with trees or under an overpass. Leqaving the turnouts visible will make them easier to maintain. It can look like two different yards, but the trains will be hidden from view.

Funny you say that because that's almost EXACTLY what I had in mind. Hide the staging in a deep ridge with one or both ends of the staging exposed to give the appearance of a yard(s). :)

If you want coal, you can probably put in a siding along the center track with the 30" curves. You can locate a flood loader on the siding, fed by a "mine and processing plant" just over the hill that hides your staging.

Hmmmm...you may be onto something. I've been trying to figure out where I might fit a flood loader in. Good thinking. Thanks.

The plan looks great. I like the way that you have not crowded the space with too much track.

Thanks. Crowding the space with too much track is something I have been struggling with. There will be more track once I get my industry spurs in, but I'm still trying not to have too much.
 
Looks very good indeed. You've got some very nice radii there, shouldn't have ANY trouble even with the larger locos. Is this a walk-around layout? Or will it be put against a wall?
 
Originally posted by Arlaghan
Looks very good indeed. You've got some very nice radii there, shouldn't have ANY trouble even with the larger locos. Is this a walk-around layout? Or will it be put against a wall?

Thanks. :)

The curves that I'm worried about are the 15" mainline and 13.75" siding curves on each end. I'm sure the locos and long cars can handle the curves okay, but it won't look very good I'm afraid...and I wonder if the longer cars will be clunking together at the planned 1-1/4" track spacing. :(

Unfortunately, it will be put against a wall. I wish I had room for a large walk around.
 
Well, here's a little bit of my experience:

My garage layout uses 15" min. radius turns and I've had 2 sd80macs meet head on and pass each other with plenty of room. I've also sent a string of husky stacks and same thing, plenty of room. The overhang is noticeable, but it's not so bad.

On another note, the same sd80mac's can pull cars around an 11" radius curve - again without problems. The overhang on that is pretty bad, but the running of the train was very smooth. If you get a decoupling on a curve, it's usually not able to be recoupled on such a tight space... I've had to "push" all the cars back onto a straight section before it would "catch" again. However, there's many factors involved here besides the curve, such as Micro-Trains to Accumate coupling, etc.

Bottom line is, I think you will be fine with your track spacing, but to be sure, I would tack down two pieces of flex track along those radii and just "push" a string of cars along both tracks and see what happens. If you don't feel comfortable, it's not a big deal to go to 1.5" spacing along those ends.

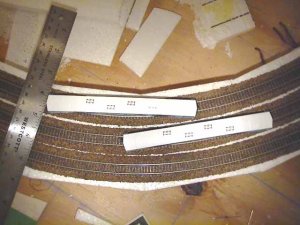
P.S. I just went to the garage and put 2 Bombardier Coach Commuter cars - one on the 15" radius and one on the next radius - 1.25" inches larger. I took a picture for your reference. This is as close as they get... plenty of room. Figure a little less room since your second track will be on the inside, instead... but keep in mind, these cars are 6.5" long! :)
 

Attachments

  • aaa.jpg
    aaa.jpg
    36.6 KB · Views: 229
Thanks Arlaghan!! That's some VERY useful information...and a picture is worth a thousand words!! How long are those commuter cars compared to autoracks? Autoracks are probably about the longest things I'll ever be running. I think they're either 85 or 89 scale feet long....don't remember which....but that comes out to 6.375" or 6.675", respectively.

I wish I could make the curves with a larger radius, but unfortunately my benchwork can't go any wider.
 
Layout 07

Just for giggles I decided to see what a double main would look like. I was afraid it would be "too much"...but it doesn't look so bad in my opinion...especially considering there will be a significant track elevation difference at the place where the tracks come the closest (at the turn).

Still can't decide on how to arrange industry spurs. Any help on that would be greatly appreciated.

aal.sized.jpg
 
Wow, you know what? I like it.

By no means am I qualified as a trackplan evaluator, but I just like the way it looks. Plus, when you see those double tracks going parallel around a curve and nicely ballasted... it just looks GREAT!

Are you considering DCC for your layout?
 
Thanks Arlaghan!! I like it too....but I still have to add industry spurs and such in.

I'll definitely be using DCC. I purchased a Lenz Set 100 back when I was working on the first layout.
 
detection

Hoss: can I offer you a suggestion for a simple detection circuit for the staging yard?
It has 2 parts -- a solar cell/light detector (What do they call those things? :confused: ) and an LED. put the light detector between the tracks where you want to detect the train, e.g. before the fouling point of the turnout, and connect it to the LED on the control panel. You will need some sort of light source above the staging yard. When the light goes out, the train is in position. It won't work in a tunnel unless you put a light above it.
 
Good idea. I was thinking of doing something like that...but I it will take a little research because I've never done anything along those lines.

Now....I unveil my FINAL track plan (subject to change of course). ;)

Seriously, I still want some feedback, but I think I've finally found a trackplan that I like. I'm sure it's got some flaws somewhere, but unless they're serious I probably won't make any changes from what you see here. What do you think??

aaq.sized.jpg
 
I think the only thing might be in the construction of a yard. The rest looks good to me. Try this link regarding Yard design... I've incorporated some of the principles into my mini design for my 36x80 plan... which is nowhere near reality ;) At least you have your benchwork done. ;)
 
That's a good link with some good info, but it's not really applicable in my case. The hidden staging yard will be nothing more than storing full length trains that are already put together and ready to roll. There won't really be any prototypical operations in that yard...just storage...a place to hide trains until they magically appear on the layout from somewhere on the "outside". ;)
 
Actually, I was thinking the five track stub yard you appear to have on the lower right hand side of the layout. Green track(?). Anyway, I shouldn't be the one giving advice on layouts... ;) I'd love to see this one evolve...

Do you have a plan for what you used with this benchwork? I may have access to a toolshop and be able to create one in sections that I could bolt together...
 
Oh....well, to be honest, that stub end yard is the biggest part of the layout that I'm still questioning. I was thinking of putting a coal tipple there, but I'm not sure what to do there really. That little section is still up for debate, and it may stay that way until I actually get ready to lay track there.

Do you have a plan for what you used with this benchwork? I may have access to a toolshop and be able to create one in sections that I could bolt together...

Well, not really. I knew the shape and dimensions of the benchwork from my track plan. As far as dimensions and what not I just figured out in my head what dimensions I'd need for each board to make the benchwork as shown. Not too difficult really. Then again, I've also had a lot of experience in carpentry work (dad and granddad are both carpenters and I'm now in commercial construction). Still though, there's not much to it. It took me about 30 minutes to make all the cuts and then about an hour and a half to assemble them after I had everything cut. Is that what you were asking??

The only tools I needed were my handy dandy Black & Decker variable speed drill, a borrowed Delta 10" compound miter saw, a tape measure and a pencil. Oh...and I did use a calculator to figure out how long the angled pieces needed to be (A^2 + B^2 = C^2). I used 3" drywall screws for all connections, and I predrilled a pilot hole for the angled sections (to prevent the screws from pulling the board out of position when tightened).