

Better Modeling with Meta/Pep/P.N
Tutorial 1: Introduction
COMPUTER-ASSISTED 3D CARDMODEL DESIGN (CA3CD) FOR BEGINNERS
It has been observed that it is a bit disappointing for a forum devoted to advancing card-modeling to have very few dedicated tutorials on the subject, which would allow the hobby to spread to a much wider audience. Apart from a few excellent pieces like those of Paragon and Nobi, a systematic treatment has not been posted. A number of tutorial pages have been referenced in several threads prior to this, but most have actually been incidentally relevant to card-modeling since they were made for other purposes, such as making 3D models for flight simulator programs. While recognizing their value for card-modelers who have had either the patience, perseverance, or the experience to apply them to the hobby, absolute beginners may find them slightly too advanced or bewildering, or at least confounding enough to decide not to pursue the more fundamental challenge of this hobby: designing one’s own card-model.
Throughout the rest of January and into March, I will be writing a series of tutorials on computer-assisted 3D card-model design written with the absolute beginner in mind. The objective of this series is to provide the necessary tools and skills that would allow one who has had no prior experience to become a relatively proficient designer who can make his own card-models and share them with this community. These tutorials will be composed of 5 threads containing the following:
. Tutorial 1: Introduction – Description and objective, basic card-modeling software, recommended settings and configurations
. Tutorial 2: Basic 3-D Sculpting and Texturing from Schematics – Making a simple model and texture out of schematic drawings, then making and applying a flat texture to the model (NX Orbital Inspection Pod), unfolding
. Tutorial 3: Intermediate Modeling with Multiple Objects – Making models (Andorian Kumari-class Cruiser) comprised of multiple objects, making textures from lo-res and hi-res orthographic drawings, and simple texturing strategies for multiple-angled faces
. Tutorial 4: Intermediate Modeling and Texturing – Making a model with multiple complex shapes and UV mapping
. Tutorial 5: Special Techniques – Working with imported meshes, manually fusing/combining objects, making a 3D model from a single isometric image, increasing the resolution of patterns, 'freestyle' modeling, etc.
The necessary files to start and follow the tutorials will be attached to each thread. These tutorials will essentially replicate my learning curve in the task of card-model design; note that they do not include an “Advanced” level because I do not consider myself that “advanced” in skills and usage of the software. I have not even unlocked all of the secrets of Meta/Pep/P.N at this point. I also think that to be at that stage, I should be using more complex and integrated packages such as Rhino and Blender.
Recommended Software
These tutorials will make use of the most easily accessible, easy-to-learn, and inexpensive software available, namely Metasequioa (both freeware and shareware versions), Pepakura Designer 2.0 (both freeware and shareware versions), and PaintDotNet (freeware). Together, these are very powerful and versatile tools that should satisfy the needs of both the casual designer and serious hobbyist, with budgets from $0.00 to $100.00.
Metasequoia 3D
Description
Metasequioa (Meta) is a compact but powerful 3D modeling tool written by Osamu Mizno, and can be downloaded from metaseq.net. Meta comes in both freeware (MetasequioaLE) and shareware (Metasequioa 2.4.7) versions, with the main difference between the two being the Multiple Views, UV Mapping, File Export, and Plug-in functions available in the shareware version. Otherwise they are essentially the same, and it is possible for one to create a wide variety of models with just MetaLE. The shareware version costs only US$45.00, a very affordable price. Though written in Japanese, there is an option for English-language menus on installation, and English help files can be downloaded and installed separately.
The main advantage of Meta over all other 3D programs (aside from price) is size and simplicity; it does not have high hardware requirements and takes up only about 15MB of hard disk space. It can easily run off older computer systems, and even out of a flash drive. The interface is designed for efficiency and ease of use (though the actual functions of some of the more arcane buttons may not be easily understood). Yet even the LE version has the capability to make and process 3D models as complex as other, more expensive packages.
The only major drawback seems to be that Meta is only a Windows program, there are no Mac or Linux versions. However, I have been informed that Metasequioa runs well enough under Linux through the Wine compatibility layer (More on this is a subsequent post).
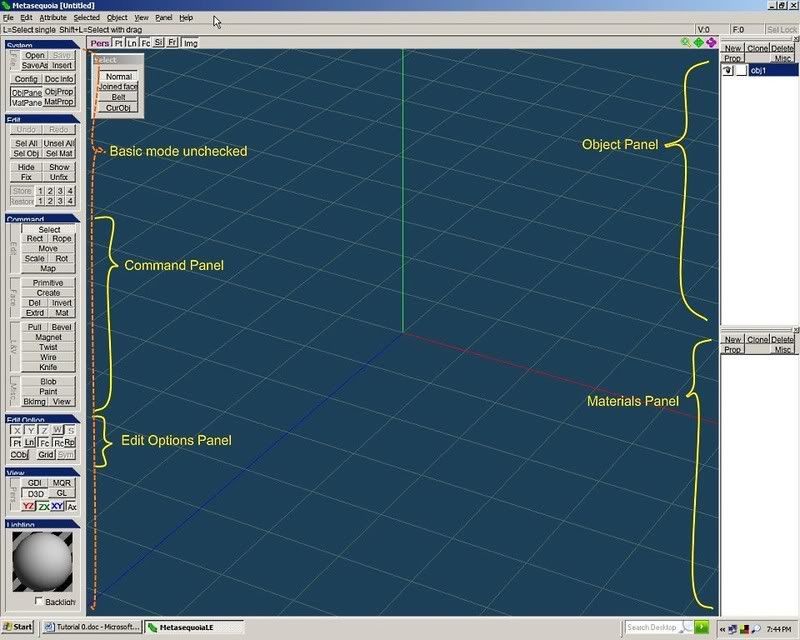
This is my MetaLE screen: (We will move on to regular Meta later on)
Recommended Settings
- Uncheck “Basic mode” in the “File” menu to expose all function buttons
- Open the “Object” and “Material” Panels by checking them in the Panel Menu. If they appear as separate windows, drag the windows all the way to the right side of the screen to make them appear as shown.
- Open all main Command Menus; but if your screen is not as large (I am using a 17" screen at 1280x1024 resolution), close some panels by click on the blue titles. You may begin with just the Command and Edit Option panels (these are the ones you will use most often), and open the others only when needed.
- In the Edit Option panel, leave just the “Pt”, “Rc”, and “CObj” buttons depressed. Note that in MetaLE, the top row of buttons are locked.
- In the upper left corner of the main screen, just make sure that the “Fr” is NOT depressed. You only use this when needed.
- In the View menu, check the “Show precisely” and “Show textures” items.
- You may change the color configuration in the drawing area later by clicking on “File”, “Configuration”, and then “View”. For now though, just leave it at the default settings.
Pepakura Designer
Description
Pepakura Designer is another compact and excellent program specifically written for card-modeling, and distributed by Tama Software Ltd. It can be downloaded from Pepakura Designer. Pepakura reads 3D model files and unfolds the model into a 2-dimensional plane for printing on paper. It works especially with Meta, though it can also read files from a few other software packages. Pepakura also has a very efficient interface, and is designed for ease of use. The unregistered version can already unfold and print 3D models, but you cannot save the pattern development files, which can be a drag if you want to take your time in developing the pattern. The save function is enabled upon registration, which only costs US$38, which is again well worth the expense.
The only weakness of Pepakura is the limit to the resolution of the textures it can print out, currently set at 1024 x 1024 pixels. Regardless of how high the original texture resolution is, Pepakura will reduce it to 1024 x 1024 upon print-out. This means that the print out may sometimes not be as sharp as one wants, depending on the design and the textures used. In most cases though, this should not be a problem. Tamasoft offers a separate high-resolution printing program, but this costs US$150, and is not necessary for the usual hobbyist (in fact it is offered for industrial use). Like Meta, Pepakura is available only for Windows. It's possible to run on Linux through Wine, but not with the current release. (More on this in a subsequent post)
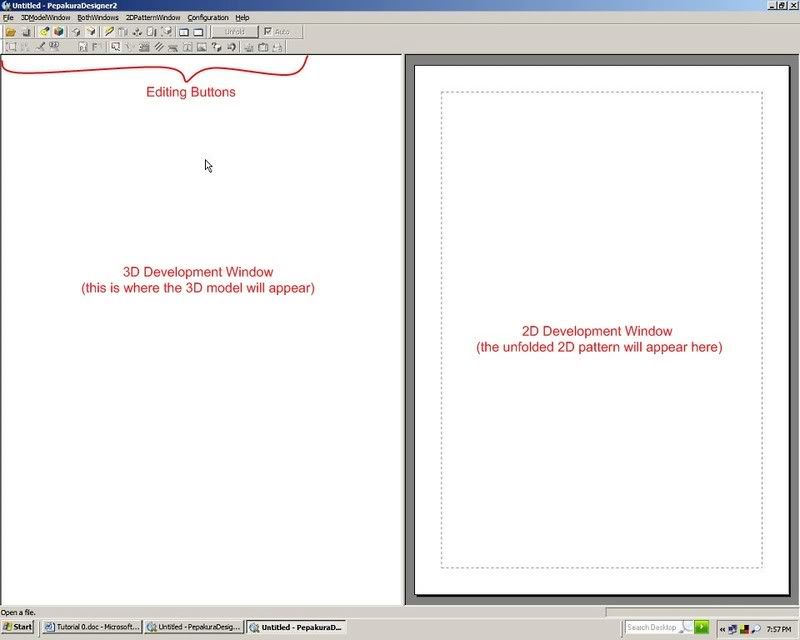
Recommended Settings
- There is no need to change the default settings on Pepakura as they work very well in normal circumstances. You will only need to change them when you encounter specific issues.
PaintDotNet
Description
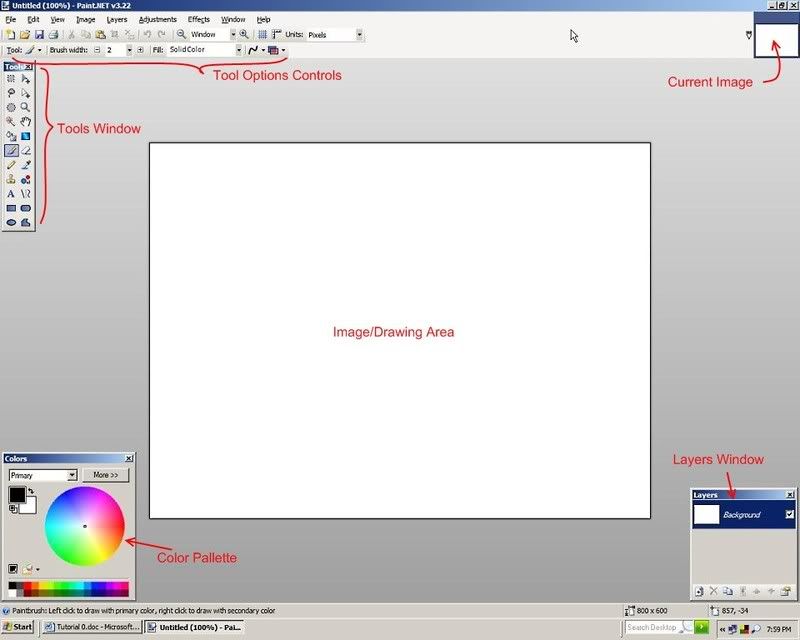
PaintDotNet is like a super-charged MS Paint program. It is a free image painting and photo editing program with versatile functions that one finds in advanced graphics programs like Photoshop. The interface is likewise clean and easy to use.
User-made free plug-ins are available and regularly posted online, which continuously expand the program’s capabilities, particularly the number and kind of special effects filters that one can apply to an image. PaintDotNet can be downloaded from Paint.NET - Free Software for Digital Photo Editing.
As with all bitmaps, PaintDotNet's disadvantage is that the textures can produce "jaggies" when printed out, i.e. the images may not be as sharp or as refined as intended. But again, this depends on the model's design and the size of the textures used.
Recommended Settings
- Open the “Tools”, “Layers”, and “Colors” windows. If you have a smaller-size/resolution screen, you can close the "Layers" window; anyway you won't need it until much later in the tutorials. Often When I am just drawing black lines and do not need colors, I also close the "Colors" window.
(c) 2008 Jay B / doodler3d@yahoo.ca
***********************************************************************
OK, that's it for this week, folks! See you on the next post!
Please note, the tutorials will be written and spread over the course of the next several weeks. I will try to keep the output regular by writing on the weekends, but due to other commitments the amount of time I can devote to this may change.
In the meantime, you are free to post your inquiries about the usage of these programs so that I can cover them in the tutorials to be written, at appropriate stages.
Tutorial 1: Introduction
COMPUTER-ASSISTED 3D CARDMODEL DESIGN (CA3CD) FOR BEGINNERS
It has been observed that it is a bit disappointing for a forum devoted to advancing card-modeling to have very few dedicated tutorials on the subject, which would allow the hobby to spread to a much wider audience. Apart from a few excellent pieces like those of Paragon and Nobi, a systematic treatment has not been posted. A number of tutorial pages have been referenced in several threads prior to this, but most have actually been incidentally relevant to card-modeling since they were made for other purposes, such as making 3D models for flight simulator programs. While recognizing their value for card-modelers who have had either the patience, perseverance, or the experience to apply them to the hobby, absolute beginners may find them slightly too advanced or bewildering, or at least confounding enough to decide not to pursue the more fundamental challenge of this hobby: designing one’s own card-model.
Throughout the rest of January and into March, I will be writing a series of tutorials on computer-assisted 3D card-model design written with the absolute beginner in mind. The objective of this series is to provide the necessary tools and skills that would allow one who has had no prior experience to become a relatively proficient designer who can make his own card-models and share them with this community. These tutorials will be composed of 5 threads containing the following:
. Tutorial 1: Introduction – Description and objective, basic card-modeling software, recommended settings and configurations
. Tutorial 2: Basic 3-D Sculpting and Texturing from Schematics – Making a simple model and texture out of schematic drawings, then making and applying a flat texture to the model (NX Orbital Inspection Pod), unfolding
. Tutorial 3: Intermediate Modeling with Multiple Objects – Making models (Andorian Kumari-class Cruiser) comprised of multiple objects, making textures from lo-res and hi-res orthographic drawings, and simple texturing strategies for multiple-angled faces
. Tutorial 4: Intermediate Modeling and Texturing – Making a model with multiple complex shapes and UV mapping
. Tutorial 5: Special Techniques – Working with imported meshes, manually fusing/combining objects, making a 3D model from a single isometric image, increasing the resolution of patterns, 'freestyle' modeling, etc.
The necessary files to start and follow the tutorials will be attached to each thread. These tutorials will essentially replicate my learning curve in the task of card-model design; note that they do not include an “Advanced” level because I do not consider myself that “advanced” in skills and usage of the software. I have not even unlocked all of the secrets of Meta/Pep/P.N at this point. I also think that to be at that stage, I should be using more complex and integrated packages such as Rhino and Blender.
Recommended Software
These tutorials will make use of the most easily accessible, easy-to-learn, and inexpensive software available, namely Metasequioa (both freeware and shareware versions), Pepakura Designer 2.0 (both freeware and shareware versions), and PaintDotNet (freeware). Together, these are very powerful and versatile tools that should satisfy the needs of both the casual designer and serious hobbyist, with budgets from $0.00 to $100.00.
Metasequoia 3D
Description
Metasequioa (Meta) is a compact but powerful 3D modeling tool written by Osamu Mizno, and can be downloaded from metaseq.net. Meta comes in both freeware (MetasequioaLE) and shareware (Metasequioa 2.4.7) versions, with the main difference between the two being the Multiple Views, UV Mapping, File Export, and Plug-in functions available in the shareware version. Otherwise they are essentially the same, and it is possible for one to create a wide variety of models with just MetaLE. The shareware version costs only US$45.00, a very affordable price. Though written in Japanese, there is an option for English-language menus on installation, and English help files can be downloaded and installed separately.
The main advantage of Meta over all other 3D programs (aside from price) is size and simplicity; it does not have high hardware requirements and takes up only about 15MB of hard disk space. It can easily run off older computer systems, and even out of a flash drive. The interface is designed for efficiency and ease of use (though the actual functions of some of the more arcane buttons may not be easily understood). Yet even the LE version has the capability to make and process 3D models as complex as other, more expensive packages.
The only major drawback seems to be that Meta is only a Windows program, there are no Mac or Linux versions. However, I have been informed that Metasequioa runs well enough under Linux through the Wine compatibility layer (More on this is a subsequent post).
This is my MetaLE screen: (We will move on to regular Meta later on)
Recommended Settings
- Uncheck “Basic mode” in the “File” menu to expose all function buttons
- Open the “Object” and “Material” Panels by checking them in the Panel Menu. If they appear as separate windows, drag the windows all the way to the right side of the screen to make them appear as shown.
- Open all main Command Menus; but if your screen is not as large (I am using a 17" screen at 1280x1024 resolution), close some panels by click on the blue titles. You may begin with just the Command and Edit Option panels (these are the ones you will use most often), and open the others only when needed.
- In the Edit Option panel, leave just the “Pt”, “Rc”, and “CObj” buttons depressed. Note that in MetaLE, the top row of buttons are locked.
- In the upper left corner of the main screen, just make sure that the “Fr” is NOT depressed. You only use this when needed.
- In the View menu, check the “Show precisely” and “Show textures” items.
- You may change the color configuration in the drawing area later by clicking on “File”, “Configuration”, and then “View”. For now though, just leave it at the default settings.
Pepakura Designer
Description
Pepakura Designer is another compact and excellent program specifically written for card-modeling, and distributed by Tama Software Ltd. It can be downloaded from Pepakura Designer. Pepakura reads 3D model files and unfolds the model into a 2-dimensional plane for printing on paper. It works especially with Meta, though it can also read files from a few other software packages. Pepakura also has a very efficient interface, and is designed for ease of use. The unregistered version can already unfold and print 3D models, but you cannot save the pattern development files, which can be a drag if you want to take your time in developing the pattern. The save function is enabled upon registration, which only costs US$38, which is again well worth the expense.
The only weakness of Pepakura is the limit to the resolution of the textures it can print out, currently set at 1024 x 1024 pixels. Regardless of how high the original texture resolution is, Pepakura will reduce it to 1024 x 1024 upon print-out. This means that the print out may sometimes not be as sharp as one wants, depending on the design and the textures used. In most cases though, this should not be a problem. Tamasoft offers a separate high-resolution printing program, but this costs US$150, and is not necessary for the usual hobbyist (in fact it is offered for industrial use). Like Meta, Pepakura is available only for Windows. It's possible to run on Linux through Wine, but not with the current release. (More on this in a subsequent post)
Recommended Settings
- There is no need to change the default settings on Pepakura as they work very well in normal circumstances. You will only need to change them when you encounter specific issues.
PaintDotNet
Description
PaintDotNet is like a super-charged MS Paint program. It is a free image painting and photo editing program with versatile functions that one finds in advanced graphics programs like Photoshop. The interface is likewise clean and easy to use.
User-made free plug-ins are available and regularly posted online, which continuously expand the program’s capabilities, particularly the number and kind of special effects filters that one can apply to an image. PaintDotNet can be downloaded from Paint.NET - Free Software for Digital Photo Editing.
As with all bitmaps, PaintDotNet's disadvantage is that the textures can produce "jaggies" when printed out, i.e. the images may not be as sharp or as refined as intended. But again, this depends on the model's design and the size of the textures used.
Recommended Settings
- Open the “Tools”, “Layers”, and “Colors” windows. If you have a smaller-size/resolution screen, you can close the "Layers" window; anyway you won't need it until much later in the tutorials. Often When I am just drawing black lines and do not need colors, I also close the "Colors" window.
(c) 2008 Jay B / doodler3d@yahoo.ca
***********************************************************************
OK, that's it for this week, folks! See you on the next post!
Please note, the tutorials will be written and spread over the course of the next several weeks. I will try to keep the output regular by writing on the weekends, but due to other commitments the amount of time I can devote to this may change.
In the meantime, you are free to post your inquiries about the usage of these programs so that I can cover them in the tutorials to be written, at appropriate stages.
") Also I would like to see it put into the WIKI. We have lots of stuff that really should be in the WIKI but isn't....
Also I would like to see it put into the WIKI. We have lots of stuff that really should be in the WIKI but isn't....